In this blog post, I am going to write about the differences between Azure ARM and Azure Bicep. What is Azure ARM or Bicep, what are the syntactic differences and how you can use Azure CLI to convert your existing ARM templates to Bicep templates.
What is Azure ARM or Azure Bicep?
Azure ARM and Azure Bicep are used for the same purpose: building Azure infrastructure using code. Before Microsoft introduced Azure Bicep the only Microsoft-native way to create infrastructure through code declaratively was using Azure ARM which uses the JSON language. JSON has a strict document structure, because of this ARM templates can be hard to read, but also tend to be cluttered, big, complex.
Azure Bicep is a domain-specific language (DSL). This means that the Bicep language is focused on one domain, in this case, Azure. Bicep is a layer on top of ARM, because of this layer every resource that can be deployed using ARM can also be deployed using Bicep. The purpose of Bicep is to improve the experience of writing infrastructure using code, have a more reliable type safety and support for reusability using modules.
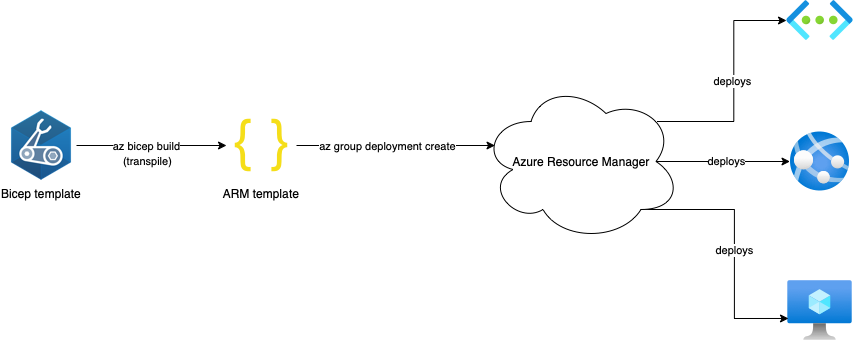
In the figure above you can see how the flow from a Bicep template to the Azure Resource Manager goes. The ARM template functions as an Intermediate Language (IL) between Bicep and the Azure Resource Manager. The Bicep template is transpiled into an ARM template. So, when you write infrastructure in Bicep and you build it using az bicep build it will transform into an ARM template. It is also possible to go from an ARM template to a Bicep template using the decompile feature in Azure CLI.
Transpiling means code is written in one language and is transformed into another language.
Syntactic differences
Bicep and ARM both have loops, conditions, parameters and variables, but the way these are written are different. In this chapter, I am going to show the syntactic differences between Bicep and ARM. The items subjected are:
For each subject, I am going to show two code examples. One for ARM and one for Bicep, each of these examples have the same purpose and have the same outcome when being deployed in Azure.
Loops
In the following examples, we are creating three storage accounts using variables amountOfAccounts and baseName.
ARM:
| { | |
| "$schema": "https://schema.management.azure.com/schemas/2019-04-01/deploymentTemplate.json#", | |
| "contentVersion": "1.0.0.0", | |
| "variables": { | |
| "amountOfAccounts": 3, | |
| "baseName": "[uniqueString(resourceGroup().id)]" | |
| }, | |
| "resources": [ | |
| { | |
| "name": "[concat(variables('baseName'), 'stg', copyIndex())]", | |
| "type": "Microsoft.Storage/storageAccounts", | |
| "apiVersion": "2021-04-01", | |
| "location": "[resourceGroup().location]", | |
| "kind": "StorageV2", | |
| "sku": { | |
| "name": "Standard_LRS" | |
| }, | |
| "copy": { | |
| "name": "myStorageAccountLoop", | |
| "count": "[variables('amountOfAccounts')]" | |
| } | |
| } | |
| ] | |
| } |
Bicep:
| var amountOfAccounts = 3 | |
| var baseName = uniqueString(resourceGroup().id) | |
| resource myStorageAccount 'Microsoft.Storage/storageAccounts@2021-06-01' = [for i in range(0, amountOfAccounts): { | |
| name: '${baseName}stg${i}' | |
| kind: 'StorageV2' | |
| location: resourceGroup().location | |
| sku: { | |
| name: 'Standard_LRS' | |
| } | |
| }] |
Instead of using the JSON object copy in ARM you can use a for-loop in Bicep. To me, this is a more intuitive way to write loops because it reminds me of creating for-loops using a programming language. The readability between these two examples makes a difference as well. It is less cluttered and the lines of code are reduced.
Conditions
In both ARM and Bicep you can use conditions to deploy a resource or set a value based on a true or false condition. In this example, we are looking at a virtual network resource that must be deployed when the parameter virtualNetworkName is not empty. It is also possible to create conditions inside resources just like the subnet name.
ARM:
| { | |
| "$schema": "https://schema.management.azure.com/schemas/2019-04-01/deploymentTemplate.json#", | |
| "contentVersion": "1.0.0.0", | |
| "parameters": { | |
| "virtualNetworkName": { | |
| "type": "string" | |
| }, | |
| "subnetName": { | |
| "type": "string" | |
| } | |
| }, | |
| "resources": [ | |
| { | |
| "condition": "[not(empty(parameters('virtualNetworkName')))]", | |
| "name": "[parameters('virtualNetworkName')]", | |
| "type": "Microsoft.Network/virtualNetworks", | |
| "apiVersion": "2020-11-01", | |
| "location": "[resourceGroup().location]", | |
| "properties": { | |
| "addressSpace": { | |
| "addressPrefixes": [ | |
| "10.0.0.0/16" | |
| ] | |
| }, | |
| "subnets": [ | |
| { | |
| "name": "[if(not(empty(parameters('subnetName'))), parameters('subnetName'), 'myFalseConditionName')]", | |
| "properties": { | |
| "addressPrefix": "10.0.0.0/24" | |
| } | |
| } | |
| ] | |
| } | |
| } | |
| ] | |
| } |
Bicep:
| param virtualNetworkName string | |
| param subnetName string | |
| resource myVnet 'Microsoft.Network/virtualNetworks@2019-11-01' = if (!empty(virtualNetworkName)) { | |
| name: virtualNetworkName | |
| location: resourceGroup().location | |
| properties: { | |
| addressSpace: { | |
| addressPrefixes: [ | |
| '10.0.0.0/16' | |
| ] | |
| } | |
| subnets: [ | |
| { | |
| name: !empty(subnetName) ? subnetName : 'myFalseConditionName' | |
| properties: { | |
| addressPrefix: '10.0.0.0/24' | |
| } | |
| } | |
| ] | |
| } | |
| } |
With the Bicep equivalent we declare the condition after the equals = sign followed by the condition. Within the subnet you can declare your “inline” condition using a ternary expression (also known as a shorthand if).
Parameter declaration
When you are using infrastructure as code you want to be flexible. Using parameters you can achieve this flexibility. Parameters are used for customisation of deployments at runtime level. Parameters improve the reusability of your ARM or Bicep template.
ARM:
| { | |
| "$schema": "https://schema.management.azure.com/schemas/2019-04-01/deploymentTemplate.json#", | |
| "contentVersion": "1.0.0.0", | |
| "parameters": { | |
| "myString": { | |
| "type": "string" | |
| }, | |
| "myInt": { | |
| "type": "int" | |
| }, | |
| "myArray": { | |
| "type": "array" | |
| }, | |
| "myBool": { | |
| "type": "bool" | |
| }, | |
| "myObject": { | |
| "type": "object" | |
| } | |
| } | |
| } |
Bicep:
| param myString string | |
| param myInt int | |
| param myArray array | |
| param myBool bool | |
| param myObject object |
As you can see the declaration of parameters in Bicep has a different approach than in ARM. Each parameter still has a name, a data type and optionally can be initialised using a default value. The declaration of a parameter is as follows:param <name> <data-type> = <(optional) default value>. The name of the parameter has to be unique.
Available data types are: string, int, bool, object, array.
ARM:
| { | |
| "$schema": "https://schema.management.azure.com/schemas/2019-04-01/deploymentTemplate.json#", | |
| "contentVersion": "1.0.0.0", | |
| "parameters": { | |
| "mySecureString": { | |
| "type": "securestring" | |
| }, | |
| "myDescription": { | |
| "type": "string", | |
| "maxLength": 4, | |
| "metadata": { | |
| "description": "This parameter has a max length of 4." | |
| } | |
| }, | |
| "myEvironments": { | |
| "type": "string", | |
| "allowedValues": [ | |
| "development", | |
| "test" | |
| ], | |
| "metadata": { | |
| "description": "This string can only contain values: development or test." | |
| } | |
| }, | |
| "myPrefix": { | |
| "type": "string", | |
| "defaultValue": "[concat('euw-', uniqueString(resourceGroup().id), '-')]", | |
| "metadata": { | |
| "description": "This parameter contains a default value" | |
| } | |
| } | |
| } | |
| } |
Bicep:
| @secure() | |
| param mySecureString string | |
| @description('This parameter has a max length of 4.') | |
| @maxLength(4) | |
| param myDescriptionDecorator string | |
| @description('This string can only contain values: development or test') | |
| @allowed([ | |
| 'development' | |
| 'test' | |
| ]) | |
| param myEnvironments string | |
| @description('This parameter contains a default value') | |
| param myPrefix string = 'euw-${uniqueString(resourceGroup().id)}-' |
Parameters can use decorators for constraints or metadata. These decorators are defined as @expression. Expressions can be used to limit characters using a maximum value, add a description to a parameter or mark a parameter as secure. Supported expressions are: allowed, description, maxLength, maxValue, metadata, minLength, minValue and secure.
Variable declaration
Variables are being used to store values that can be reused in multiple places in ARM or Bicep. The Azure Resource Manager resolves these variables before starting the deployment operation. So, before the Resource Manager uses the variable they first replace it with the value you described in your ARM or Bicep file.
ARM:
| { | |
| "$schema": "https://schema.management.azure.com/schemas/2019-04-01/deploymentTemplate.json#", | |
| "contentVersion": "1.0.0.0", | |
| "parameters": { | |
| "myEnvironment": { | |
| "type": "string", | |
| "allowedValues": [ | |
| "D", | |
| "T", | |
| "A", | |
| "P" | |
| ] | |
| } | |
| }, | |
| "variables": { | |
| "myName": "John", | |
| "setting": { | |
| "D": { | |
| "environmentName": "MyDevEnvironment", | |
| "sku": "basic" | |
| }, | |
| "T": { | |
| "environmentName": "MyTestEnvironment", | |
| "sku": "basic" | |
| }, | |
| "A": { | |
| "environmentName": "MyAccEnvironment", | |
| "sku": "premium" | |
| }, | |
| "P": { | |
| "environmentName": "MyPrdEnvironment", | |
| "sku": "premium" | |
| }, | |
| } | |
| } | |
| } |
Bicep:
| @allowed([ | |
| 'D' | |
| 'T' | |
| 'A' | |
| 'P' | |
| ]) | |
| param myEnvironment string | |
| // var <variable-name> = <variable-value> | |
| var myName = 'John' | |
| var setting = { | |
| D: { | |
| environmentName: 'MyDevEnvironment' | |
| sku: 'basic' | |
| } | |
| T: { | |
| environmentName: 'myTestEnvironment' | |
| sku: 'basic' | |
| } | |
| A: { | |
| environmentName: 'myAccEnvironment' | |
| sku: 'premium' | |
| } | |
| P: { | |
| environmentName: 'myPrdEnvironment' | |
| sku: 'premium' | |
| } | |
| } |
Just like the parameter the syntax approach for a variable is different: var <name> = <value>. You don’t specify a data type for variables, because the type is inferred from the value. If you look at the Bicep example you can see the myName variable. This variable is inferred to a string (implicit declaration).
Dependencies
Dependencies play an important role when deploying resources. Some resources might depend on another resource. In ARM you can define dependent resources using dependsOn.
The order of resource deployment is determined in two ways: implicit dependency and explicit dependency. The Resource Manager checks for dependencies between resources and deploys them in the correct order. If a resource is not dependent on another resource, then the Resource Manager deploys this in parallel.
Implicit dependency
Both ARM and Bicep can create an implicit dependency by using child resources. To achieve this the parent resources also implement the child resources. In the following example the Microsoft.Network/dnsZones resources will also deploy two child resources: Microsoft.Network/dnsZones/A and Microsoft.Network/dnsZones/CNAME. The child resources are defined inside the parent block using the resources object.
ARM:
| { | |
| "$schema": "https://schema.management.azure.com/schemas/2019-04-01/deploymentTemplate.json#", | |
| "contentVersion": "1.0.0.0", | |
| "resources": [ | |
| // Nested resources (Implicit) | |
| { | |
| "name": "dnszone.com", | |
| "type": "Microsoft.Network/dnsZones", | |
| "apiVersion": "2018-05-01", | |
| "location": "global", | |
| "properties": {}, | |
| "resources": [ | |
| { | |
| "name": "dnszone.com/google", | |
| "type": "Microsoft.Network/dnsZones/A", | |
| "apiVersion": "2018-05-01", | |
| "location": "global", | |
| "properties": { | |
| "TTL": 3600, | |
| "Arecords": [] | |
| }, | |
| "dependsOn": [ | |
| "[resourceId('Microsoft.Network/dnsZones', 'dnszone.com')]" | |
| ] | |
| }, | |
| { | |
| "name": "dnszone.com/opensource", | |
| "type": "Microsoft.Network/dnszones/CNAME", | |
| "apiVersion": "2018-05-01", | |
| "location": "global", | |
| "properties": { | |
| "TTL": 3600, | |
| "CNAMERecord": { | |
| "cname": "opensource.microsoft.com" | |
| } | |
| }, | |
| "dependsOn": [ | |
| "[resourceId('Microsoft.Network/dnsZones', 'dnszone.com')]" | |
| ] | |
| } | |
| ] | |
| } | |
| ] | |
| } |
Bicep:
| // Nested resources (Implicit) | |
| resource dnsZone 'Microsoft.Network/dnsZones@2018-05-01' = { | |
| name: 'dnszone.com' | |
| location: resourceGroup().location | |
| resource aRecord 'A@2018-05-01' = { | |
| name: 'google' | |
| properties: { | |
| TTL: 3600 | |
| ARecords: [ | |
| { | |
| ipv4Address: '142.251.36.4' | |
| } | |
| ] | |
| } | |
| } | |
| resource cnameRecord 'CNAME@2018-05-01' = { | |
| name: 'opensource' | |
| properties: { | |
| TTL: 600 | |
| CNAMERecord: { | |
| cname: 'opensource.microsoft.com' | |
| } | |
| } | |
| } | |
| } |
Besides the parent/child construction Bicep also support an implicit dependency using the symbolic name. In the example below I created a network security group that has a dependency with NSG using the symbolic name (nsg).
Bicep:
| // Implicit dependency | |
| resource nsg 'Microsoft.Network/networkSecurityGroups@2019-11-01' = { | |
| name: 'euw-nsg-vm' | |
| location: resourceGroup().location | |
| } | |
| resource nsgRule 'Microsoft.Network/networkSecurityGroups/securityRules@2019-11-01' = { | |
| name: '${nsg}/AllowAllRule' | |
| properties: { | |
| description: 'Allow all' | |
| protocol: '*' | |
| sourcePortRange: '*' | |
| destinationPortRange: '*' | |
| sourceAddressPrefix: '*' | |
| destinationAddressPrefix: '*' | |
| access: 'Allow' | |
| priority: 100 | |
| direction: 'Inbound' | |
| } | |
| } |
Explicit dependency
The most common way to create dependencies is to set the dependency explicitly using dependsOn. This can be done in both ARM and Bicep.
ARM:
| { | |
| "$schema": "https://schema.management.azure.com/schemas/2019-04-01/deploymentTemplate.json#", | |
| "contentVersion": "1.0.0.0", | |
| "resources": [ | |
| // Explicit dependency | |
| { | |
| "name": "contoso.com", | |
| "type": "Microsoft.Network/dnsZones", | |
| "apiVersion": "2018-05-01", | |
| "location": "global", | |
| "properties": {} | |
| }, | |
| { | |
| "name": "euw-contoso", | |
| "type": "Microsoft.Network/virtualNetworks", | |
| "apiVersion": "2020-11-01", | |
| "location": "[resourceGroup().location]", | |
| "properties": { | |
| "addressSpace": { | |
| "addressPrefixes": [ | |
| "10.0.0.0/16" | |
| ] | |
| } | |
| }, | |
| "dependsOn": [ | |
| "[resourceId('Microsoft.Network/dnsZones', 'contoso.com')]" | |
| ] | |
| } | |
| } |
Bicep:
| // Explicit dependency | |
| resource contosoZone 'Microsoft.Network/dnsZones@2018-05-01' = { | |
| name: 'contoso.com' | |
| location: 'global' | |
| } | |
| resource virtualNetwork 'Microsoft.Network/virtualNetworks@2019-11-01' = { | |
| name: 'euw-contoso' | |
| location: resourceGroup().location | |
| properties: { | |
| addressSpace: { | |
| addressPrefixes: [ | |
| '10.0.0.0/16' | |
| ] | |
| } | |
| } | |
| dependsOn: [ | |
| contosoZone | |
| ] | |
| } |
A side note: do not use dependsOn in Bicep when you already have an implicit dependency. Use this construction when you want to deploy unrelated resources in a specific order.
Use Azure CLI to decompile ARM templates to Bicep
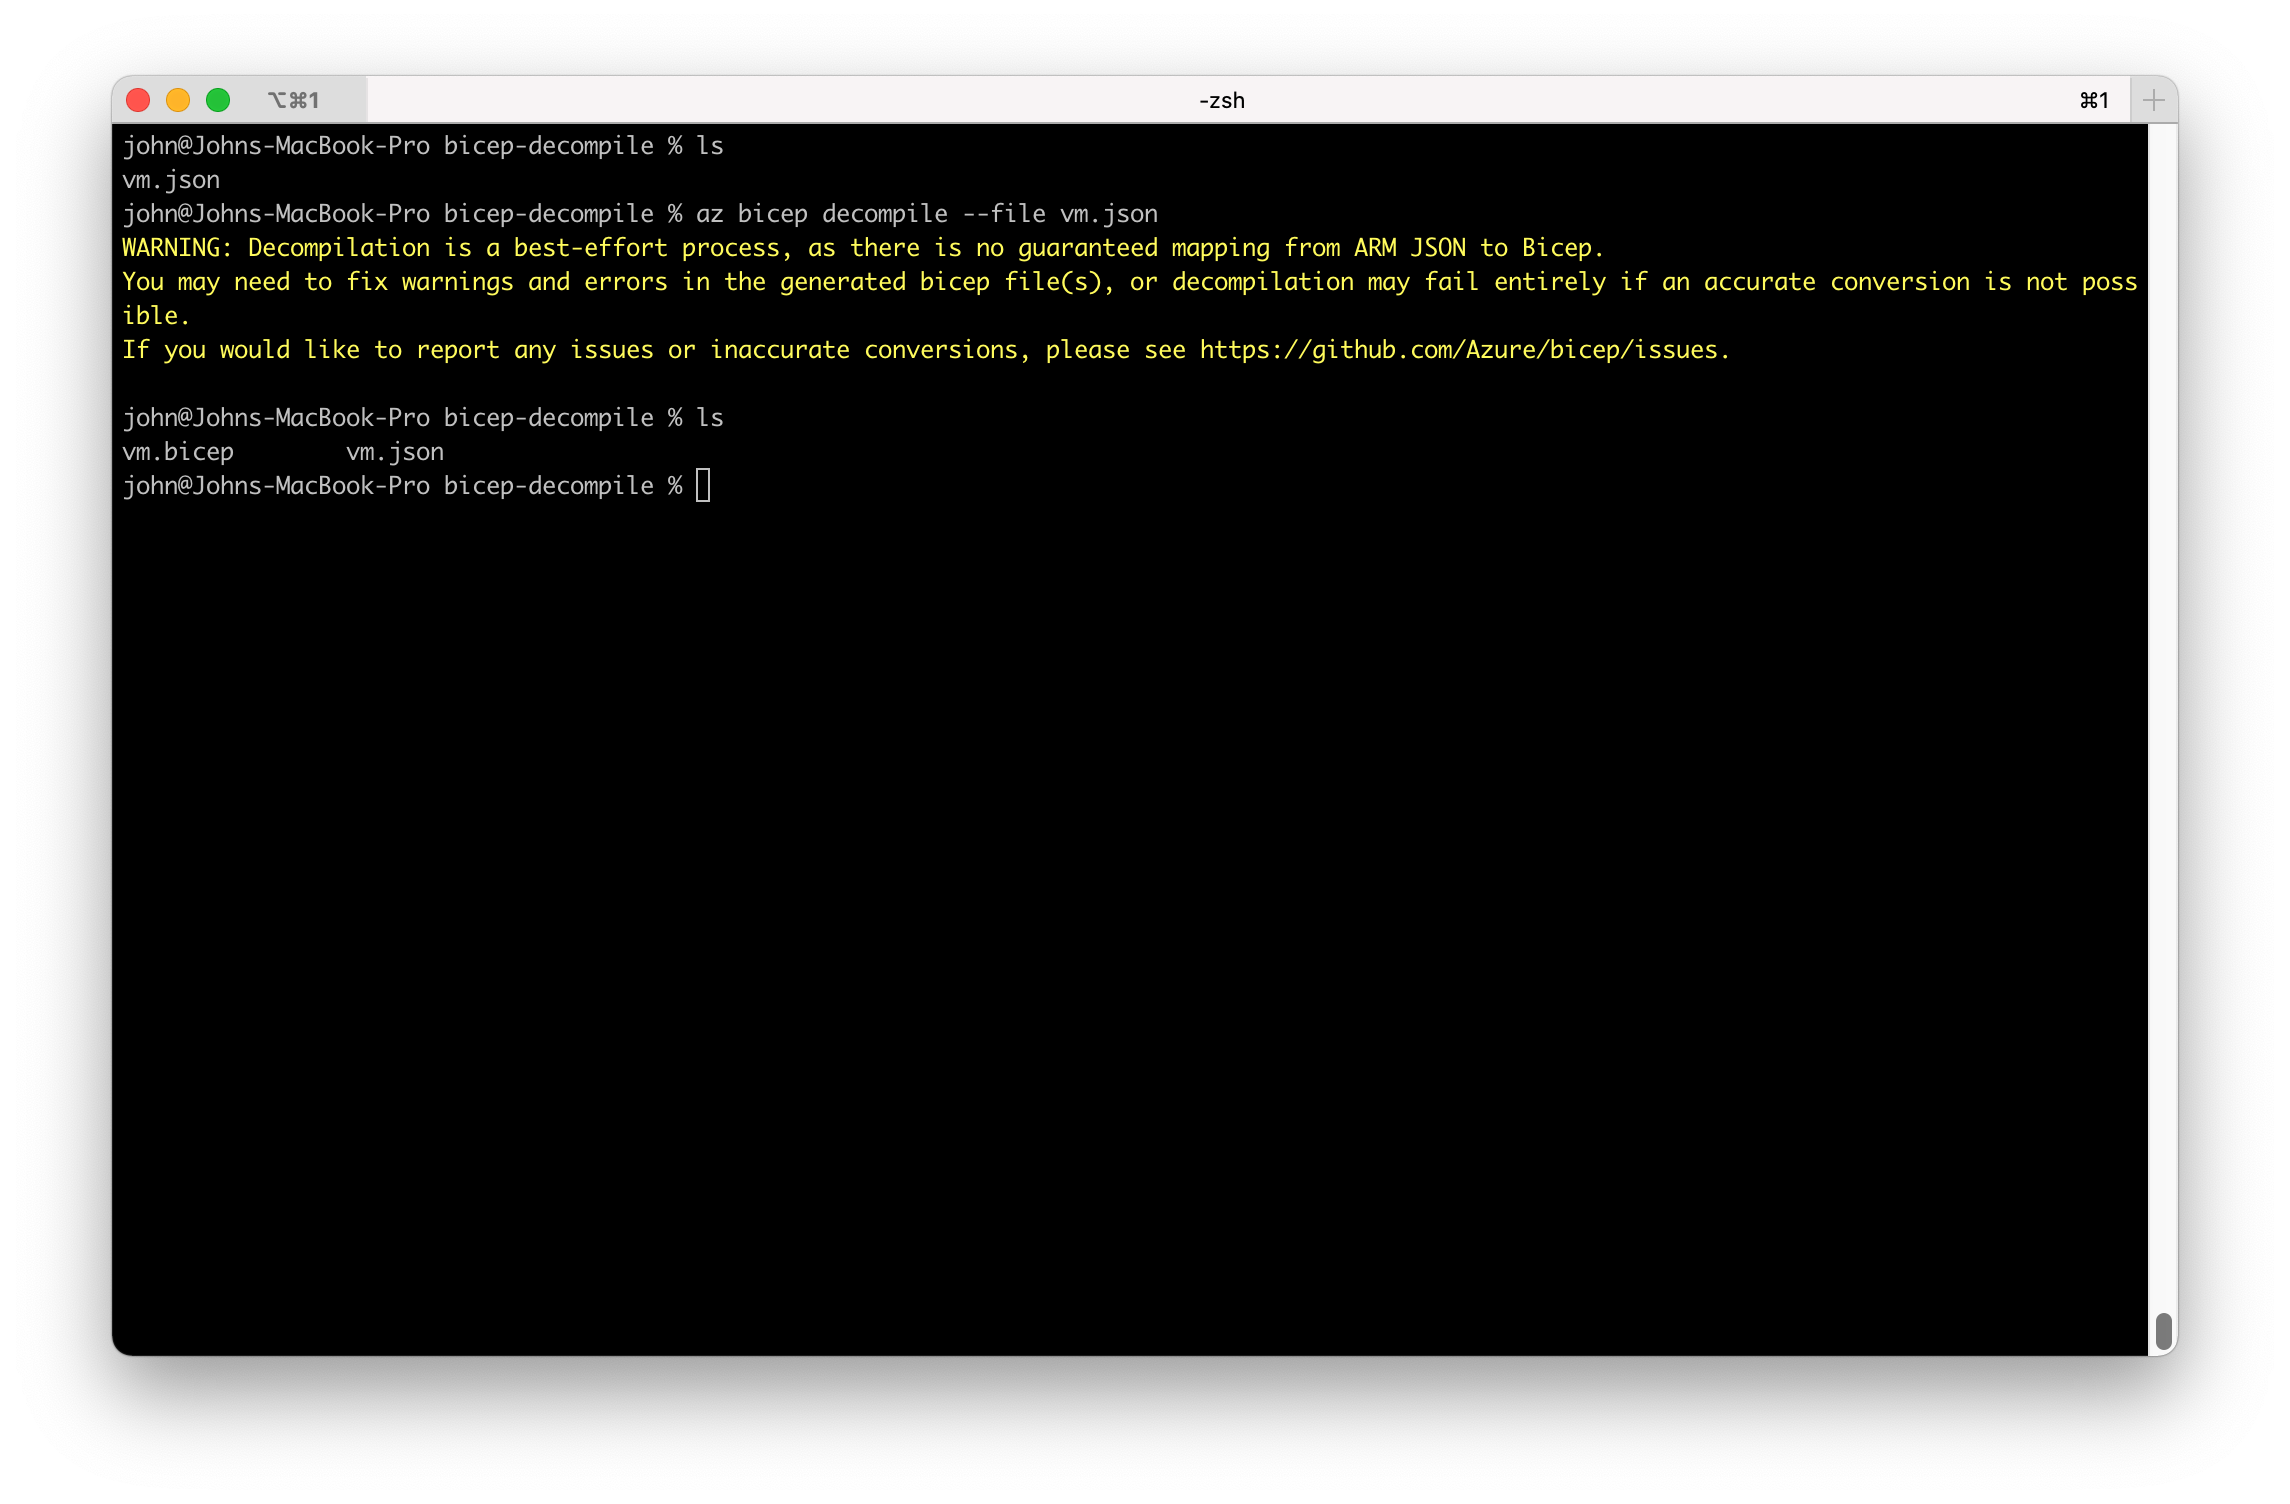
You can rewrite your ARM files to Bicep using a manual approach, but it is possible to convert your ARM templates to Bicep using Azure CLI to do this automatically. The command az bicep decompile attempts to decompile ARM to Bicep. This conversion method does not work accurately all the time, it is possible that some of the contents aren’t converted properly for example the dependsOn links might be explicitly written instead of the implicit way.
If you want to see the Bicep output or if you want to decompile yourself then check my GitHub repository.
Conclusion
I hope my blog helped to show the differences between Azure ARM and Bicep. If you want to check out the code files used as examples in this blog, these can be found in this GitHub repository.
Check out the open source repository for Azure Bicep: https://github.com/Azure/bicep.

One thought on “Convert ARM templates to Azure Bicep”