Stable, scalable and secure infrastructure as code is important to have a performing Azure environment. As organisations adopt Infrastructure as Code (IaC) to automate and manage their cloud resources, the need for maintaining code quality and enforcing best practices becomes important. This is where Azure Bicep linting comes into play, especially when integrated with Azure DevOps build validation.
What is linting in general?
Linting is the process of running a program that analyses code for potential errors, stylistic issues, and deviations from coding standards or best practices. It helps developers identify problems such as syntax errors, bugs, stylistic errors, and suspicious constructs that could lead to future issues, without executing the code. Linting tools are used to improve code quality, maintain consistency across a codebase, and ensure adherence to coding guidelines, making the code more reliable and easier to maintain.
Azure Bicep linter
The Azure Bicep linter is designed to catch Bicep specific syntax errors and best practice violations. The linting functionality helps to enforce Bicep coding standards and checks your Bicep template against Microsoft-defined best practices. These Bicep best practices are defined in the bicepconfig.json file and can be customised.
Linter checks
The set of rules for the linter to evaluate can be found in the bicepconfig.json file. If you don’t have a bicepconfig.json in your project, you can create one and add the following content:
| { | |
| "analyzers": { | |
| "core": { | |
| "enabled": true, | |
| "rules": { | |
| ... rules here ... | |
| } | |
| } | |
| } | |
| } |
As you see in the above configuration file the analyser can be enabled or disabled. Also, there is a property “rules” in which you can define which rules have to be analysed. There’s a list of rules available on the Microsoft Bicep site here which are built-in.
Let’s fill the rules property with the rule no-unused-params:
| { | |
| "analyzers": { | |
| "core": { | |
| "enabled": true, | |
| "rules": { | |
| "no-unused-params": { | |
| "level": "error" | |
| } | |
| } | |
| } | |
| } | |
| } |
When you add the rule you can choose the diagnostic level. The diagnostic level determines the way the linter reacts during either build-time or when authoring a Bicep template when violation is found. The available levels you can choose are:
| Diagnostic level | Build-time behaviour | Editor behaviour |
|---|---|---|
| Error | Shows errors in command-line output and your builds will fail. | Shows a red squiggly line in your code editor. |
| Warning | Shows warnings in the command-line output, but does not fail the build. | Shows a yellow squiggly line in your code editor. |
| Info | Nothing happens during build-time. | Shows a blue squiggly line in your code editor. |
| Off | Linting is fully suppressed | Linting is fully suppressed |
In the example you see the no-unused-params configured with diagnostic level error. This is how it looks within the editor:

Lint your Azure Bicep templates
Incorporating linting as part of static code analysis during your development cycle helps catch errors in your infrastructure as code. Ideally, this should be done as early as possible! Azure DevOps can assist by performing these checks regularly, for example, by triggering a build validation to lint your Bicep templates when a pull request is opened. This occurs before the code merges with a critical branch, such as the main branch.
In this blog, I will focus on the Azure CLI tooling, but there are several Bicep related linting tools available. Choose what suits best for your workload:
- Azure CLI:
az bicep lint - Bicep CLI:
bicep lint - PSBicep (community project):
Test-BicepFile
Integrate linter in an Azure Pipeline
Before you can configure build validation, you need to create an Azure pipeline. After creating the pipeline, it will be configured for build validation. The purpose of this pipeline is to execute the Bicep linter command az bicep lint --file <filePath> to lint Azure Bicep templates. Let’s take a look at the YAML file:
| trigger: none | |
| parameters: | |
| - name: OnlyLintChangedFiles | |
| type: boolean | |
| default: true | |
| displayName: "Only lint changed files" | |
| pool: | |
| vmImage: windows-latest | |
| steps: | |
| - task: PowerShell@2 | |
| displayName: "[Lint] Azure Bicep Template Files" | |
| inputs: | |
| targetType: "inline" | |
| pwsh: true | |
| script: | | |
| $lintChangedFiles = ${{ parameters.OnlyLintChangedFiles }} | |
| $bicepTemplates = @() | |
| $failedLints = @() # Array to hold paths of failed lints | |
| if ($lintChangedFiles) { | |
| $bicepTemplates = git diff --name-only --diff-filter=AM $(git merge-base HEAD refs/heads/main) HEAD | Select-String -Pattern "\.bicep$" | |
| } else { | |
| $bicepTemplates = Get-ChildItem -Path $(Build.SourcesDirectory) -Recurse -Filter *.bicep | Select-Object FullName -ExpandProperty FullName | |
| } | |
| Write-Host "Found $($bicepTemplates.Count) Bicep templates to lint:" | |
| $bicepTemplates | |
| foreach ($path in $bicepTemplates) { | |
| Write-Host "[Lint] Linting Bicep template $path" | |
| $output = az bicep lint --file $path --only-show-errors 2>&1 | |
| if ($LASTEXITCODE -ne 0) { | |
| $failedLints += [PSCustomObject]@{ | |
| Path = $path | |
| ErrorMessage = $output | |
| } | |
| } | |
| } | |
| if ($failedLints.Count -gt 0) { | |
| Write-Host "##[error][Failed] Linting failed for the following Bicep templates:" | |
| [System.Environment]::NewLine | |
| foreach ($failedLint in $failedLints) { | |
| Write-Host "Path: $($failedLint.Path)" | |
| Write-Host "Error: $($failedLint.ErrorMessage)" | |
| [System.Environment]::NewLine | |
| } | |
| exit 1 | |
| } else { | |
| Write-Host "All Bicep templates passed linting." | |
| } |
This YAML file is designed orchestrate the validation Azure Bicep template files. It contains contains the PowerShell task, which will be used to trigger az bicep lint.
Before triggering the lint command, there are some checks that are configurable. You have the option to check either only the files changed in the pull request or to perform a full check on every file in the Build.SourcesDirectory. If the OnlyLintChangedFiles parameter is set to true, it will run a Git command to determine which files have been changed. Following that, a regex is used to identify files that end with the .bicep extension.
If OnlyLintChangedFiles is set to false, it will retrieve all files in the Build.SourcesDirectory. This is a predefined Azure DevOps variable used to refer to the local path on the agent where your source code files are downloaded.
Finally, when the bicepTemplates array is filled with the Bicep templates that need to be linted, it loops through the array to lint the files one by one. If the linter detects an error, an object with the properties Path and ErrorMessage is added to the failedLints array. The output of this array is displayed in the pipeline for verbosity.
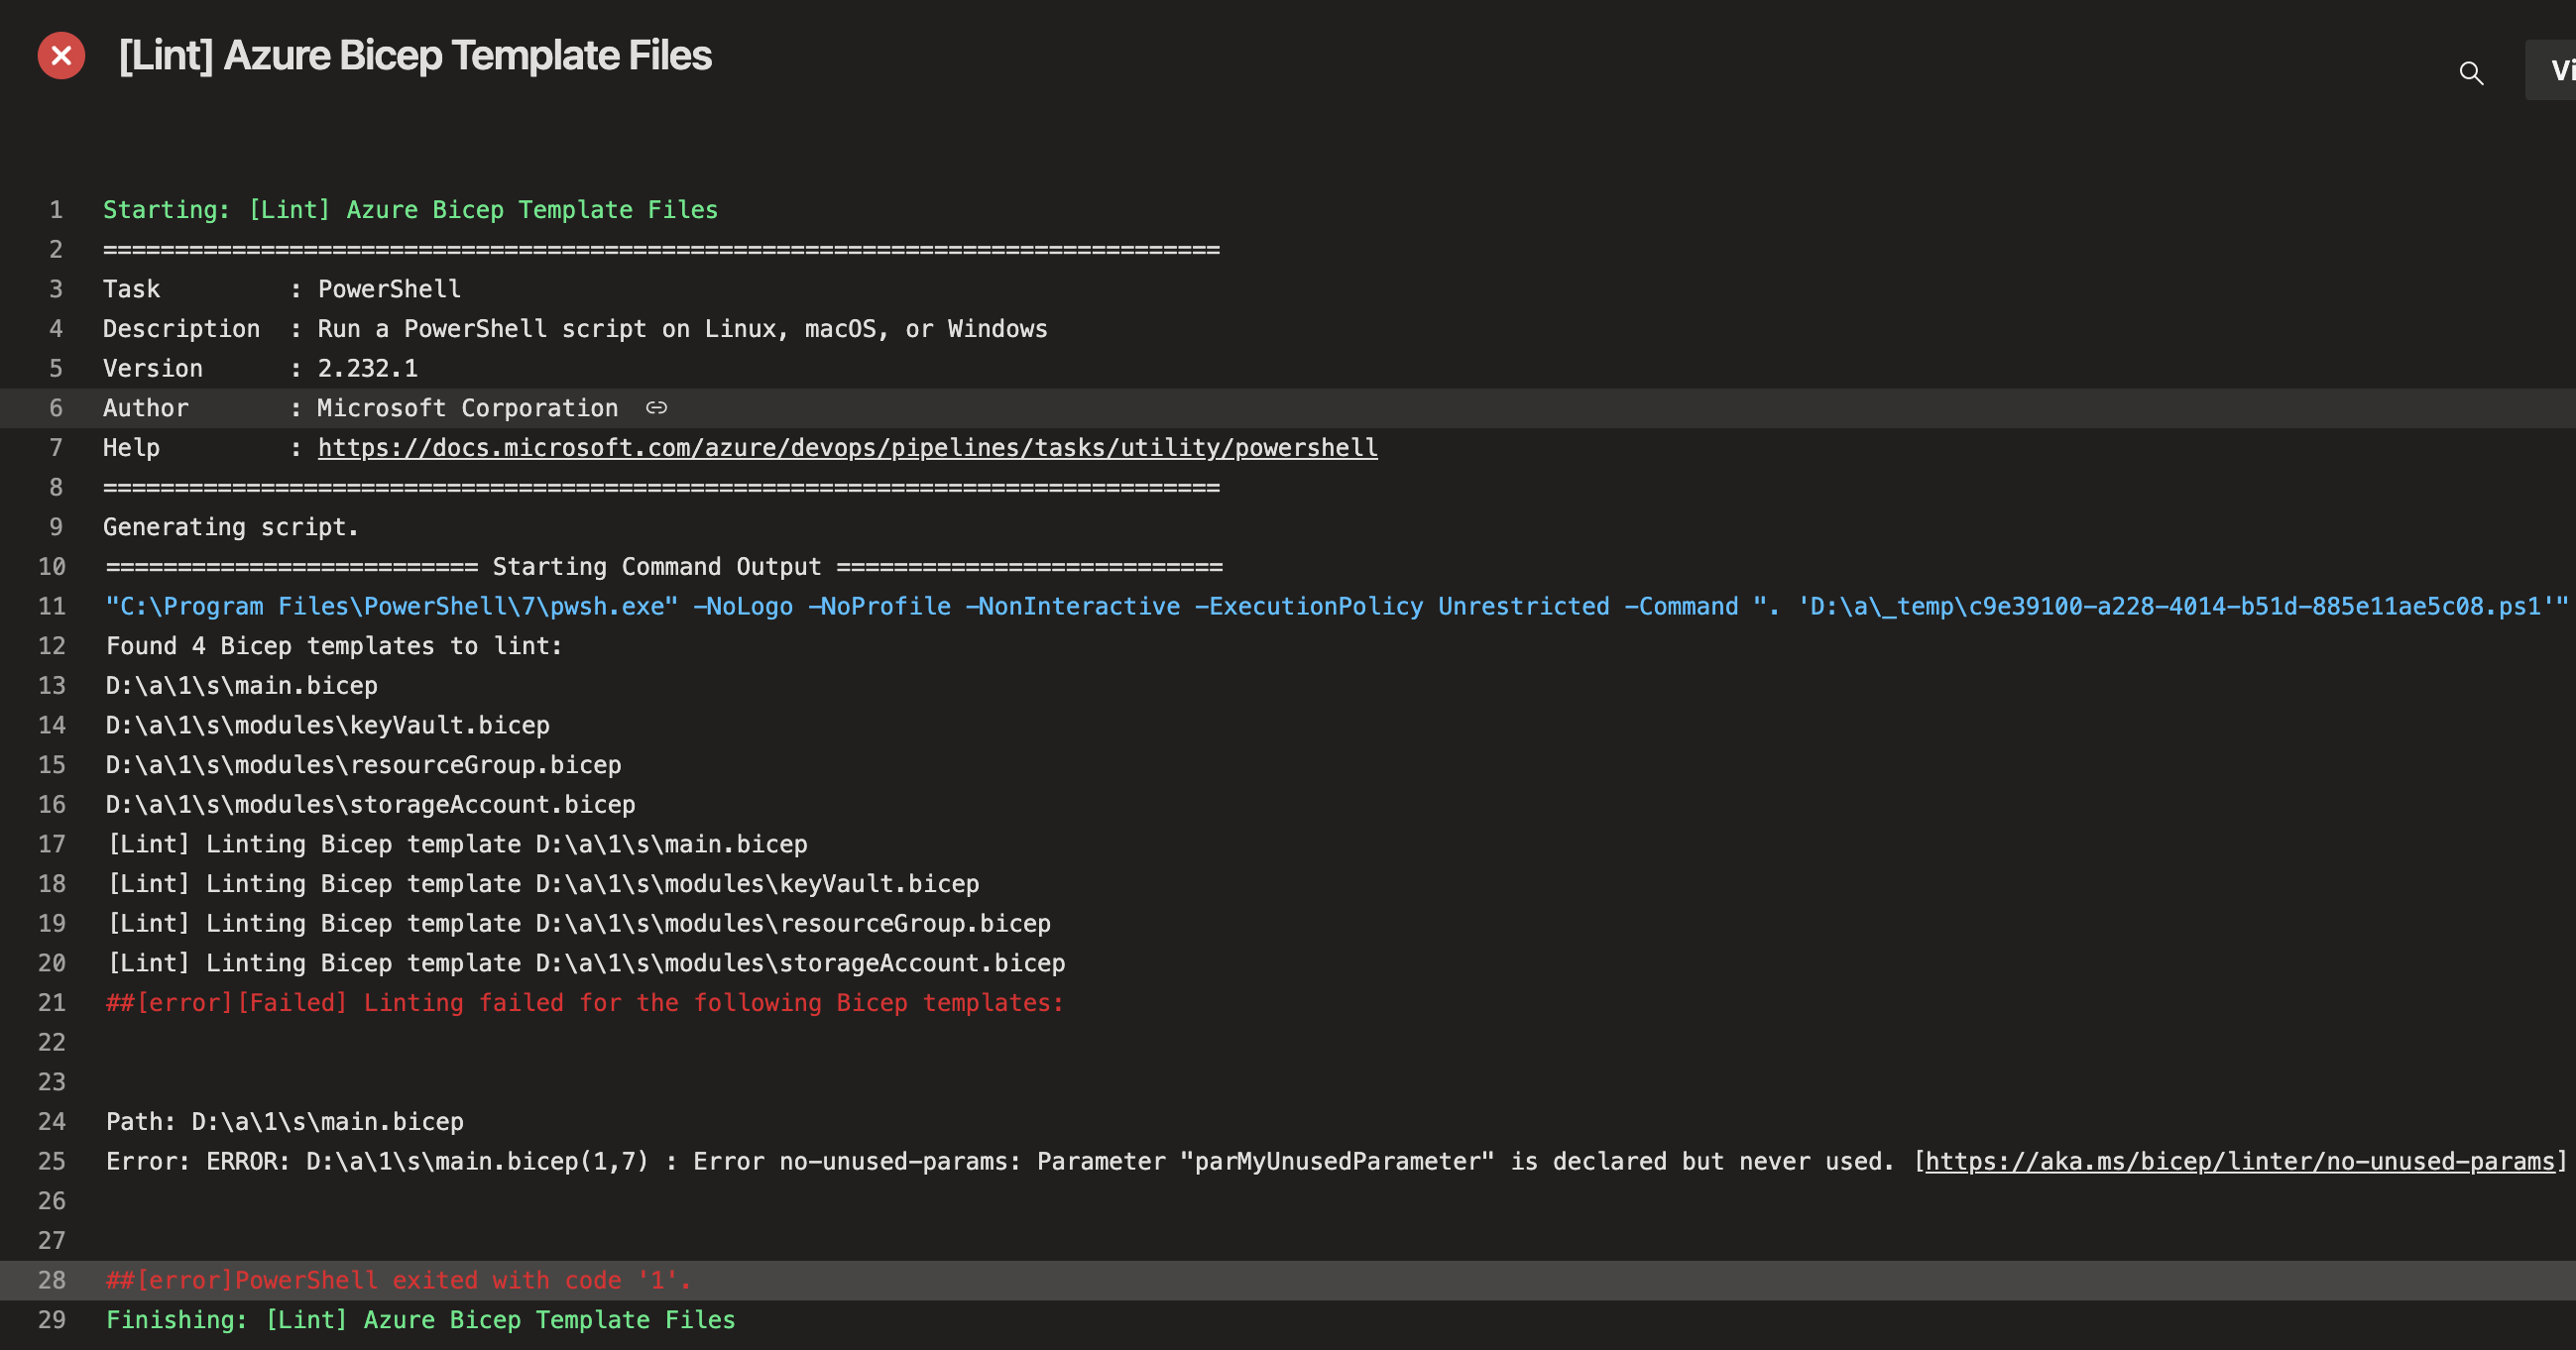
Pipeline output
In the image below you see the output of the Azure Pipeline. In the image you see logging regarding how many files are found that have to be linted and the actual linting action. When failed lints are found it prints the Path and the ErrorMessage for each Bicep template.
Setup Build Validation to run the linter in a pull request
A build validation can be configured in branch policy in Azure DevOps. A branch policy help to protect branches to enforce code quality standards. Most of the time the branch policy is configured on the main branch which is the most important branch that you want to protect at all costs.
To configure a branch policy follow these steps:
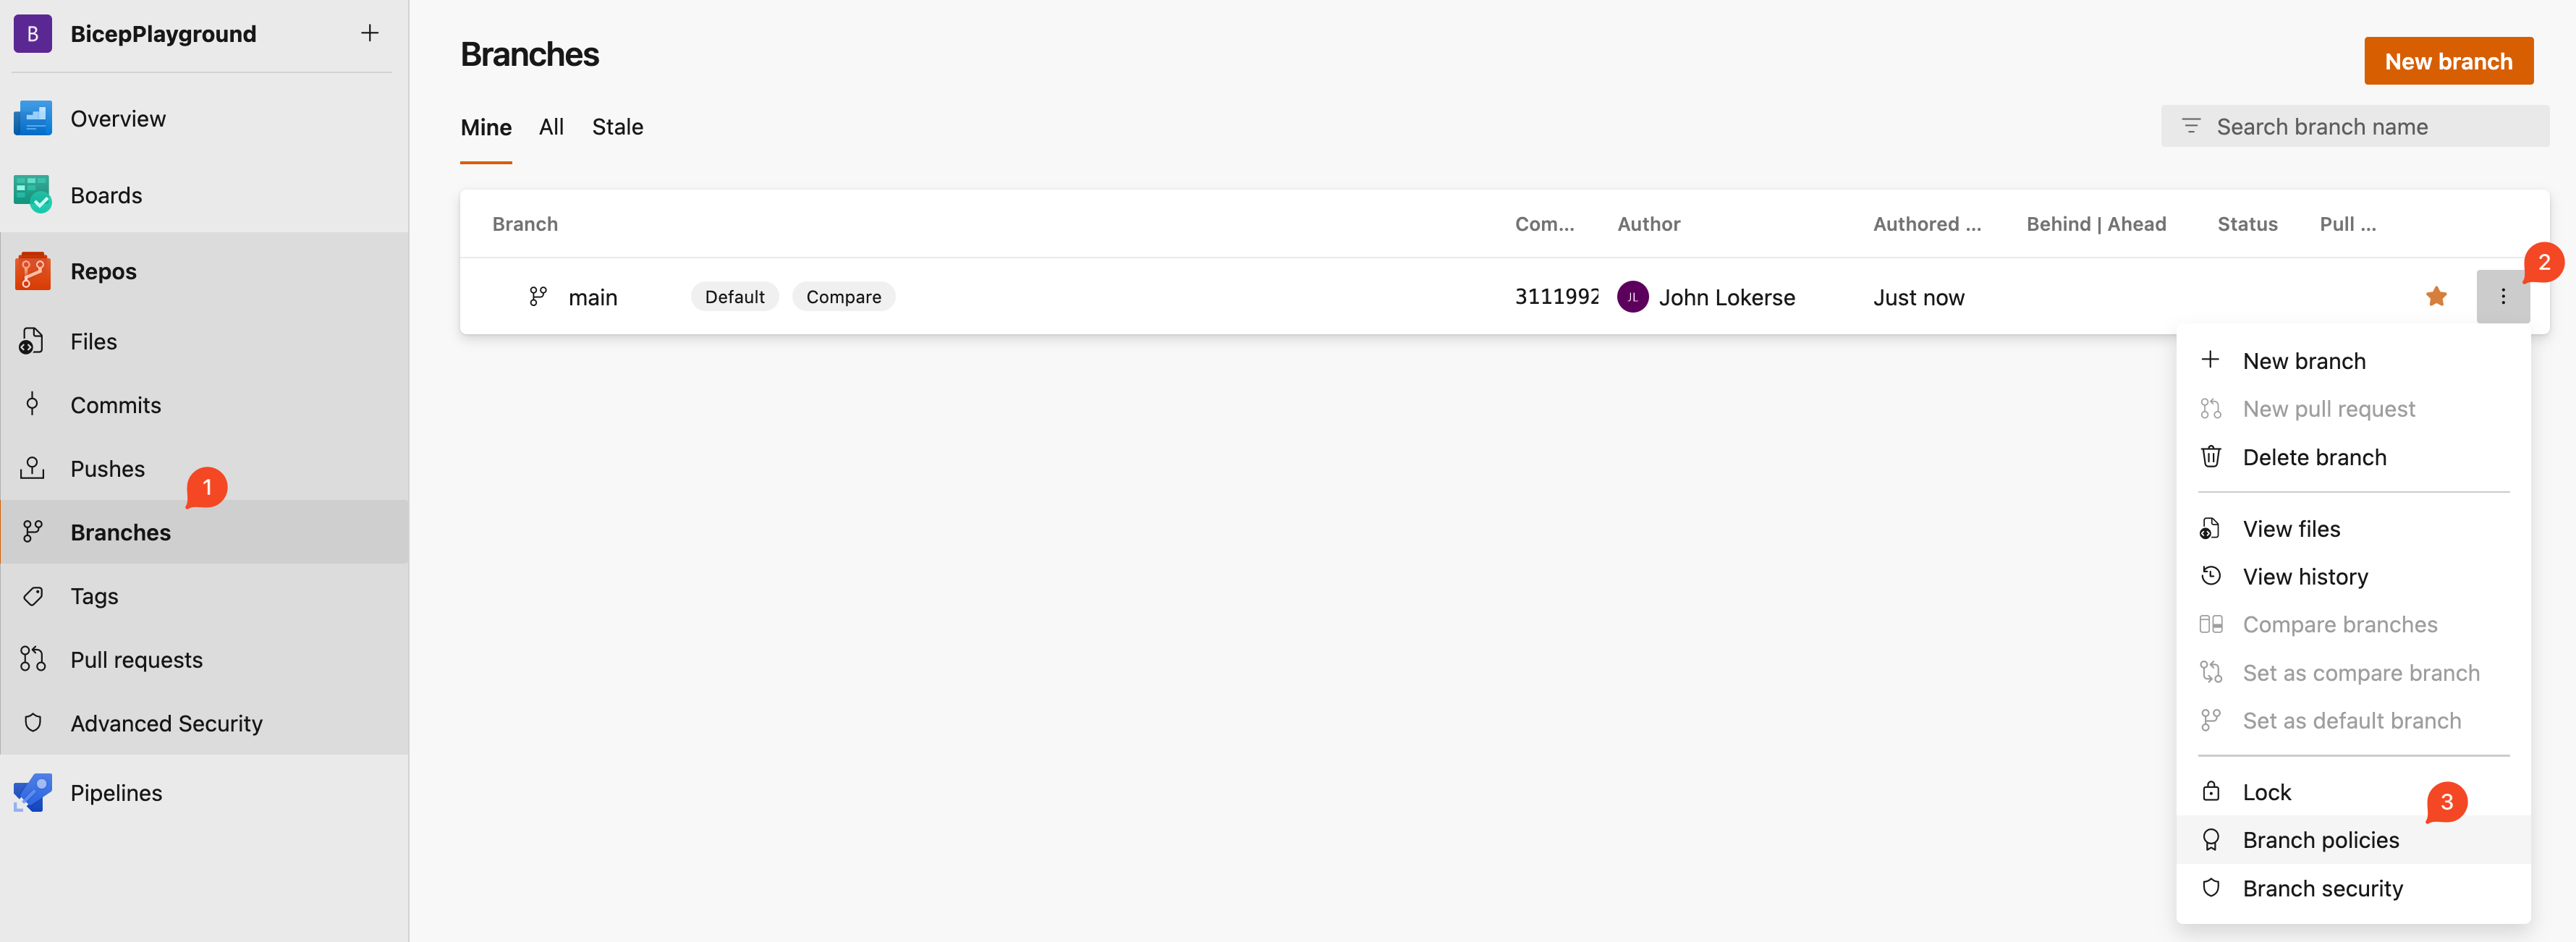
- Go to your repository and click on Branches.
- Hover over the main branch to see the ellipsis (three dots) on the right, click on these dots.
- It opens a dropdownmenu and click on Branch policies.
On the Branch Policies screen add a build validation:
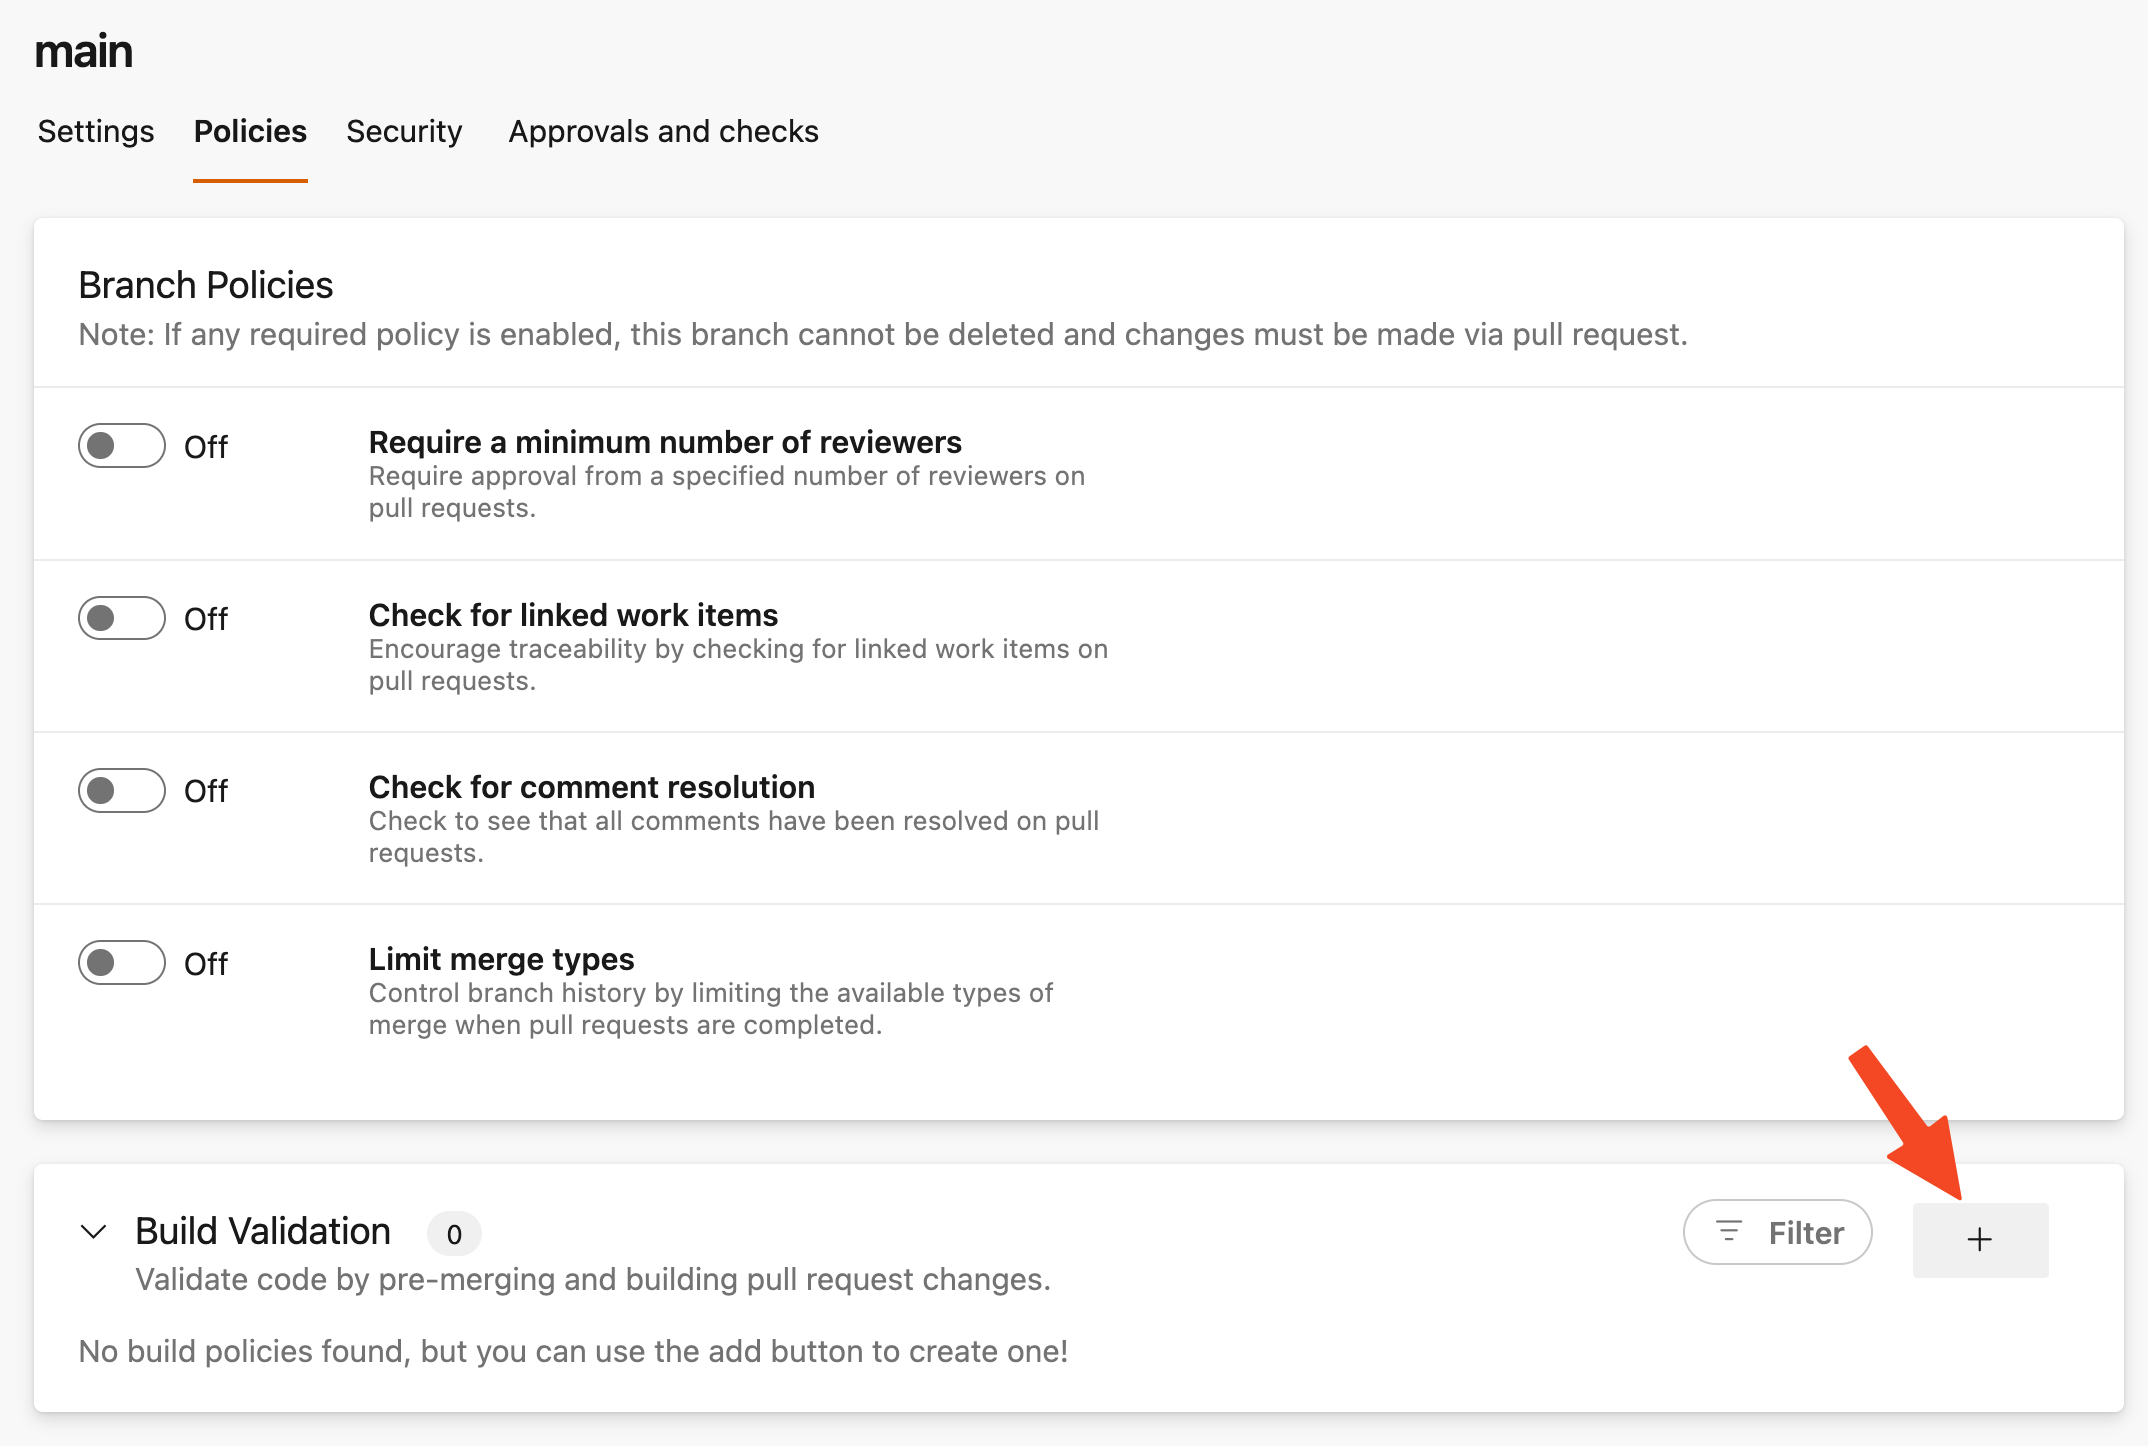
On the Build Validation configuration screen refer to the Bicep linter pipeline. You can choose to keep the default configuration or update it to your liking. After saving this will be the output:

Now each pull request created to the main branch will trigger the Azure Bicep template linter pipeline:

Conclusion
In conclusion, Azure Bicep linting combined with Azure DevOps Build Validation provides a robust and efficient way to improve code quality, maintain consistency, and enforce best practices in your Bicep infrastructure-as-code projects.
The Azure Pipeline used in this blog is ready to be implemented in your projects. Just add it as a pipeline in Azure DevOps project and use it in the build validation. Happy linting!
