
After working with Azure Bicep for some time, I’d like to share the daily tips and tricks that I have gathered. These insights will not only make writing Azure Bicep code more enjoyable but also significantly improve its readability.
#1: Adopt a prefix convention
Azure Bicep aims to improve and simplify the authoring experience with a cleaner syntax. Although it is an improvement over ARM templates, you still need to adopt a way of writing.
If we take a look at the ARM template writing structure we can see that ARM forces you to reference a parameter, variable, or resource: [parameter(...)], [variable(...)] and [resourceId(...)].
In contrast to ARM, Azure Bicep offers more flexibility. But, when dealing with large Bicep files, this flexibility can be overwhelming. To enhance readability and maintain consistency I recommend using prefixes for different Bicep components, as shown in the table below:
| Component | Prefix | Example |
|---|---|---|
| Module | mod | modMyModule |
| Resource | res | resMyResource |
| Variable | var | varVariable |
| Parameter | par | parMyParameter |
| Output | out | outMyOutput |
Let’s do a comparison of the creation of an Azure Key Vault resource with and without prefixes:
Without prefixes
| param name string | |
| param location string = resourceGroup().location | |
| param addressPrefixes array | |
| param subnets array | |
| var dnsServers = [ | |
| '1.2.3.4' | |
| ] | |
| resource virtualNetwork 'Microsoft.Network/virtualNetworks@2019-11-01' = { | |
| name: name | |
| location: location | |
| properties: { | |
| dhcpOptions: { | |
| dnsServers: dnsServers | |
| } | |
| addressSpace: { | |
| addressPrefixes: addressPrefixes | |
| } | |
| subnets: [for subnet in subnets: { | |
| name: subnet.name | |
| properties: { | |
| addressPrefix: subnet.addressPrefix | |
| } | |
| }] | |
| } | |
| } | |
| output virtualNetworkId string = virtualNetwork.id |
With prefixes
| param parName string | |
| param parLocation string = resourceGroup().location | |
| param parAddressPrefixes array | |
| param parSubnets array | |
| var varDnsServers = [ | |
| '1.2.3.4' | |
| ] | |
| resource resVirtualNetwork 'Microsoft.Network/virtualNetworks@2019-11-01' = { | |
| name: parName | |
| location: parLocation | |
| properties: { | |
| dhcpOptions: { | |
| dnsServers: varDnsServers | |
| } | |
| addressSpace: { | |
| addressPrefixes: parAddressPrefixes | |
| } | |
| subnets: [for subnet in parSubnets: { | |
| name: subnet.name | |
| properties: { | |
| addressPrefix: subnet.addressPrefix | |
| } | |
| }] | |
| } | |
| } | |
| output outVirtualNetworkId string = resVirtualNetwork.id |
The inclusion of prefixes in (larger) Bicep files significantly affects both readability and traceability. It enhances clarity in distinguishing variables, parameters, resources, and outputs.
#2: Debugging
If you are used to debugging with breakpoints, then debugging in Azure Bicep can be a struggle. Azure Bicep offers tools like the validate command to ensure the syntactical correctness of your code and the WhatIf feature for previewing changes, but it lacks support for validating or debugging data manipulations, for example.
As a workaround to debug data manipulations, you can make use of output. Create a new Bicep file that holds a set of dummy data that you want to manipulate, add the manipulation (this can be a filter(), map(), or other function that does data manipulation) to the output, and then create a new deployment to test/debug your manipulation. Luckily, this deployment does not consume Azure credits!
Let’s take a look at an example on how to leverage the output for debugging a data manipulation. I want to check how the reduce() function works, so in this example I am using the reduce function as my output. But first I have added my dummy data varShoppingList and used map() to create a new object with the product prices and added this to varReceipt . The example:
| var varShoppingList = [ | |
| { | |
| name: 'Milk' | |
| price: 2 | |
| } | |
| { | |
| name: 'Bread' | |
| price: 1 | |
| } | |
| { | |
| name: 'Chocolate' | |
| price: 3 | |
| } | |
| ] | |
| var varReceipt = map(varShoppingList, items => items.price) | |
| output outTotalPrice int = reduce(varReceipt, 0, (current, previous) => current + previous) |
Deploy to Azure using the following Azure CLI command:
az deployment group create --template-file shoppingList.bicep --resource-group rg-debugThe outputs are shown when the deployment has finished:
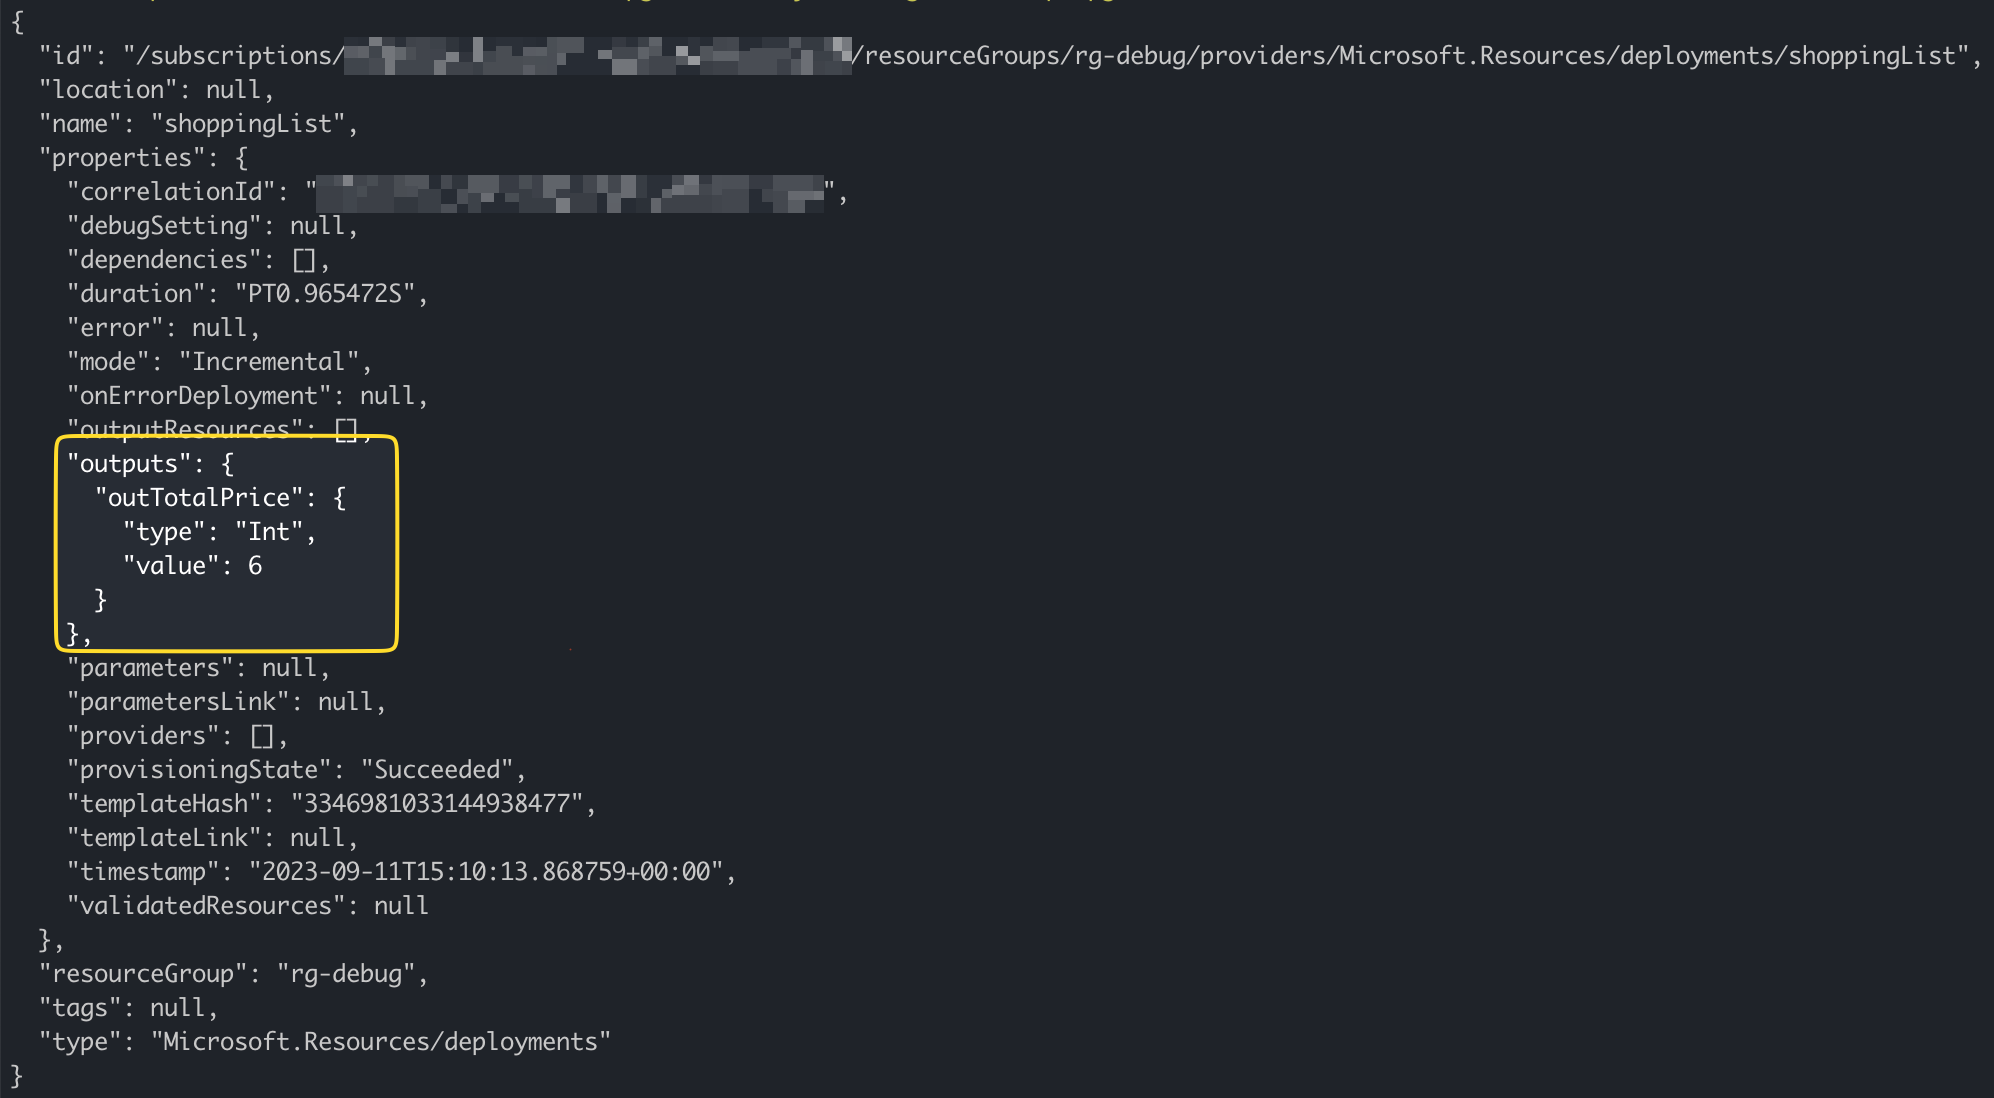
While this particular usage of the reduce() function may be quite specific, it serves as a approach for iteratively experimenting with data manipulations or exploring new functionalities in Bicep using outputs.
#3: Modules, modules, modules!
One of the most valuable tricks in Azure Bicep is the use of modules. Modules are powerful for structuring and optimizing deployments. They can be used in various ways, such as grouping multiple resource definitions or creating custom modules for tagging configurations. The beauty of modules lies in their ability to enhance the readability and flexibility of your Bicep code. This flexibility leads to improved reusability, making the infrastructure as code more efficient and easier maintainable.
Let’s take a look at an example regarding the tagging configuration. In the following Bicep, I created the tagging.module.bicep that accepts user-defined tags using the parUserDefinedTags parameter. It also has a variable that contains the default tags. At last, the output unionizes the user-defined tags and the default tags.
| @description('Specific tags for resources') | |
| param parUserDefinedTags object = {} | |
| param parDeploymentDate string = utcNow('yyyy-MM-dd') | |
| var varDefaultTags = { | |
| DeploymentDate: parDeploymentDate | |
| } | |
| output outTags object = union(parUserDefinedTags, varDefaultTags) |
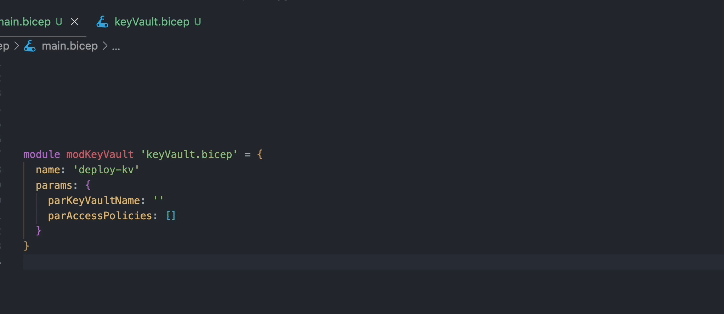
This tagging module can be re-used within other modules or when deploying a main Bicep file.
| @description('Specifies the location for resources.') | |
| param parLocation string = 'westeurope' | |
| module modTagging 'tagging.module.bicep' = { | |
| name: 'build-tagging-object' | |
| } | |
| module modKeyVault 'keyVault.bicep' = { | |
| name: 'deploy-keyvault' | |
| params: { | |
| parName: 'my-keyvault' | |
| parLocation: parLocation | |
| parTags: modTagging.outputs.outTags | |
| } | |
| } |
There are many ways to leverage modules. To leverage the flexibility of Bicep modularization is the way!
#4: Make use of @description decorator
Parameters use decorators for metadata. A decorator is written in the format of @expression and is placed above the parameter. It is a good practice to provide @descriptions for your parameters. Keep in mind to make these descriptions helpful and readable. A fun fact is that you can write markdown in descriptions.
Let’s take a look at the description in action. In this example, I wrote two parameters regarding a Key Vault name and access policies:
| @description('Required. Name of the Azure Key Vault resource.') | |
| param parKeyVaultName string | |
| @description(''' | |
| **Optional**. An access policy array that contains identities with specified permissions. | |
| This parameter expects the following format: | |
| ```[ | |
| { | |
| tenantId: 'tenantId' | |
| objectId: 'objectId' | |
| permissions: { | |
| keys: [ | |
| 'get' | |
| ] | |
| secrets: [ | |
| 'list' | |
| 'get' | |
| ] | |
| } | |
| } | |
| ] | |
| ``` | |
| ''') | |
| param parAccessPolicies array = [ | |
| { | |
| tenantId: tenant().tenantId | |
| objectId: '18849fec-d7c8-4673-b00c-551863cd1329' | |
| permissions: { | |
| keys: [ | |
| 'get' | |
| ] | |
| secrets: [ | |
| 'list' | |
| 'get' | |
| ] | |
| } | |
| } | |
| ] | |
| ... truncated Key Vault resource creation ... |
When you refer to this Key Vault as a module, the descriptions will appear like this:
The description decorator can be found in the sys namespace. You can reference the description directly or via the namespace @sys.description. The reference to the sys namespace can be useful when you need to differentiate a decorator from another item with the same name. For example, when you declare a parameter with the name description:
@sys.description('Description here.')
param description string
If you work with prefixes on parameters or other items this won’t be an issue.
#5: Maintain a clear overview with a simple folder structure
When I work with Bicep files I want to maintain a simple folder structure. This makes it easier to navigate and find the relevant files. Here is an example of a simple folder structure for a Bicep project:
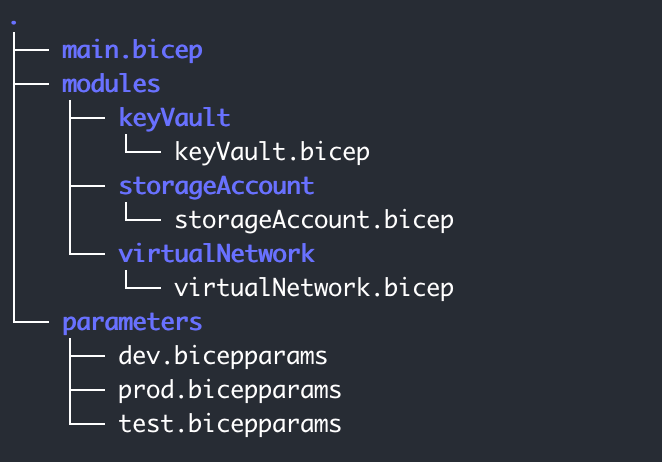
In this structure, the main.bicep file serves as the entry point for the Bicep project. The modules folder contains reusable modules that can be used by the main template or other modules. The parameters folder contains parameter files for different environments, such as dev and prod.
This structure can be adapted to fit the needs of your project, but the key is to keep it simple and easy to navigate.
#6: Use implicit over explicit dependencies
Prefer to use implicit dependencies over explicit dependencies. The implicit dependency uses the resource or module symbolic name to create a relationship. When using the implicit dependency Bicep and the Azure Resource Manager manages this relationship and deploys the resources or modules in the correct order.
When you want to sequence deployments and there is no relationship between resources or modules then an explicit dependency is the way.
#7 Start small approach
Last but not least: start small. Do not rush to create the perfect picture, but focus on the quality of your infrastructure as code. This will benefit you in quality in the long run!
Conclusion
Here are some helpful insights and techniques for working with Azure Bicep. I hope these tips and tricks are improving your Bicep experience even more.

Nice pointers! The recommendation to use naming prefixes is a good one, and that idea might not strike newcomers even though it seems so obvious. Also a great tip that modules don’t have to perform significant changes: They can be used to implement custom “functions” or to split logic out into separate files.
LikeLike