
Prior to the introduction of Azure Bicep user-defined types, you were limited to using types such as string, int, bool, array, and object. A significant advantage of user-defined types is that these allow you to assign a strongly typed value to an object.
In this blog, you will learn about what user-defined types are and how to create your own user-defined type.
Note! To use user-defined types you need Azure Bicep version 0.21.1 or newer.
What are user-defined types?
With user-defined types, you can create custom objects in your Bicep files. These custom objects can serve as a type, on par with the existing types like string, int, bool, array, and object. Moreover, once defined in a Bicep file, the user-defined type can be efficiently re-used multiple times within that file.
Benefits of user-defined types
User-defined types bring benefits, especially for the author experience:
- Objects can be given a strong typed value
Before user-defined types, achieving type safety when using an object was not feasible because objects could contain any value, making it difficult to enforce and predict the kind of data they should hold. With user-defined types, it is possible to provide structure to objects by defining expected properties and value types, thereby allowing them to be strongly typed and ensuring that they adhere to a specified schema.
- Autocompletion
A benefit of having strongly typed objects is that they enable the use of autocompletion; this is because the Bicep Language Service understands the semantics of the type, which informs the autocompletion feature about the properties and methods that are available for that type. Consequently, autocompletion becomes more accurate and useful. Autocompletion works in both Bicepparam and Bicep files.
- Readability
Utilizing types enhances the readability of Bicep code because it assigns strongly typed values to objects, thereby making it clearer what kind of data each object is meant to hold and how it should be used.
How to create user-defined types
First, let’s dive deeper into user-defined types and let’s start with the syntax of a user-defined type:
type <user-defined-data-type-name> = <type-expression>
In Bicep, every element begins with a keyword such as resource, var, or param. User-defined types begin with the keyword type and are defined within a Bicep file.
Now that we know what the user-defined type syntax is, it is time to see how this works in practice. In the upcoming Bicep samples, I will show you some user-defined types:
- Creating a basic type definition named
personType - Expanding
personTypewith an optional property - Expanding
personTypeby referencing another user-defined type - Enforce
personTypeto be used as an array with a specific object structure
Basic type definition
Below you can find a definition of a user-defined type. This type is called personType and is structured as an object that expects two properties: name and age.
| type personType = { | |
| name: string | |
| age: int | |
| } |
Using optional properties
It is possible to add properties to objects that are marked as optional. This can be achieved by adding a question mark (bool?) behind the type.
| type personType = { | |
| name: string | |
| age: int | |
| hasChildren: bool? | |
| } |
Since it is an optional type, it is not required to add the property hasChildren to your object and it will not show up as a required property in the autocompletion dialog.
Use a user-defined type in another type
Besides the literal types, it is possible to define user-defined types within other user-defined types. For example, below, you can see the personType we defined earlier, but now with the address property added. This property is linked to the user-defined type addressType.
| type addressType = { | |
| street: string | |
| city: string | |
| country: string | |
| } | |
| type personType = { | |
| name: string | |
| age: int | |
| address: addressType | |
| hasChildren: bool? | |
| } |
Enforce an array to use an object
In addition to using strongly typed objects, arrays can also be defined to conform to a particular structure. For example, below you can find the personType. This type is defined as an object with specific properties. Since [] brackets have been added, the personType became an array that expects one or more objects with the properties name, age, address, or hasChildren. As of now, each item in the array must adhere to the structure of the object personType.
| type addressType = { | |
| street: string | |
| city: string | |
| country: string | |
| } | |
| type personType = { | |
| name: string | |
| age: int | |
| address: addressType | |
| hasChildren: bool? | |
| }[] |
Other examples
In addition to creating user-defined types for objects, types can also be applied to literals such as strings, integers, and booleans.
Here are some examples of types applied to strings, integers, booleans, and arrays:
| // Enforce string to be either 'This', 'Is' or 'Awesome' | |
| type stringType = 'This' | 'Is' | 'Awesome' | |
| // Enforce number to be either 1, 2, 3, 4 or 5 | |
| type intType = 1 | 2 | 3 | 4 | 5 | |
| // Enforce boolean to be true | |
| type boolType = true | |
| // Enforce to be an array of type string (look at the way of writing!) | |
| type arrayType = string[] | |
| // Enforce to be an array of allowed values: 'This', 'Is' or 'Awesome' | |
| type arrayType2 = ('This' | 'Is' | 'Awesome')[] | |
| // Enforcing to be an array of either 'This is awesome', 5, true or {} | |
| type arrayMixedType = ('This is awesome' | 5 | true | {})[] |
How to use types in your own work
I have shown some theoretical usages of the user-defined types above. Now I want to demonstrate how you can use the user-defined types in your own work. In the example below I want to show how to build a user-defined type for Azure Key Vault access policy:
| type accessPoliciesType = { | |
| tenantId: string | |
| objectId: string | |
| permissions: { | |
| keys: keyPermissionType? | |
| secrets: secretPermissionType? | |
| } | |
| }[] | |
| type keyPermissionType = ('get' | 'list' | 'create' | 'update' | 'delete')[] | |
| type secretPermissionType = ('get' | 'list' | 'set' | 'delete')[] | |
| param parAccessPolicies accessPoliciesType | |
| resource keyVault 'Microsoft.KeyVault/vaults@2019-09-01' = { | |
| name: 'my-key-vault' | |
| location: 'westeurope' | |
| properties: { | |
| enabledForDeployment: true | |
| enabledForTemplateDeployment: true | |
| enabledForDiskEncryption: true | |
| tenantId: tenant().tenantId | |
| accessPolicies: parAccessPolicies | |
| sku: { | |
| name: 'standard' | |
| family: 'A' | |
| } | |
| } | |
| } |
Let’s dive into the Bicep code shown above:
The accessPoliciesType type has been created to represent the key vault property accessPolicies and the type has the following definition:
- The property
tenantIdis of type string and is required - The property
objectIdis of type string and is required - The permission is of type object and comes with the following optional properties:
- keys which reference the type
keyPermissionType. - secrets which reference the type
secretPermissionType.
- keys which reference the type
The keyPermissionType and secretPermissionType types have been created to implement specific access policies for the ‘keys’ or ‘secret property property. Both are expected to be an array of strings with strict values.
After that, the user-defined type accessPoliciesType is linked to the parAccessPolicies parameter. Therefore, when you specify this parameter in your Bicep parameter file, it is expected to be an array of objects with the properties specified in accessPoliciesType. At last
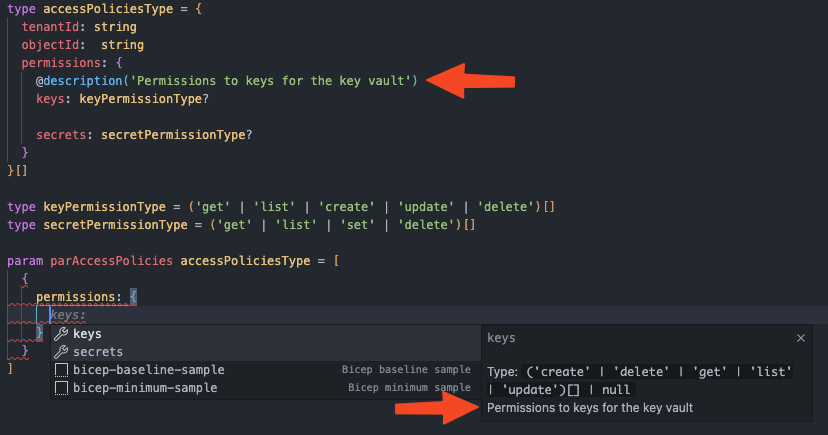
Autocompletion
A benefit of having strongly typed objects is that you can use autocompletion. The Bicep Language Service knows the semantics of the type, so it gives you the option to select properties from a dialog for autocompletion:

Documentation
If you want to document each property you are able to set a description on it using the @description decorator:
Conclusion
In conclusion, user-defined types in Azure Bicep provide several benefits, including assigning strongly typed values to objects, enabling autocompletion, and enhancing the readability of Bicep files. By creating custom objects and defining their properties, you can create more structured and reusable code. Take your infrastructure as code to the next level and start with user-defined objects 🚀!

One thought on “Enhance objects with User-Defined Types in Azure Bicep”