Agent Skills can have a significant impact on your workflow when using AI agents, as they are well suited for reusable tasks.
In this blog post, you will learn what Agent Skills are, how to create them, and how to use them in GitHub Copilot. I will also share four Agent Skills that I use when working with Azure Bicep and GitHub Copilot.
What are Agent Skills in GitHub Copilot?
Agents are highly capable of performing tasks, but they often lack context and domain expertise. Skills address this limitation by providing agents with specialised knowledge, extending their capabilities and improving expertise for specific tasks. Agent Skills integrate with both the GitHub Copilot coding agent and the GitHub Copilot CLI.
Skills enable agents to do the following:
- Gain domain expertise: Package specialised domain knowledge into reusable instructions
- Gain new capabilities: Provide agents with new abilities (such as reviewing code, formatting code, creating presentations, building MCP servers, and analysing datasets)
- Trigger repeatable workflows: Transform manual multi-step tasks into consistent, automated workflows
Enable Agent Skills for GitHub Copilot
In Visual Studio Code (version 1.108 or higher), you can enable the Use Agent Skills setting. This allows GitHub Copilot to load skills on demand by reading them from the .github/skills or ~/.copilot/skills folder.
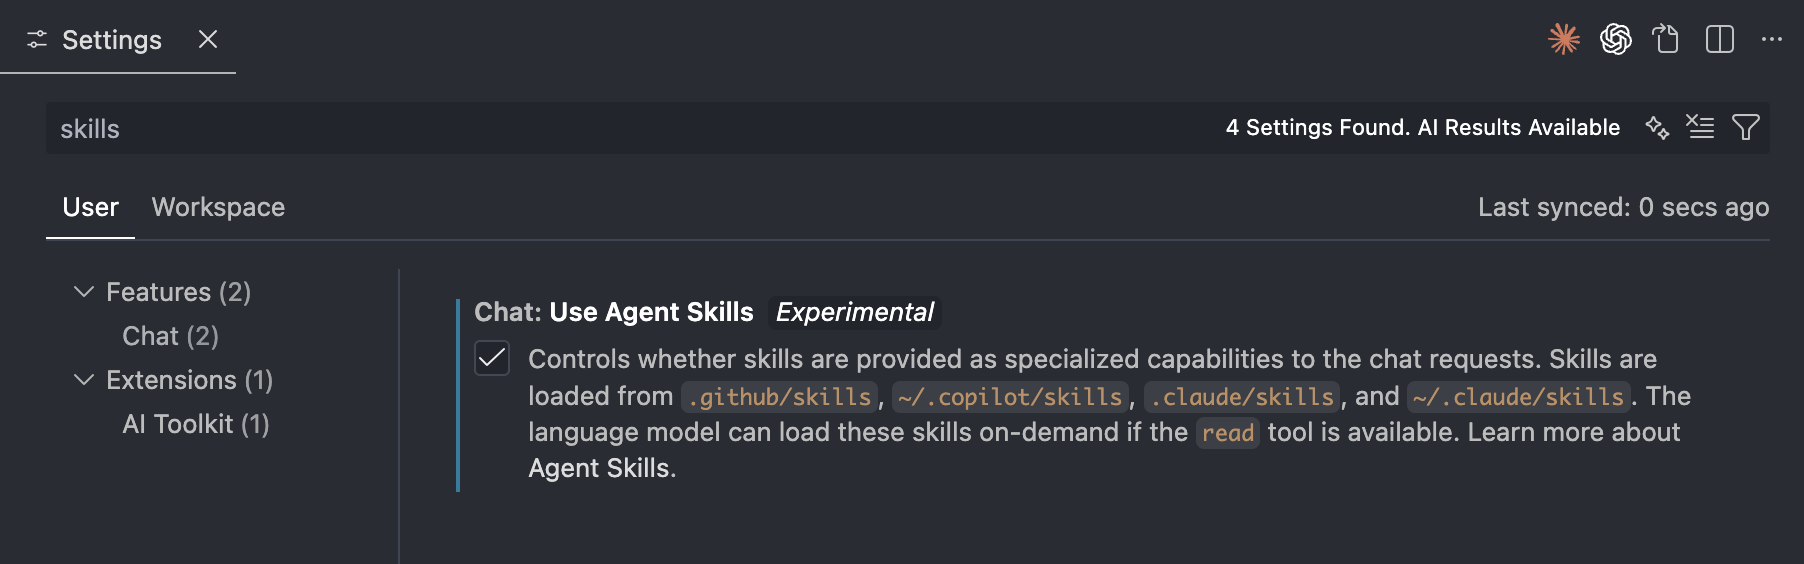
Or configure chat.useAgentSkills in your Visual Studio Code settings.json.
Create a new Agent Skill
Before creating a new Skill, it’s important to know that there are two locations where you can store your Skills:
- Project-level Skills: These are stored per repository in the
.github/skillsfolder. The advantage of this approach is that your Skills can be version-controlled and shared with everyone working on the project. - Personal Skills: These are stored in your personal
~/.copilot/skillsfolder. The advantage of this approach is that you define a Skill once and can reuse it across all your projects. This is ideal for personal workflows you want to automate, but the downside is that these Skills are not shared with your team.
To create your own Agent Skill, follow these steps:
- Choose where you want to store the Skill (project-level or personal).
- Each Skill must have its own directory. Create a new directory in the skills folder. Directory names must be lowercase and use hyphens instead of spaces (for example,
format-bicep). - In the directory, create a file named exactly
SKILL.md. (SKILL must be in uppercase) - Finally (optional), add example scripts or other resources that GitHub Copilot can use during Skill execution. Place these files in the Skill’s directory. You have to reference the extra scripts, or other markdown files in the Skill markdown.
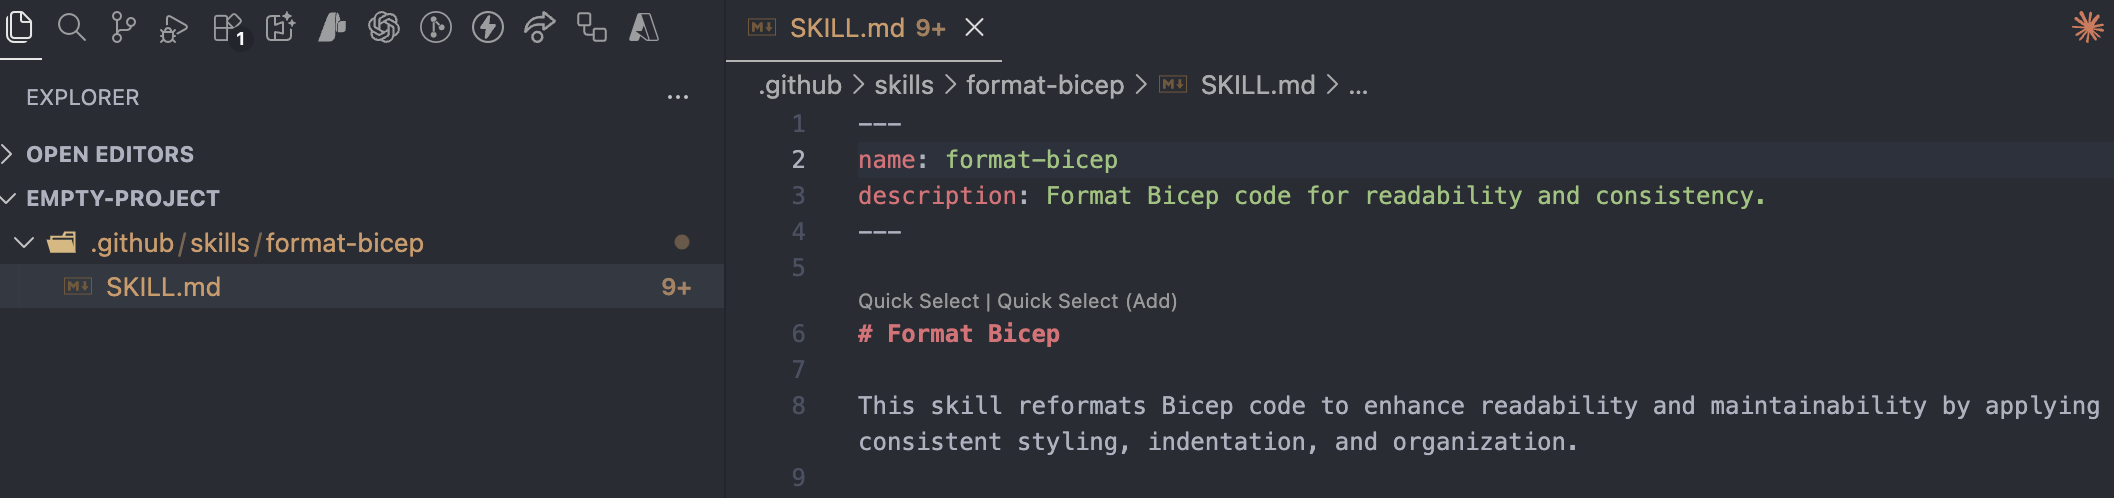
After creating the Skill folder and Markdown file, it looks like this:
YAML Frontmatter
SKILL.md is a Markdown file that uses YAML frontmatter to identify the name and description (goal) of the Skill. The YAML frontmatter includes:
- Name: The unique identifier for the Skill. This must be lowercase, using hyphens for spaces and typically matches the name of the directory.
- Description: A description on what the Skill does and when GitHub Copilot should use it.
- Body: This is where you define the instructions, examples, and guidelines that GitHub Copilot must follow. It essentially describes the workflow the Skill needs to execute. This section can also include PowerShell, Bash, and Python commands.
This is what an empty Skill Markdown file with YAML frontmatter looks like:
---name: [Name of the Skill]description: [Description of the Skill]---[Skill body]
Agent Skills discovery
In GitHub Copilot, Skill metadata is preloaded, meaning the name and description are always available to Copilot. This allows Copilot to decide which Skill matches a given prompt. When a match is found, the Skill body is loaded into the context. All of this happens on demand, and you don’t have to add an instruction to load a specific Skill.
Things to keep in mind
There are a few important considerations to get the most out of your Skills:
- Be aware that the contents of your Skills (the markdown text) share the context window. This means there is no need to include code language specific instructions, this is should be added to the custom instructions file.
- Be concise in your wording and use code snippet examples where appropriate. Focus on a single task and keep the Skill clear and simple.
- As described in the Agent Skills discovery section, the Skill name and description are critical in helping Copilot decide which Skill to use. Invest time in choosing a clear name and an effective description.
Agent Skills for Azure Bicep
During my work, I have created several Skills that allow me to automate tasks I would otherwise do manually. The Skills that help me are:
- A Skill to quickly format Azure Bicep files, ensuring a consistent style across my repository. I called this Skill
format-bicep. - A Skill to convert loosely typed parameters using data types such as array and object into strongly typed (specific) definitions. I called this Skill
convert-loose-to-strong-types. - A Skill to convert non-AVM resource definitions into an Azure Verified Modules module. I called this Skill
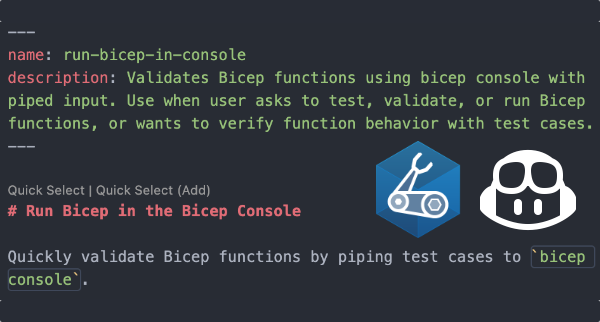
convert-bicep-to-avm. - A Skill to run a Bicep snippet, such as a User-Defined Function, in the Bicep console to quickly validate input and output. I called this Skill
run-bicep-in-console.
Each activity has a typical workflow that you follow to achieve a specific goal. This is also true for the tasks mentioned above, making them good candidates for encapsulating the workflow as a Skill in Markdown. In the examples, I will also document the manual steps I would have taken to complete the tasks.
Note! For the screenshots, I used the GPT-5.2-Codex model to demonstrate the output of each skill.
Skill 1: format-bicep
This Skill is used to format Bicep files in a consistent way across all Bicep templates. This adds value because the templates become easier to read, more predictable, and therefore easier to navigate. After formatting, the Skill runs bicep build to verify that the changes did not introduce any errors.
Link to Skill markdown:
Manual workflow
- Analyse the current state of the Bicep template. For example, check whether parameters, variables, modules, resources, and other elements are defined.
- Group these elements together.
- Place them in your preferred structure.
- Add a divider above each group, for example
// variables //,// parameters //, and so on. - Run
bicep formatto fix indentation andbicep buildto verify that the template is still valid.
When using the Skill, you only need to write a prompt and let GitHub Copilot perform the manual work for you.
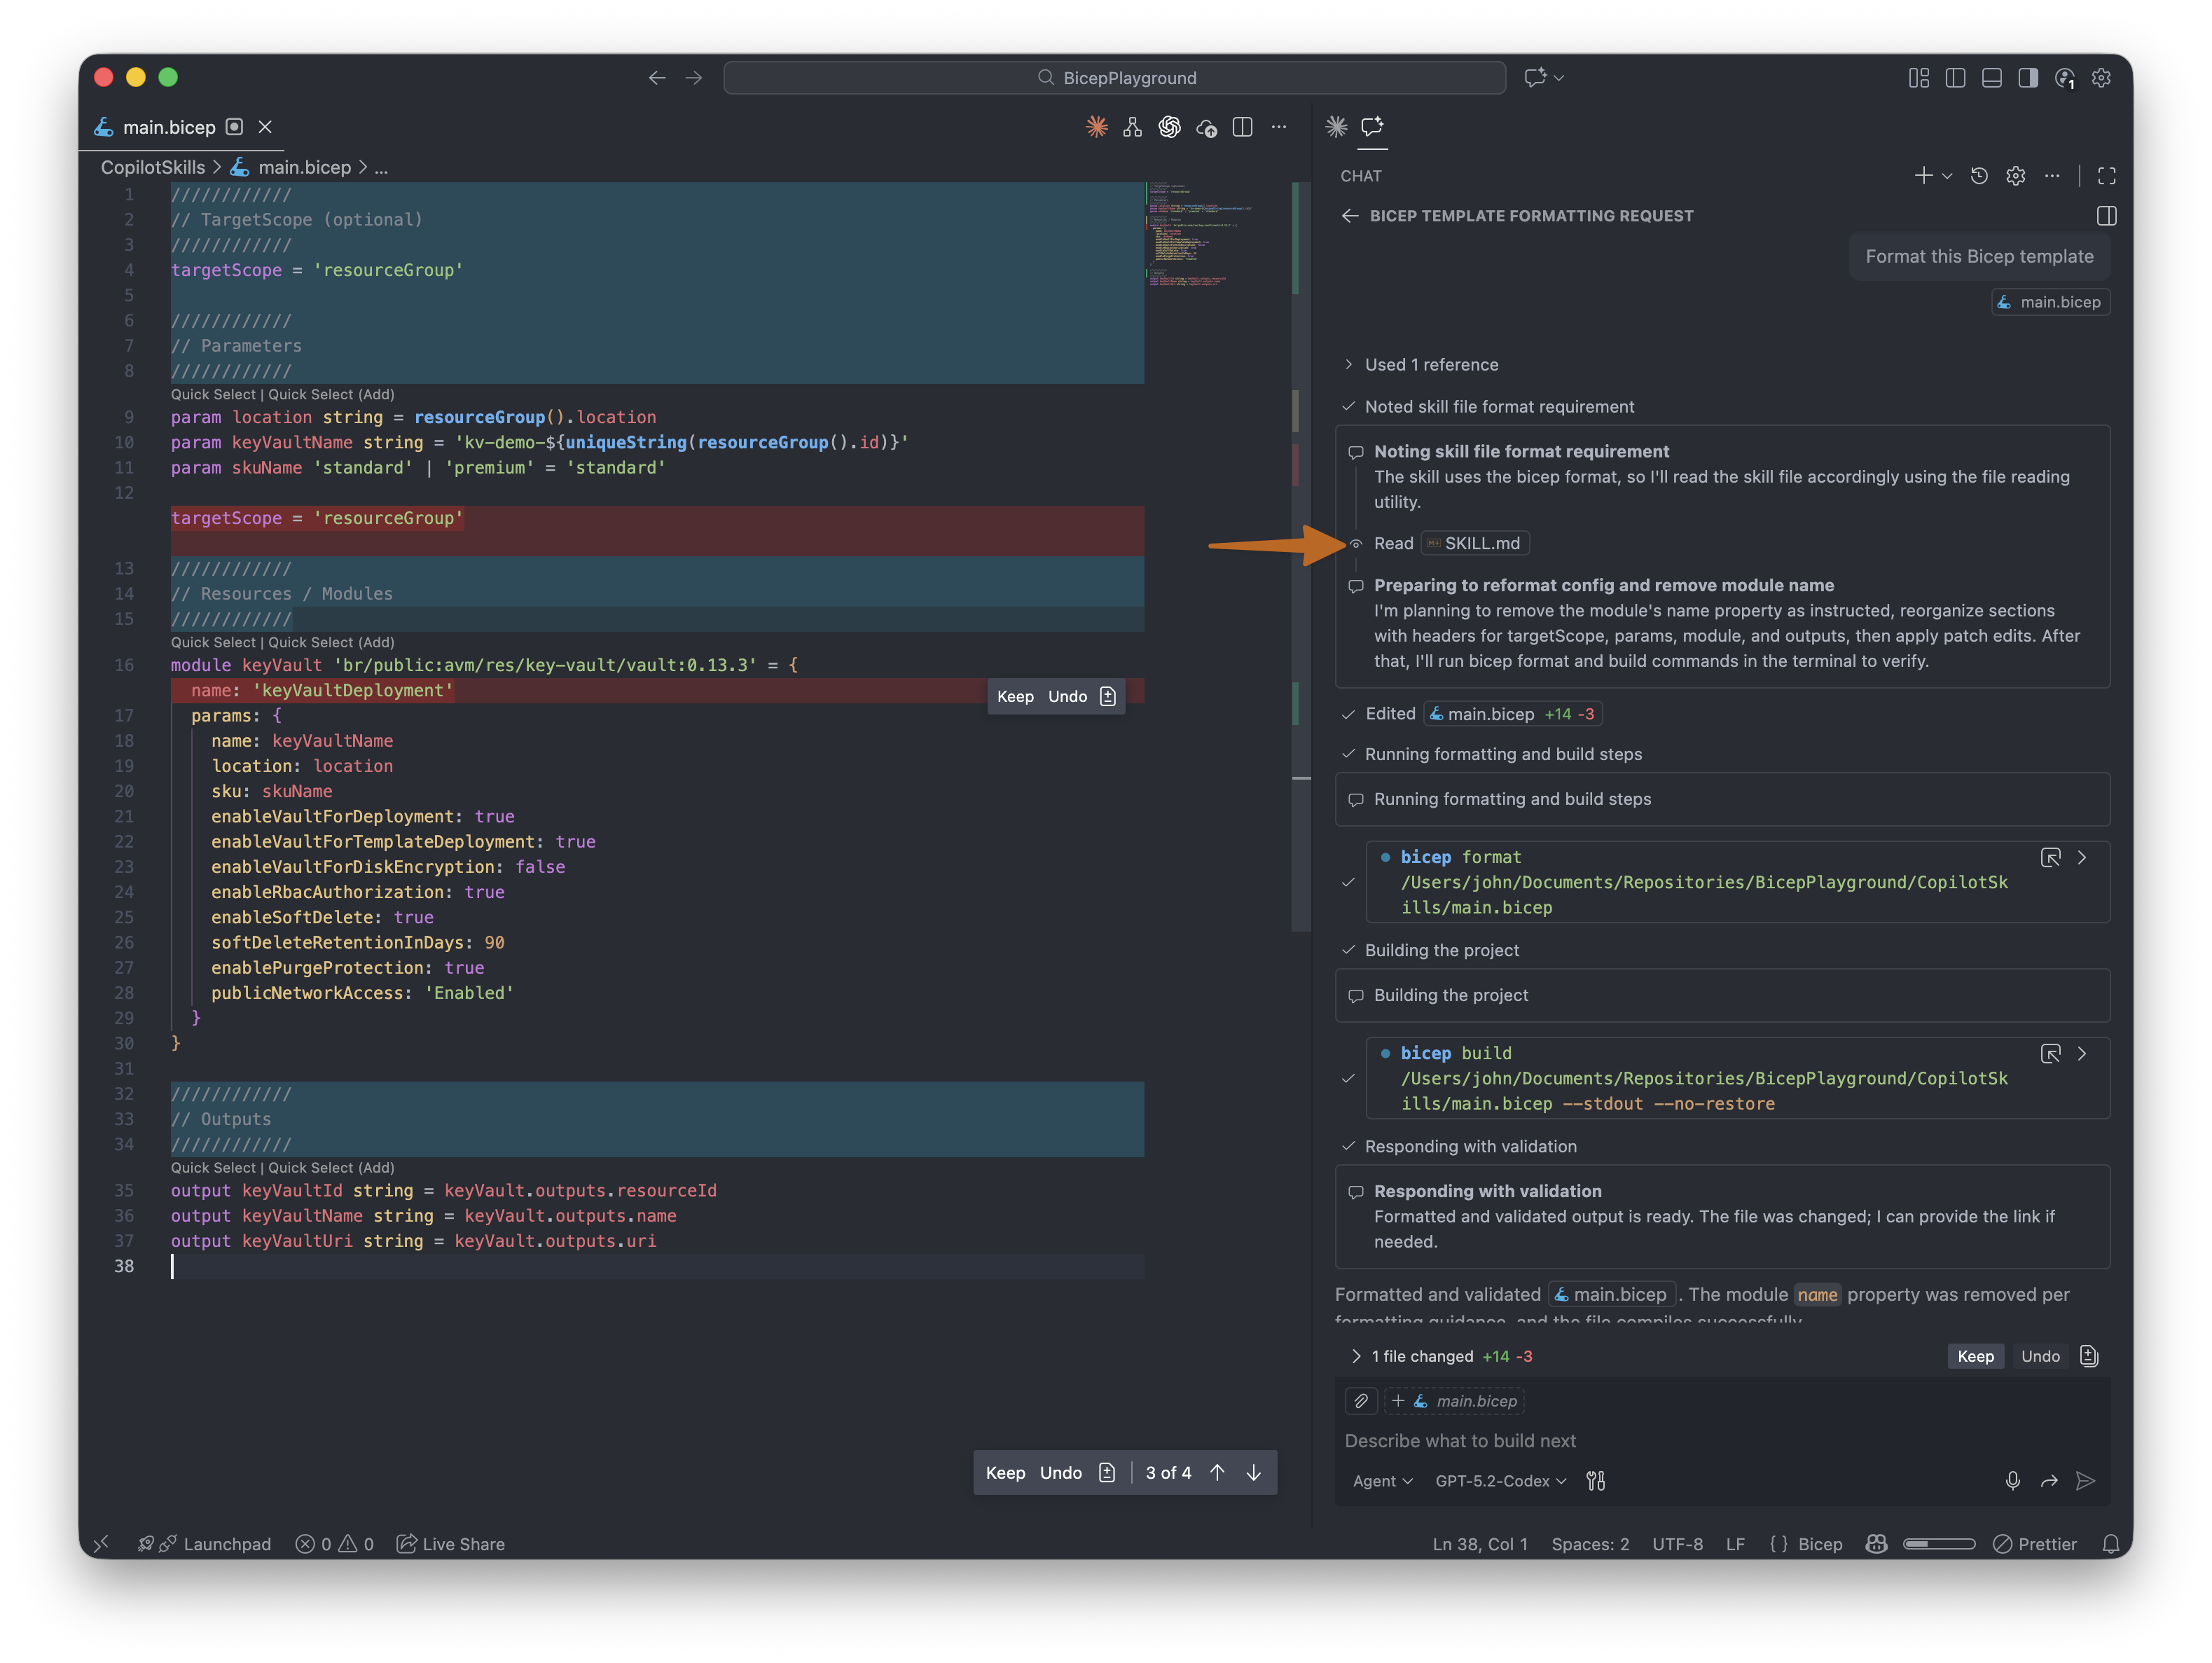
Prompt that triggers the Skill
Format this Bicep template
Result
As a result, the agent reformatted the Bicep template using dividers, relocated targetScope and runs bicep format and bicep build.
(click on the image to enlarge)
Skill 2: convert-loose-to-strong-type
This Skill converts loosely typed parameters (using array or object) into strongly typed definitions. Examples include using string[] for arrays of strings, a User-Defined Type, or a resourceInput<> type. Strong typing significantly improves the quality, predictability, and maintainability of your Bicep templates.
Link to Skill:
Manual workflow
- Identify which parameters are loosely typed.
- Analyse how these parameters are used and which values they are expected to hold. (Which is very time consuming for larger templates)
- Apply one of the following approaches:
- When using Azure Verified Modules (AVM), the parameter type must match the type defined in the module. This requires inspecting the AVM module, determining the correct type, and then updating the Bicep template accordingly.
- When using direct resource definitions and the parameter maps one-to-one to a resource property, review the resource’s property definitions to derive the correct data type.
- Run
bicep buildto validate the template.
When using the Skill, you only need to write a prompt and let GitHub Copilot perform the manual work for you.
Prompt that triggers the skill
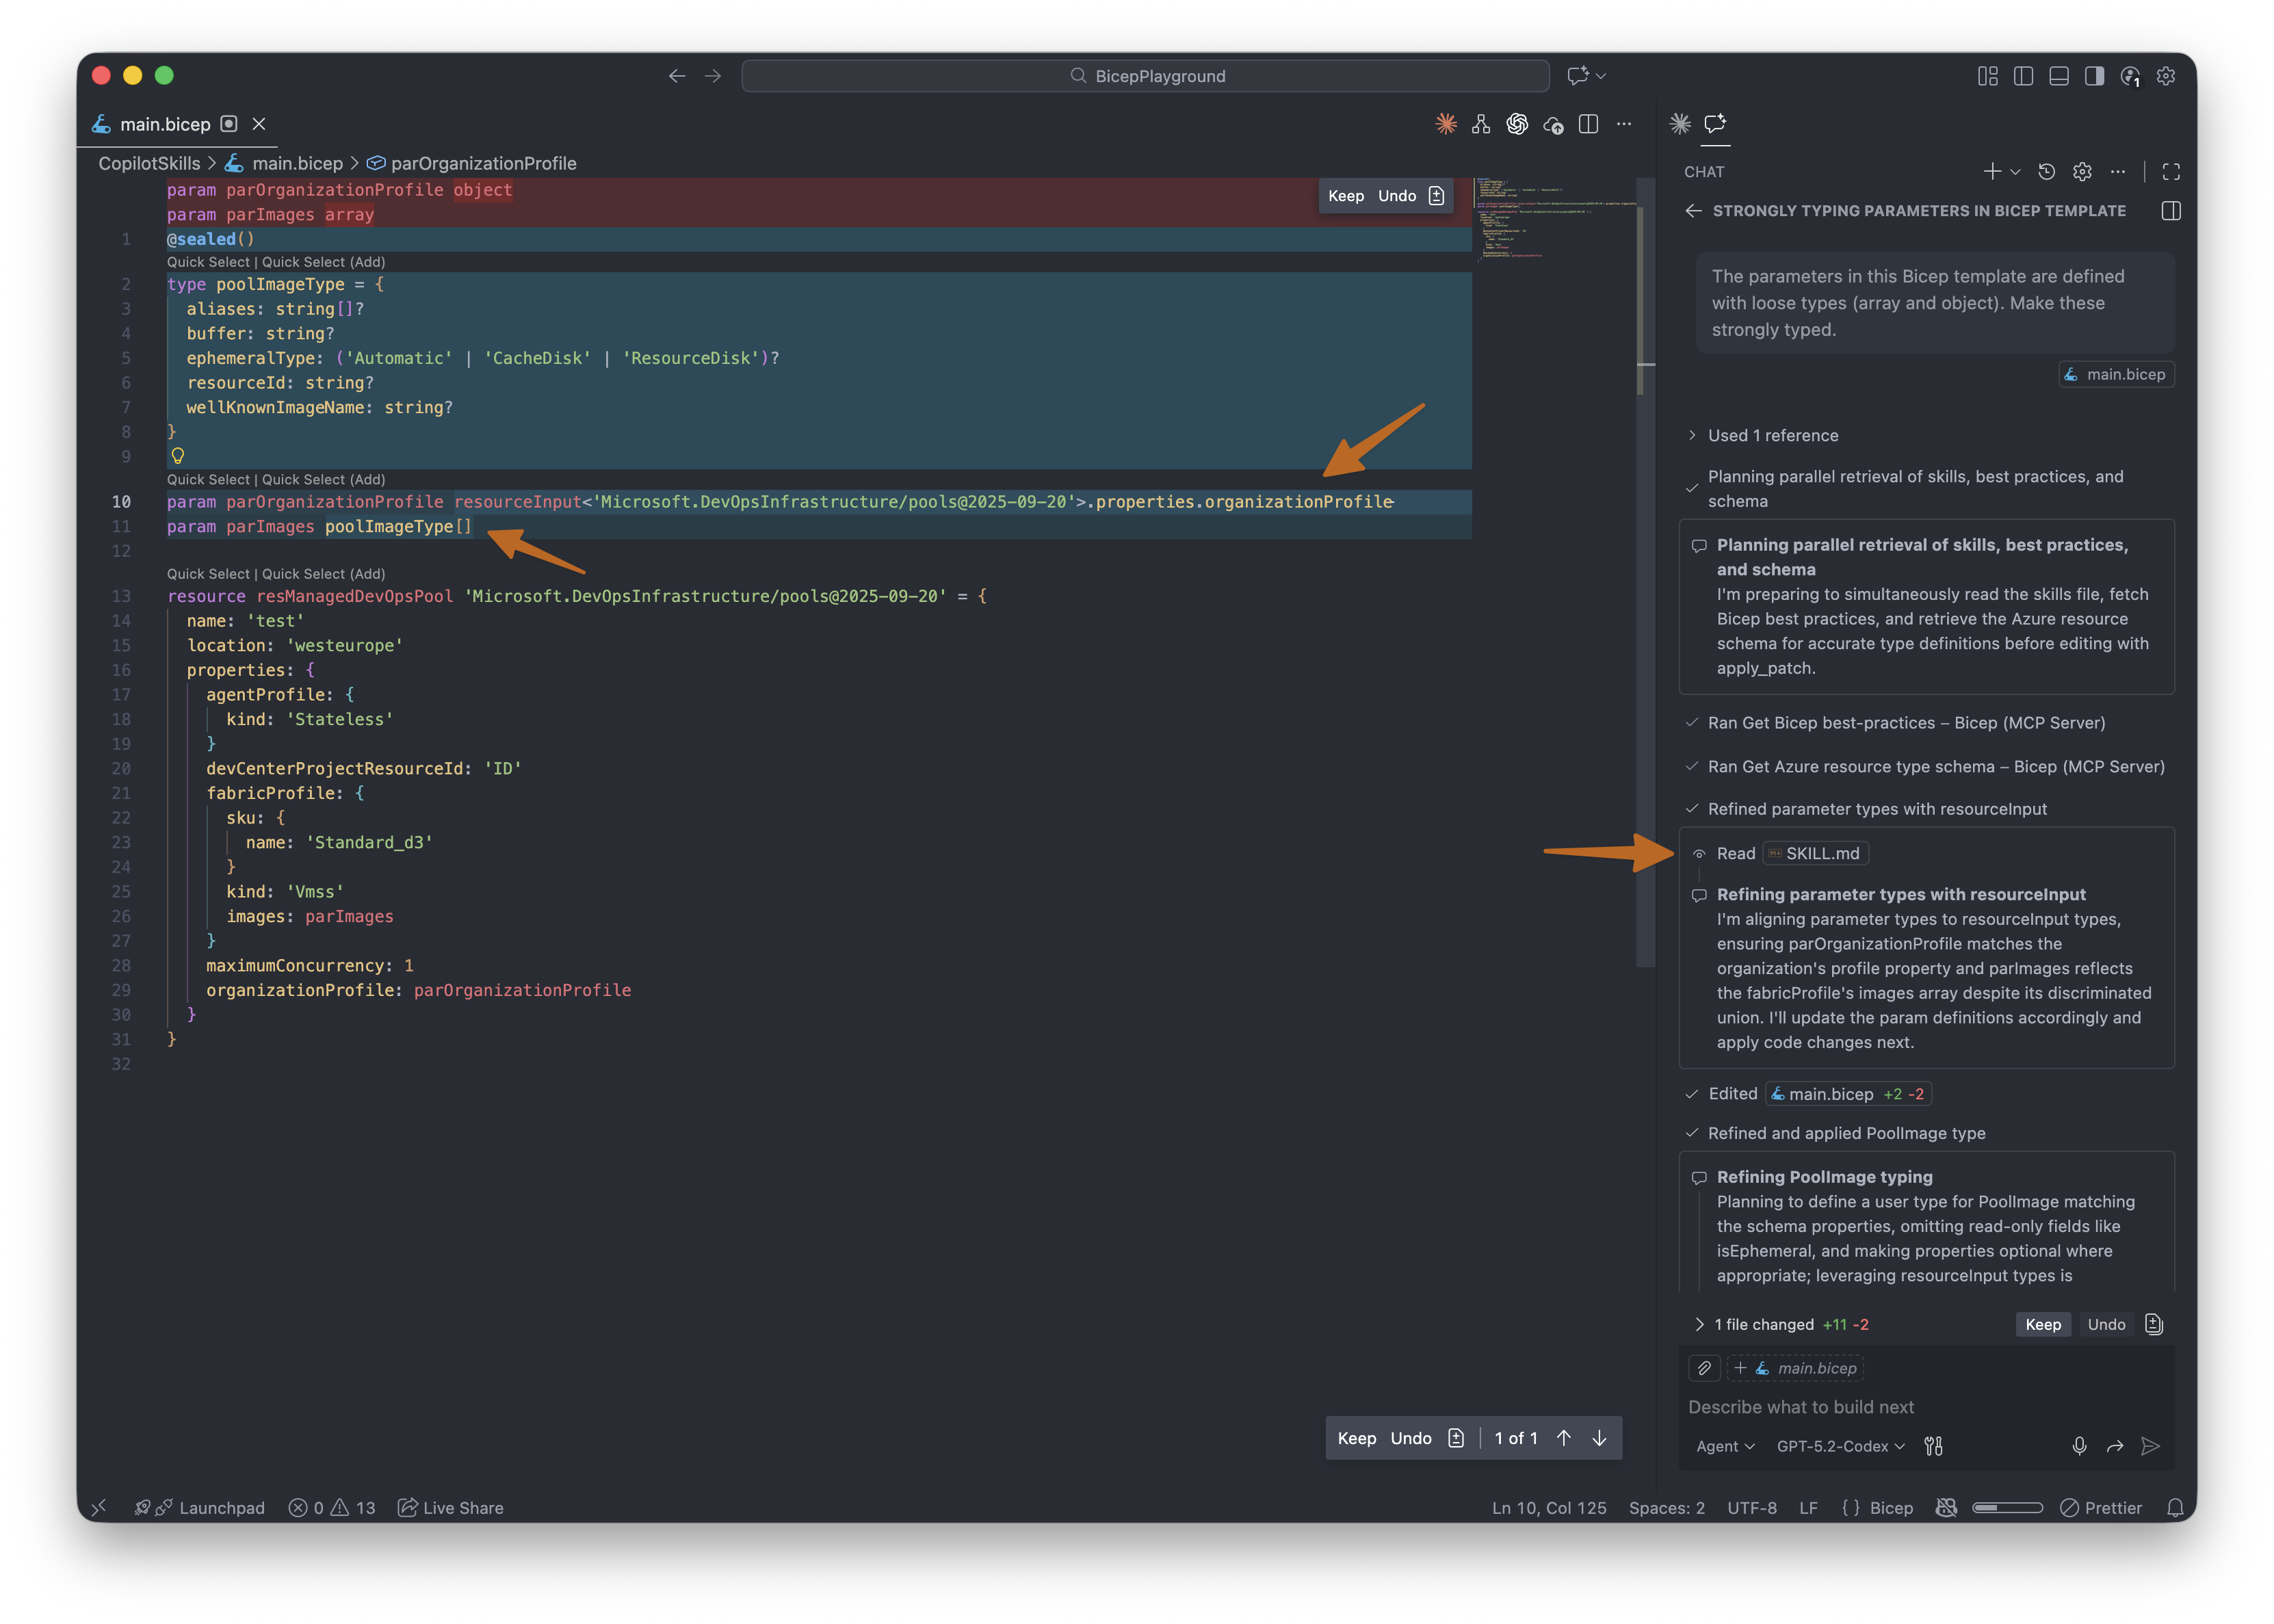
The parameters in this Bicep template are defined with loose types (array and object). Make these strongly typed.
Planning mode (optional)
For this task, I found that using GitHub Copilot’s Plan mode improves the quality of the output. Plan mode makes the agent explicitly outline the steps it would take, which is especially helpful for more complex Bicep templates. If you are working with larger or more complex templates, I recommend guiding the agent using Plan mode.
Result
As a result, the agent calls the Skill and implements strongly typed parameter definitions. In this example, it uses resourceInput<> for the organisation profile and introduces a new User-Defined Type for the images of the Managed DevOps Pools resource.
(click on the image to enlarge)
Skill 3: convert-bicep-to-avm
This Skill converts Azure Bicep resource definitions into Azure Verified Modules (AVM), allowing you to adopt standardised, well-maintained modules instead of managing resource definitions.
Link to Skill:
Manual workflow
- Analyse the list of resources defined in the Bicep template.
- Manually search for the corresponding Azure Verified Modules and review their available parameters and properties.
- Replace the resource definitions with module declarations, refactoring parameters where necessary to match the AVM module definitions.
- Run
bicep buildto validate the template.
When using the Skill, you only need to write a prompt and let GitHub Copilot perform the manual work for you.
Prompt that triggers the skill
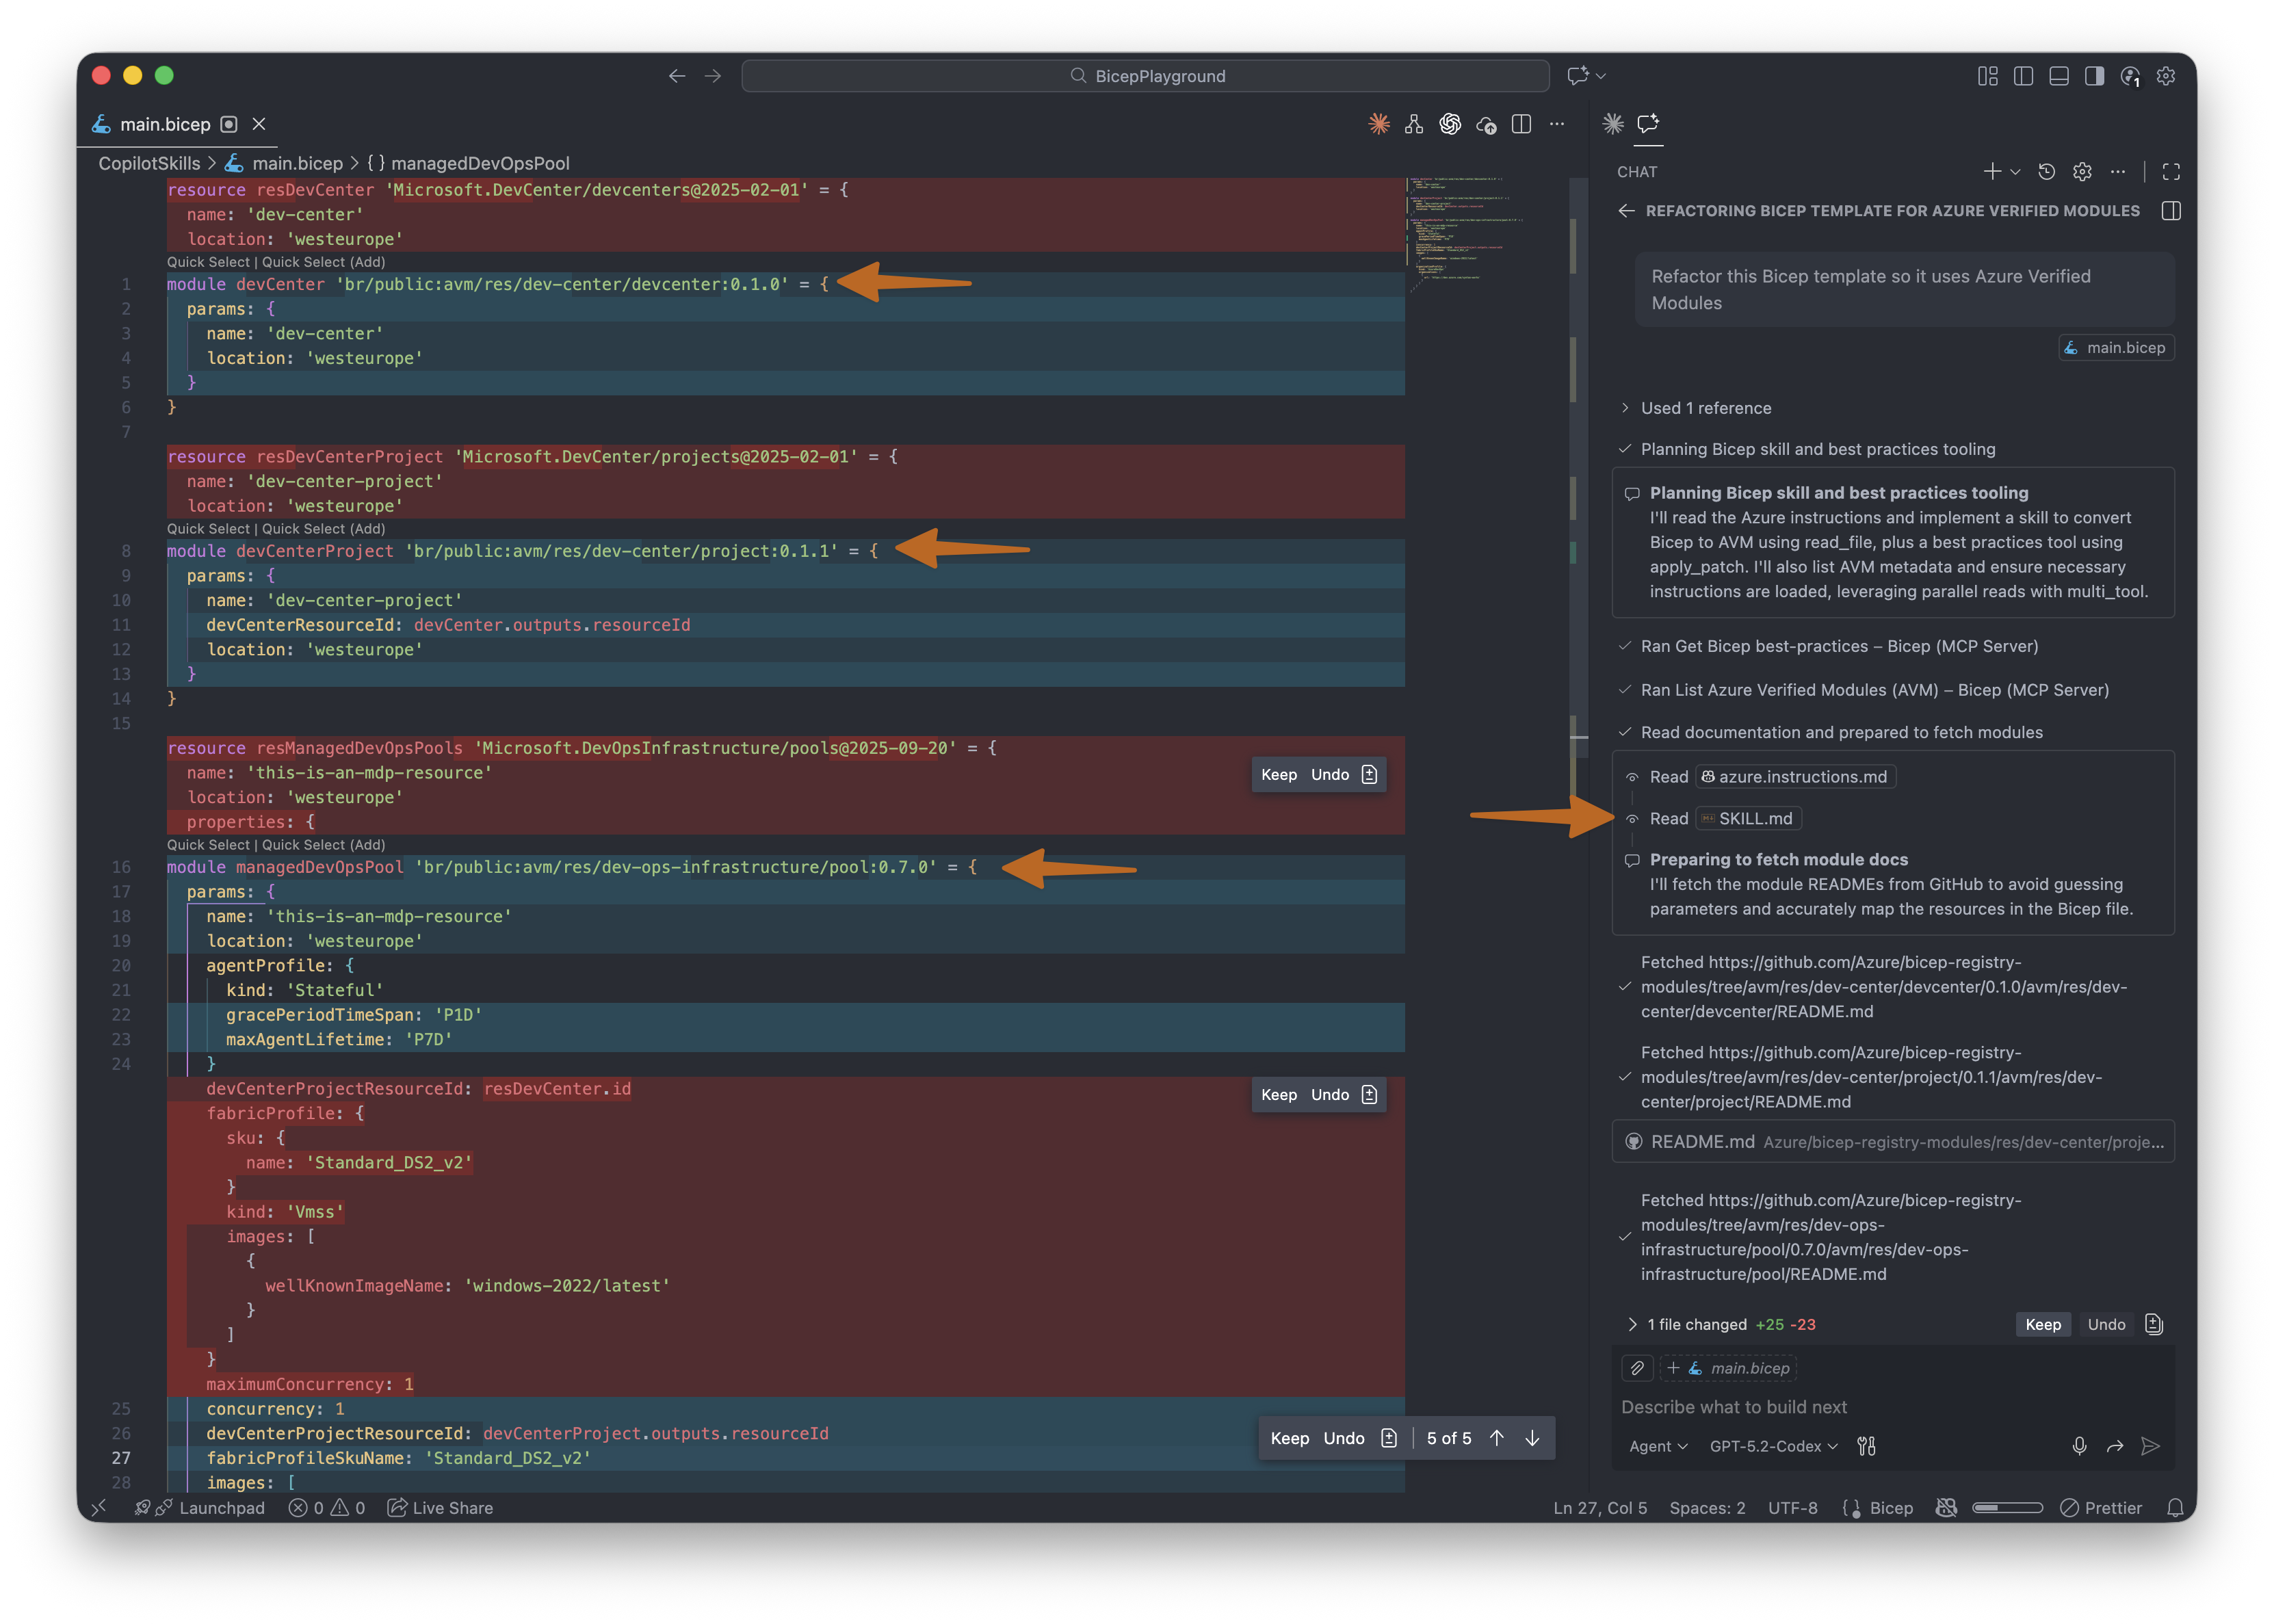
Refactor this Bicep template so it uses Azure Verified Modules
Planning mode (optional)
For this task, I recommend using GitHub Copilot’s Plan mode, especially for templates with multiple resources. Plan mode helps the agent reason through module selection, parameter mapping, and refactoring steps before applying changes.
Result
As a result, the agent rewrites the Bicep resource definitions to use Azure Verified Modules. The agent first analyses the existing resources, runs the list_avm_metadata tool from the Azure Bicep MCP, and retrieves the README files for each module to understand supported parameters and inputs. Finally, it updates the Bicep template to use the latest available version of each Azure Verified Module.
(click on the image to enlarge)
Skill 4: run-bicep-in-console
This Skill runs Bicep snippets, such as User-Defined Functions (UDFs), in the bicep console. It enables quick validation and testing of UDFs, including test cases, by using the console with multi-line piped input. Additionally, when you fully generate UDFs, this Skill can be automatically invoked when you ask to run them in the console.
If you include the expected output in your prompt, the agent can test the function and, if the actual output does not match the expected output, automatically fix the function to achieve the desired result.
Link to Skill:
Manual workflow
- Create the UDF (you can let the agent generate one too based on a specification file) or select an existing UDF.
- Copy and paste the UDF into the Bicep console.
- Define relevant test cases.
- Interpret and validate the output.
When using the Skill, you only need to write a prompt and let GitHub Copilot perform the manual work for you.
Prompt that triggers the skill
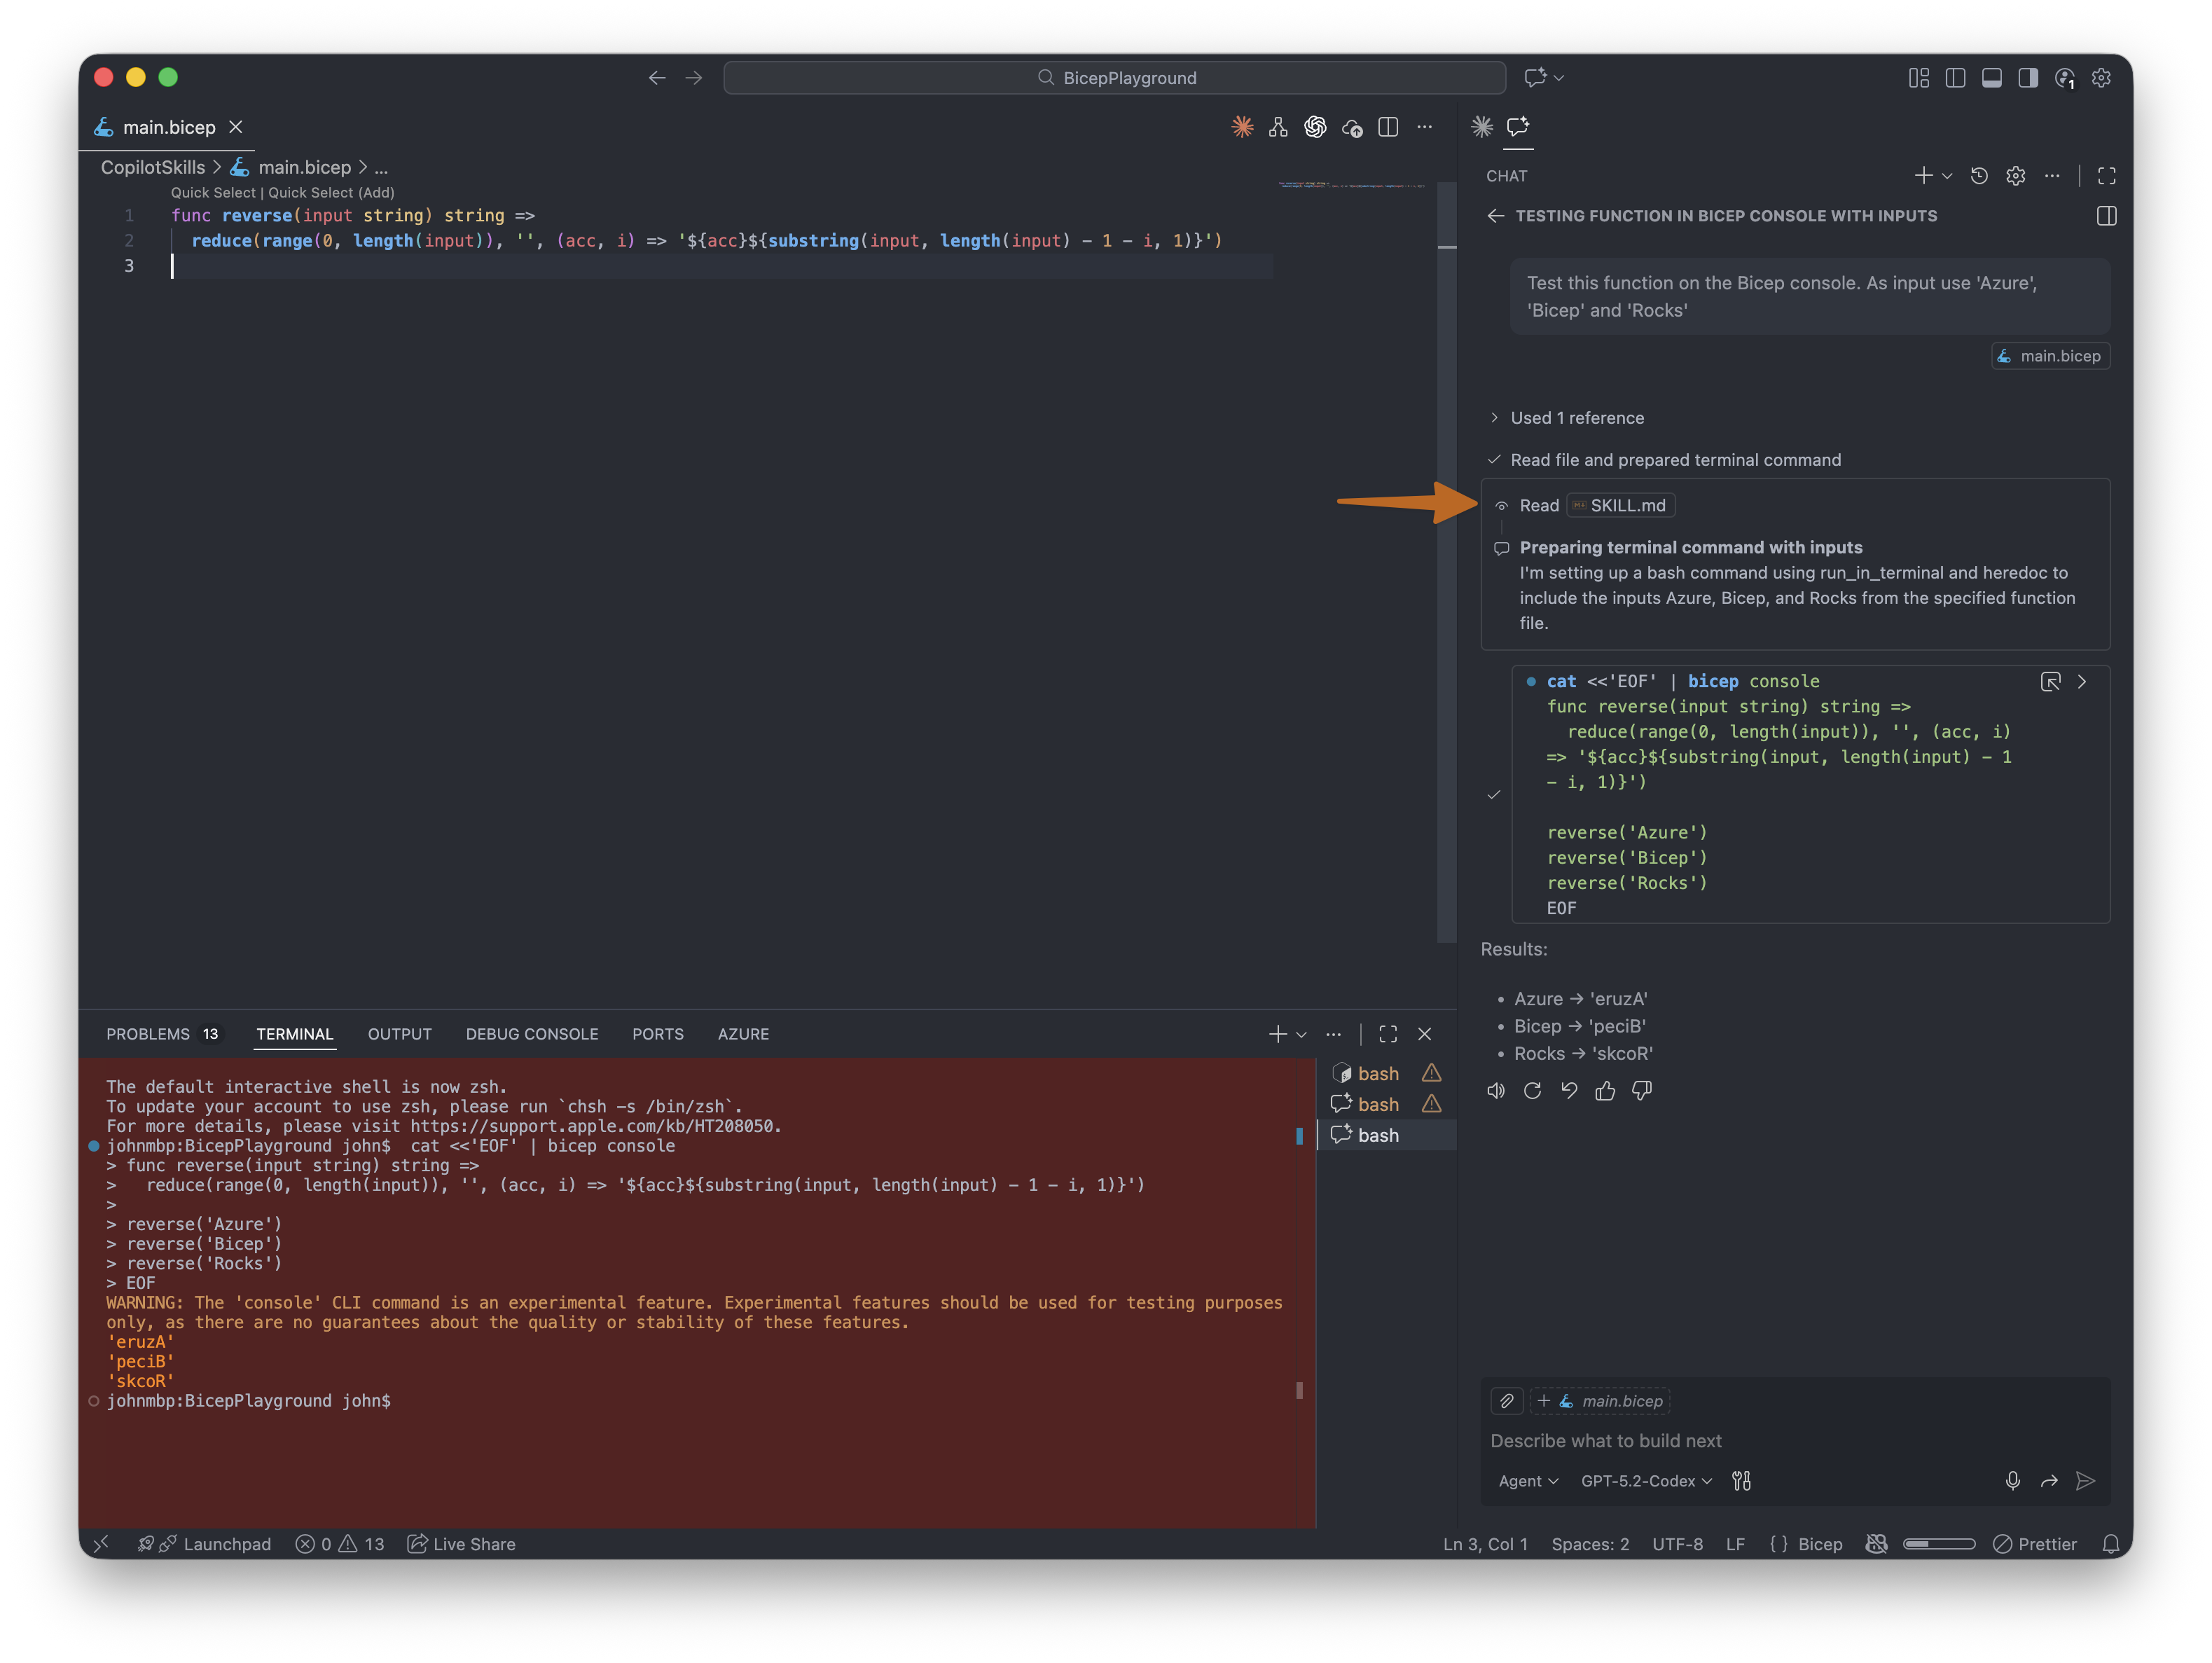
Test this function in the Bicep console. As input use 'Azure', 'Bicep' and 'Rocks’
Planning mode (optional)
If you are working with complex UDFs, I recommend using GitHub Copilot’s Plan mode to guide the agent through the validation steps.
Result
As a result, the agent creates a heredoc to construct a multi-line string containing the UDF definition and test inputs and it pipes that string to the bicep console. The agent also detects whether the active terminal is Bash or PowerShell, when PowerShell is used, it creates a herestring instead. The great thing is that if you provide expected results and the actual result differs from the expected result, you can instruct the agent to fix the user-defined function so that it produces the expected output.
(click on the image to enlarge)
Conclusion
This is how you can apply Agent Skills to your workflow when writing or maintaining Azure Bicep. If you work with agents, I highly recommend reviewing the way you work to identify and automate manual, repeatable tasks. If you use GitHub Copilot, then Agent Skills must be in your toolset, and when Agent Skills are used properly, it can be a timesaver!
Although this blog focuses on Azure Bicep, Agent Skills are not limited to Bicep and can be applied in many other contexts. Even with a non-technical background, Agent Skills can help automate parts of your work.
