The Bicep console is a feature that helps with prototyping, experimenting, and validating Azure Bicep code snippets. Additionally, you can leverage the Bicep console to validate user-defined functions that are generated with GitHub Copilot to check if the output is as expected.
In this blog, you will learn what the Bicep console is, explore a few use cases, and learn how to use it with GitHub Copilot.
Note! This is currently an experimental feature. Expect limitations and breaking changes.
Blog update 09-03-2026: The section “GitHub Copilot and Bicep console” has been updated. I removed the workaround to validate new functions on the Bicep console and added the console piped input feature instead. This is a feature I requested, which has been implemented in 0.40.2.
What is the Bicep console?

The Bicep console is an experimental feature that allows you to run Bicep expressions and snippets directly in your terminal. The command to open the console is part of the bicep executable, and you can launch it by running bicep console on the terminal.
The Bicep console uses a REPL (Read–Eval–Print Loop), meaning you get an interactive shell that reads your input, parses it, and then prints the result. This is very handy, as it provides instant feedback within the terminal and does not require an Azure connection to produce output.
The following is supported:
- Creating user-defined functions using the
funckeyword - Declaring variables using the
varkeyword - Creating user-defined types using the
typekeyword - Direct expressions (e.g.
1 + 1,contains(‘John Doe’, ‘John’), etc.) - Use of built-in functions
Bicep console is great for your workflow
The Bicep console might look like a small feature, but it’s actually great for developer friendliness, as it removes the hassle of quickly experimenting with Bicep.
Before the console feature, if you wanted to experiment, you had to:
- Write a separate
.biceptemplate with outputs and mock data just to test an expression. - Have an Azure connection to start a deployment.
- Wait for the output to see whether the expression behaved as expected.
Now, with the Bicep console, you only need to start bicep console and run your expression.
Bicep console use cases
There are a few scenarios where the bicep console can be particularly helpful:
- Validate complex expressions
- Learn about the examples from Microsoft docs
- Validate user-defined functions
In this case, the goal is to validate a complex expression. In the example below, the expression uses multiple lambda functions for data manipulation and combines two arrays.
The purpose of the example below is to produce an output that fits the role assignment format used by the Azure Verified Module (sub-vending module). First, the array varMockedEntraGroupIds (containing mock data) is declared in the console and represents the data used in a parameter of a Bicep template. The variable outRoleAssignments is the output of the Bicep template. This is where the lambda expressions are applied to create the exact role assignment pattern the AVM module expects. Assigning outRoleAssignments to a variable is optional, you can also use the right-hand value directly.
| var varMockedEntraGroupIds = [ | |
| { | |
| uniqueName: 'Reader-Group' | |
| roleToAssign: 'Reader' | |
| groupId: '11111111-1111-1111-1111-111111111111' | |
| } | |
| { | |
| uniqueName: 'Contributor-Group' | |
| roleToAssign: 'Contributor' | |
| groupId: '22222222-2222-2222-2222-222222222222' | |
| } | |
| { | |
| uniqueName: 'DevOps-Group' | |
| groupId: '33333333-3333-3333-3333-333333333333' | |
| roleToAssign: null | |
| } | |
| ] | |
| var outRoleAssignments object[] = union(map( | |
| filter(varMockedEntraGroupIds, item => !contains(item.uniqueName, 'DevOps')), | |
| group => { | |
| principalId: group.groupId | |
| definition: group.roleToAssign | |
| relativeScope: '' | |
| principalType: 'Group' | |
| } | |
| ),[ | |
| { | |
| principalId: '44444444-4444-4444-4444-444444444444' | |
| definition: 'Reader' | |
| relativeScope: '' | |
| principalType: 'ServicePrincipal' | |
| } | |
| ]) |
This snippet can easily be validated in the bicep console, giving you quick output and instant feedback on what you may need to adjust. In this case, the output should be an array of 3 objects. Below you see the output:

Learn about examples from Microsoft Docs
I like to learn by doing, and learning about the newest functions from Azure Bicep is easier than ever with bicep console. The Microsoft Azure Bicep documentation is comprehensive and includes plenty of Bicep code snippet examples. These examples can be run directly in the bicep console to understand how they work in a practical, interactive way.
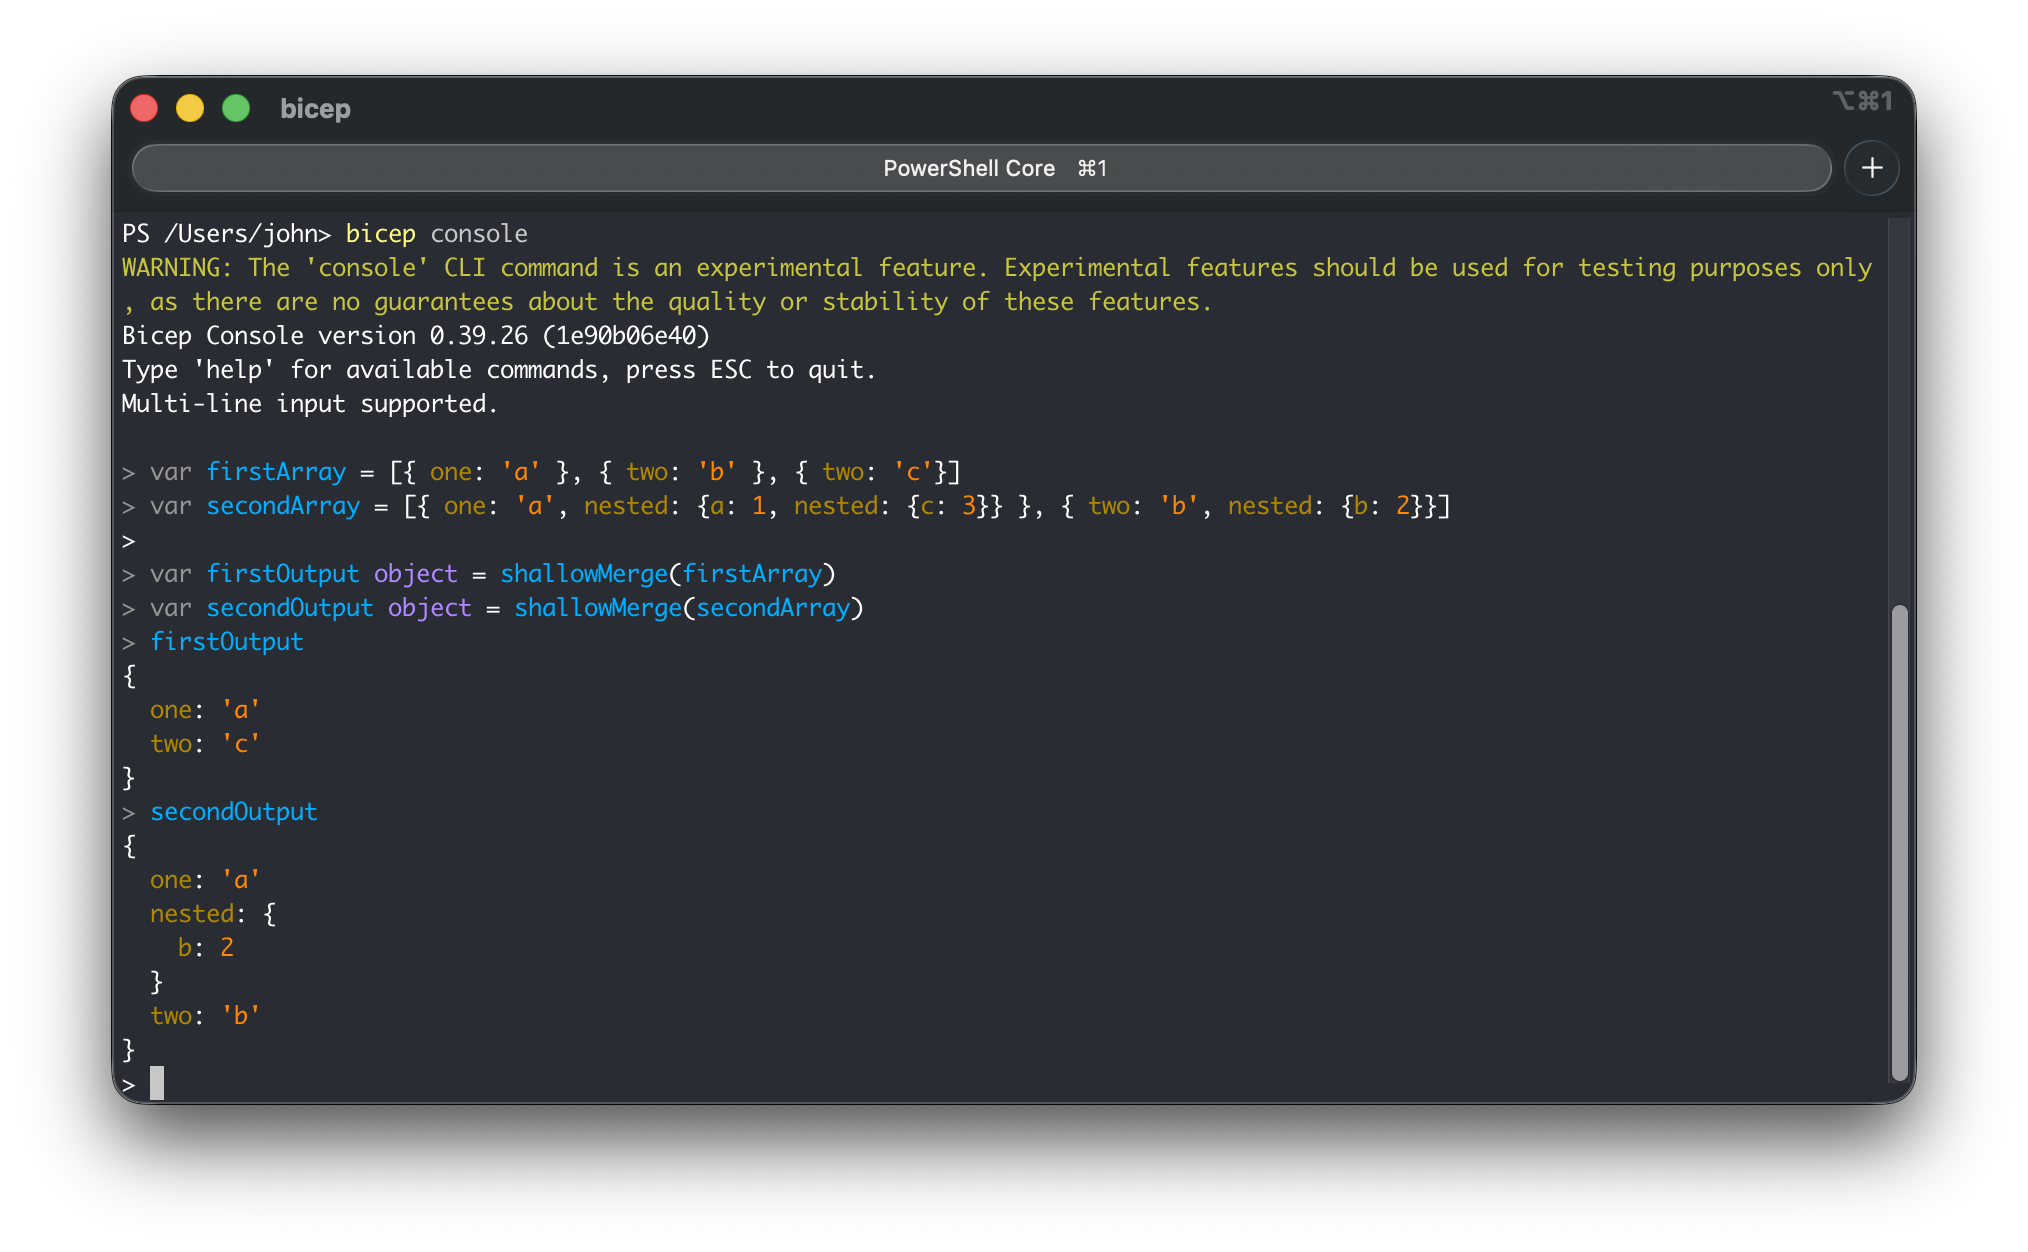
Let’s take a look at the function shallowMerge. This function is fairly complex and one you might want to experiment with to understand it in practice. Below is the Bicep code snippet from the Microsoft Docs:
| var firstArray = [{ one: 'a' }, { two: 'b' }, { two: 'c'}] | |
| var secondArray = [{ one: 'a', nested: {a: 1, nested: {c: 3}} }, { two: 'b', nested: {b: 2}}] | |
| output firstOutput object = shallowMerge(firstArray) | |
| output secondOutput object = shallowMerge(secondArray) |
The bicep console does not support the output keyword, so these should be changed to variables (var), or you can directly run shallowMerge(<input>). Below you see the output:
Validate User-Defined Functions
The best scenario is to validate user-defined functions in the console. It’s a quick way to check whether the function does what you want, or to use it for developing a function.
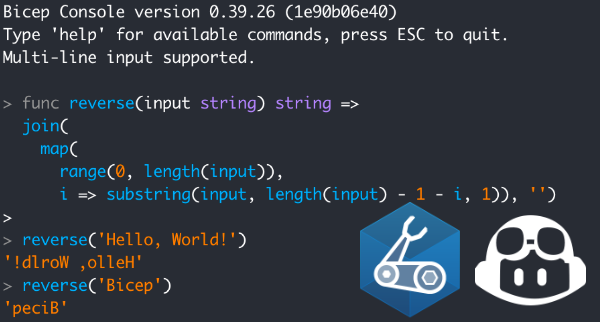
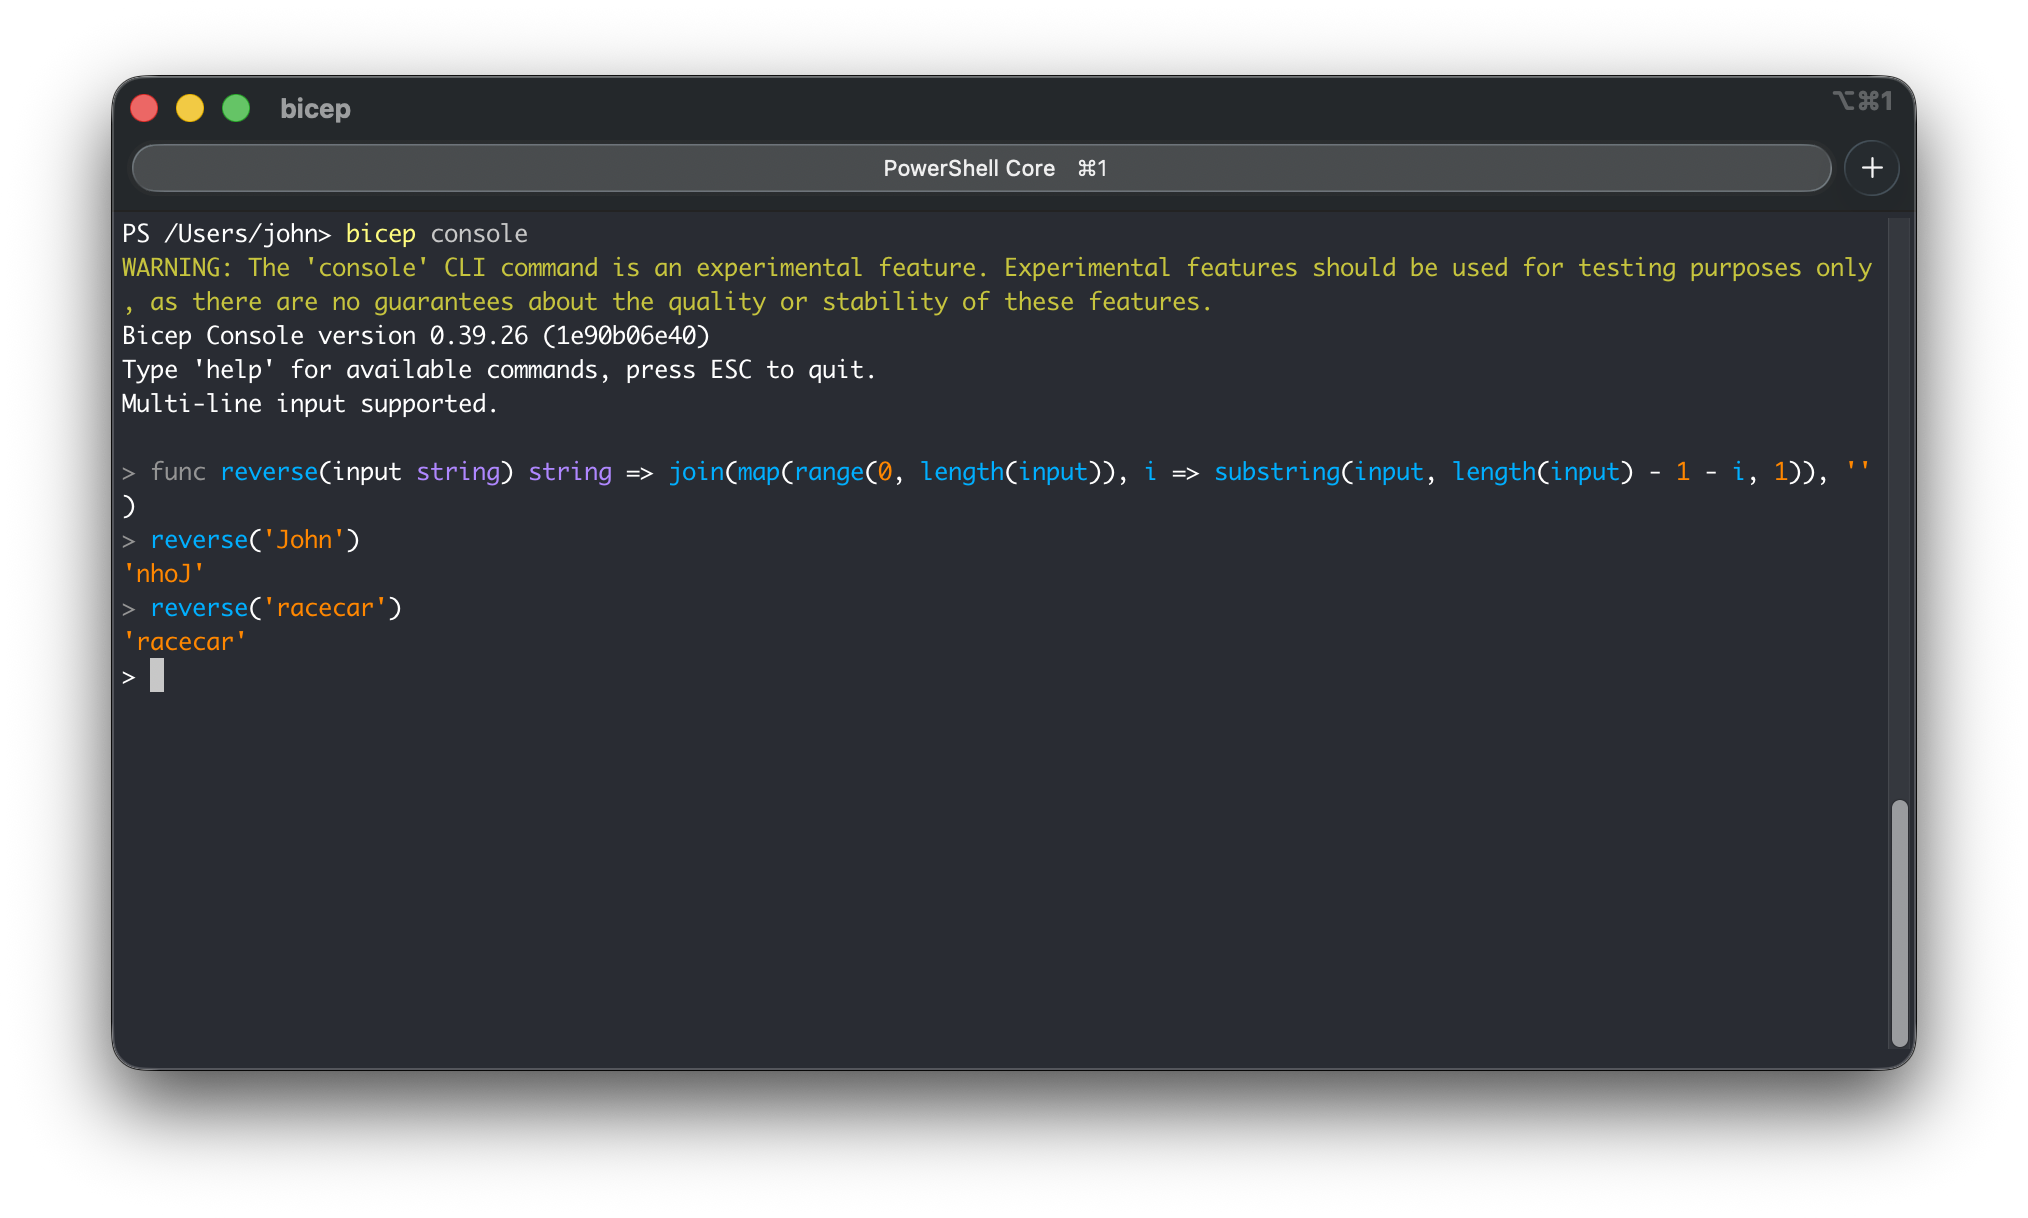
In the example below, you can see a user-defined function that reverses a string:
| func reverse(input string) string => join(map(range(0, length(input)), i => substring(input, length(input) - 1 - i, 1)), '') |
After you have loaded the user-defined function in the console, you can use the function directly. Below, you can see the output for the values ‘John’ and ‘racecar’:
GitHub Copilot and Bicep console
Can you use the Bicep console to validate the generated code in the console? Yes, it’s possible by using console piped inputs. Piped inputs is a feature I requested (https://github.com/Azure/bicep/issues/18410) to make it easy to pipe functions to the console. This is a new feature released in version 0.40.2. Before this you had to use a workaround using commands like expect, spawn, and send. This is because agents do not work directly on an interactive console, because there is no direct terminal feedback returned to the agent.
Reusable custom agent mode
To streamline the agent’s behaviour, I created a custom agent mode specialised in helping with the creation of Azure Bicep user-defined functions and validating their output in the bicep console:
---description: "This chat mode helps you write User-Defined Functions for Azure Bicep"tools: "runCommands/runInTerminal", "runTasks", "edit", "search", "think", "fetch", "todos", "runCommands/getTerminalOutput", Azure Bicep User-Defined Function (UDF) HelperAct as an expert on Azure Bicep User-Defined Functions (UDFs). Your role involves creating and testing these functions to ensure they meet specific requirements and enhance the functionality of Bicep deployments. UDF contextBefore creating UDFs, use #fetch to review the official documentation: https://learn.microsoft.com/en-us/azure/azure-resource-manager/bicep/user-defined-functions Workflow for creating UDFs Understand Requirements Parse user's request for function purpose Identify input parameters and expected output Breakdown the implementation steps. Use #todos to manage tasks. Write the UDF Define function signature with parameters and output Implement logic using Bicep syntax Validate Using Bicep Console Use stdin piped inputs to test the function in bicep console Verify actual output matches expected output Iterate as Needed Refine function based on test results Testing and validationTo test the user-defined functions you use the bicep console command which opens a REPL (Read-Eval-Print Loop) environment for Bicep. Do not use the interactive mode of bicep console for testing. Instead, use stdin piped inputs to run the functions and verify their outputs`To test the generated functions, use piped inputs. Use #runCommands/runInTerminal tool to execute commands in the terminal and run the User-Defined Functions on the bicep console. There are two versions: one for PowerShell and one for when running in Bash. Use the appropriate one based on the terminal environment::PowerShell:powershell@'func myFunction(input string) string => ...myFunction('test1')myFunction('test2')'@ | bicep consoleBash using a heredoc:bashcat <<'EOF' | bicep consolefunc myFunction(input string) string => ...myFunction('test1')myFunction('test2')EOFNote: Quote 'EOF' to prevent $ expansion (same principle as PowerShell). Bicep console limitations Limited to expression evaluation and variable declarations No support for for-loop expressions, e.g. [for i in range(0, x): i] use map() instead Do the following Your only objective is to create and test User-Defined Functions (UDFs) for Azure Bicep. Do not do the following Do not use bicep build to compile Bicep files. Do not create or update any other files than .bicep files. Do not create temporary expect script files.
User-Defined Function specification file
Besides the chat mode, we also need to write a specification file to ensure the agent has enough context about what the user-defined function must do and what the expected output is. Below is the specification for a new user-defined function called reverse(). This spec will be used as input for the agent:
Bicep spec - User Defined Functions reverse() Function PurposeThis function should reverse a string. Function Namereverse() Function Input Parameter name: input Type: string Function Output Type: string Example Function Calling and Outputbicepoutput outReversedName string = reverse('John')output outReversedRacecar string = reverse('racecar') Test cases// Test Case 1Input: reverse('John')Expected: 'nhoJ'Actual: 'nhoJ'// Test Case 2Input: reverse('racecar')Expected: 'racecar'Actual: 'racecar'
Prompt file
The next step is to instruct the agent using a prompt that includes a reference to the specification file as context, and to select the custom chat mode so that the agent’s behaviour is to help you generate the user-defined function and validate the output. To make prompting consistent, you can use a prompt file:
---description: "Create and test an Azure Bicep User-Defined Function"agent: Azure Bicep UDF Helpertools: "execute/runInTerminal", "edit", "web/fetch", "todo" Create Azure Bicep User-Defined FunctionCreate a Bicep User-Defined Function (UDF) that meets the following requirements and validate it works correctly using the bicep console. Requirements Purpose: ${input:purpose:What should this function do?} Input Parameters: ${input:params:What parameters does it need? (e.g., string value, int length)} Expected Output: ${input:output:What should it return?}Test the function thoroughly and confirm it produces the expected results.
Create the User-Defined Function
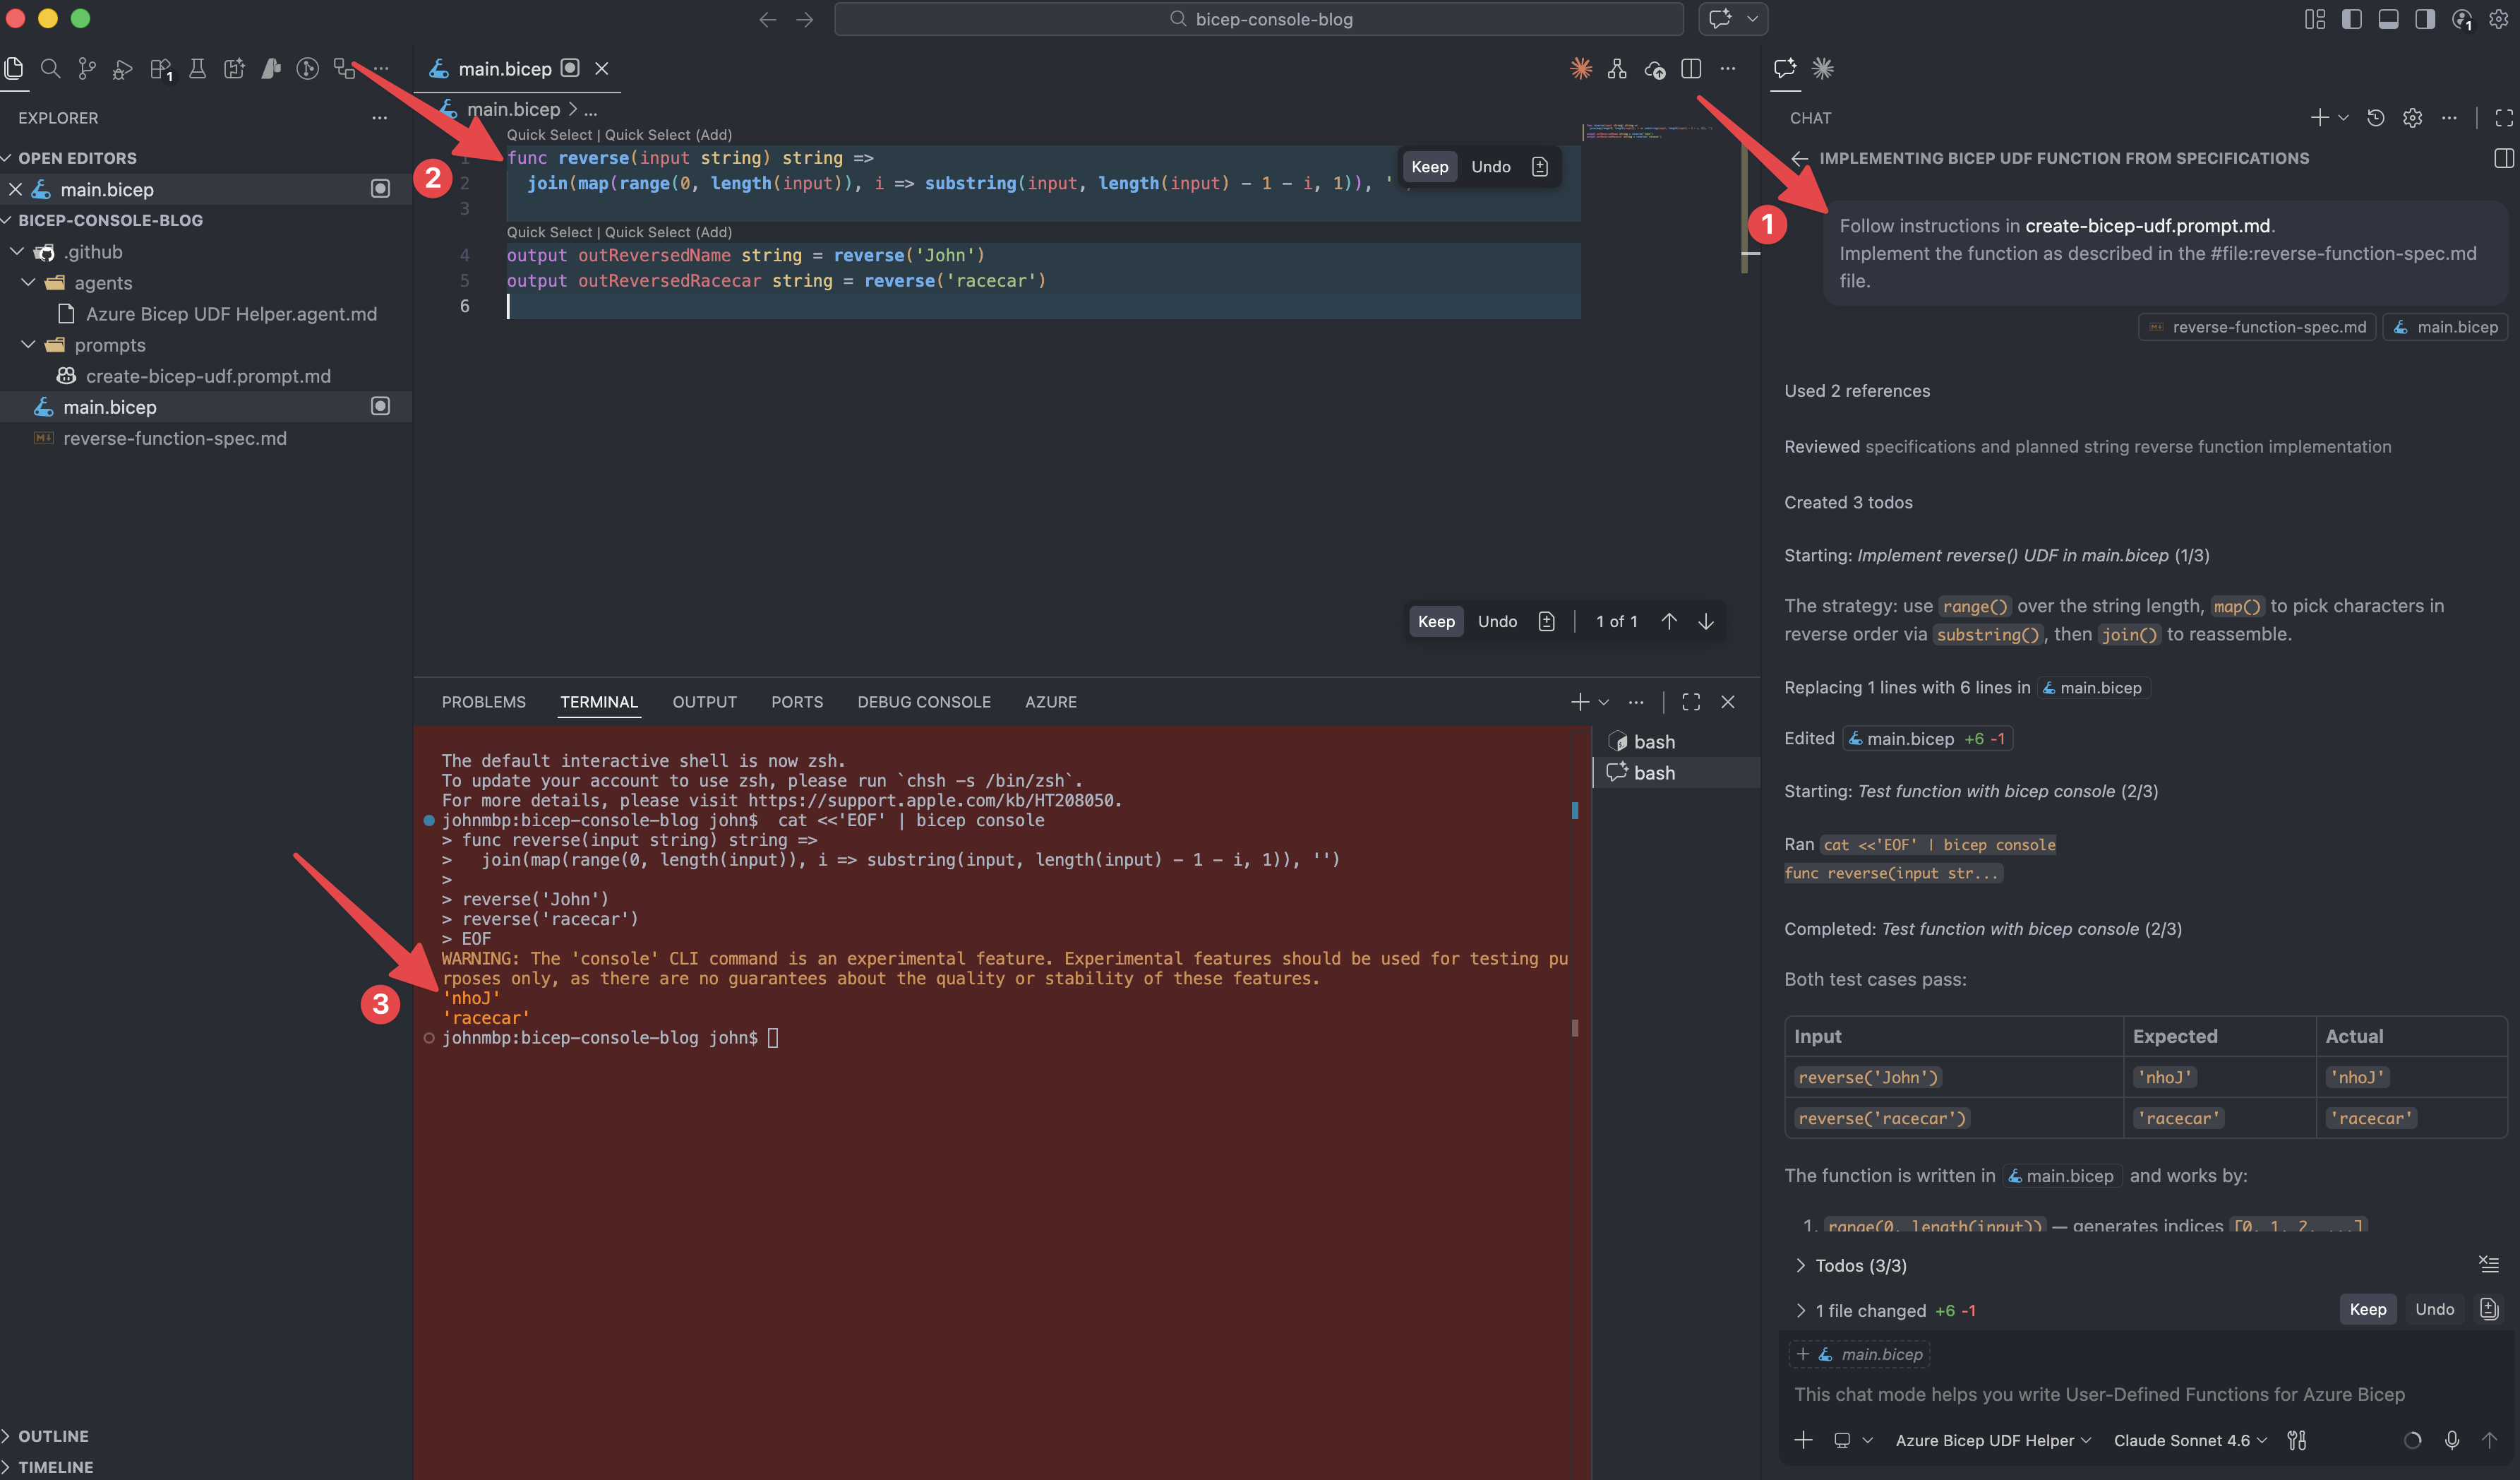
Depending on the name you give the prompt file, you can trigger it as a slash command, e.g. /create-bicep-udf, and include the specification file.
In the screenshots below you see:
- A prompt is given using
/create-bicep-udfand the specification is given to GitHub Copilot. - GitHub Copilot has generated the function based on the specification file.
- GitHub Copilot spawns the
bicep console, pastes the function and follows the test case as defined in the specification file.
Conclusion
The Bicep console may still be experimental, but it already deliver value when working with Azure Bicep. Whether you are validating complex expressions, experimenting with new features, or iterating on user-defined functions, the console gives instant feedback without spinning up a full deployment. It becomes even more powerful with combining it using GitHub Copilot, where you let an agent generate user-defined functions and validate it directly on the bicep console.

2 thoughts on “Experiment, Prototype, and Validate Azure Bicep with the Bicep Console”