
In this blog post, you will learn how to use GitHub Copilot Agent Skills together with GitHub Copilot Hooks to generate a changelog video using Remotion. The agentic pipeline also creates an automated voice-over with Microsoft’s MAI-Voice-1 text-to-speech model through Microsoft Foundry.
What are hooks in GitHub Copilot?
Hooks allow you to execute custom shell commands at specific lifecycle points during a GitHub Copilot agent session. Unlike prompt files, skills, or AI-driven behaviour in general, hooks provide deterministic, code-driven automation that runs regardless of how the agent was prompted.
There are a lot of use cases for hooks, but a few examples are:
- Code quality: automatically format code, run tests and lint
- Inject context: run a script to retrieve Azure Key Vault secrets and inject them while GitHub Copilot is actively running
- Auditing: log Copilot’s behaviour during an agent session
Hooks are configured in JSON files stored in the .github/hooks/ folder of your repository and are loaded automatically by VS Code for GitHub Copilot. If you want to use a hook across all of your repositories, you can store it in the ~/.copilot/hooks folder. A hook is a .json file. There are eight events available:
| Hook event | When it fires | Examples |
|---|---|---|
SessionStart | User submits the first prompt of a new session | Fetch Azure Key Vault secrets and inject them as environment variables |
UserPromptSubmit | User submits a prompt | Validate that a Bicep file exists before allowing deployment prompts |
PreToolUse | Before the agent invokes a tool | Run az account show to confirm the correct Azure subscription is set |
PostToolUse | After a tool completes successfully | After editFile tool is used trigger a az deployment group validate after a Bicep file is written |
PreCompact | Before conversation context is compacted | Save the current GitHub Copilot state to a log file for auditing |
SubagentStart | When a subagent is spawned | Pass the Azure DevOps project and pipeline ID to the subagent |
SubagentStop | When a subagent completes | Aggregate subagent results and post a summary to an Azure DevOps PR |
Stop | When the agent session ends | Run a linter |
For this blog, I will use the PostToolUse hook event to trigger a PowerShell script.
Note! Agent hooks in VS Code are currently in Preview. Hook events might change in the future.
Remotion and MAI-Voice-1
The two main technologies used to generate the video and voice-over are Remotion for video generation and MAI-Voice-1, in Microsoft Foundry, for speech generation.
Remotion
Remotion is an open-source framework that lets you create videos programmatically using React. Instead of editing videos in a traditional timeline editor, you write code to define animations, layouts, and content, and Remotion renders them into MP4 files. To learn more about Remotion, I recommend visiting their website: https://www.remotion.dev/
MAI-Voice-1
MAI-Voice-1 is Microsoft’s first-party speech generation model available in Microsoft Foundry via Azure Speech. It can produce 60 seconds of expressive, natural-sounding audio in under one second, making it one of the most efficient text-to-speech systems available today. To learn more about MAI-Voice-1, I recommend reading the announcement blog post: https://techcommunity.microsoft.com/blog/azure-ai-foundry-blog/introducing-mai-transcribe-1-mai-voice-1-and-mai-image-2-in-microsoft-foundry/4507787
In this blog post, Remotion is used to generate the changelog video. Microsoft Foundry provides the voice-over by using MAI-Voice-1 for text-to-speech. GitHub Copilot drives the orchestration of skills and content generation.
Agent Skills, Hooks and Scripts
To wire up the full video and voice generation pipeline, you need a few key components: Copilot skills, hooks, and scripts. The table below gives a high-level overview before diving into each component.
Skills
Four Copilot skills drive the content gathering and orchestration of the video and voice generation pipeline. Each skill is defined as a SKILL.md file, stored in .github/skills/<skill name>, and is automatically available to GitHub Copilot during an agent session.
| Component | Name | Purpose |
|---|---|---|
| Skill | fetching-bicep-changelog | Fetches the latest Bicep release notes from GitHub |
| Skill | fetching-youtube-video | Extracts metadata from a Bicep community call on YouTube. This skill is optional. |
| Skill | summarizing-bicep-update | Combines changelog and YouTube data into a structured summary |
| Skill | generate-video | Orchestrates the full flow and writes summary.json |
The generate-video is the only skill that is user-invocable: true. This means it acts as the entry point you call directly as a slash command (/generate-video). The other three skills are invoked automatically by Copilot when needed.
You can find the skill definitions in my GitHub repository: https://github.com/johnlokerse/changelog-video-tts-generator/tree/main/.github/skills
Hook
The PostToolUse hook is configured in .github/hooks/video-pipeline.json and fires every time GitHub Copilot successfully uses a tool. The hook runs a PowerShell script that watches for one specific event: Copilot writing summary.json. All other tool usage is ignored, and the hook exits immediately.
At the moment, hooks cannot be configured to monitor edits to specific files directly. Because of this, you need to create your own middleware logic in the PowerShell script that you will read about later.
The contents of the video-pipeline.json hook looks as follows:
| { | |
| "hooks": { | |
| "PostToolUse": [ | |
| { | |
| "type": "command", | |
| "command": "pwsh -NoProfile -File .github/hooks/scripts/Invoke-VideoPipeline.ps1 -HookMode", | |
| "cwd": ".", | |
| "timeout": 1800 | |
| } | |
| ] | |
| } | |
| } |
You can find the hook definition in my GitHub repository: https://github.com/johnlokerse/changelog-video-tts-generator/blob/main/.github/hooks/video-pipeline.json
Script
Invoke-VideoPipeline.ps1 runs the three-step pipeline automatically once summary.json is created or updated:
- Voice generation: reads the summary, builds Speech Synthesis Markup Language (SSML) segments (intro, headline, one per highlight, breaking changes if any, outro), and calls the Azure Speech TTS endpoint using the
MAI-Voice-1voice for each segment. Each MP3 is measured for duration and written to anaudio-manifest.json. - Scaffolding: runs a Node.js scaffold script that wires the
summary.jsoncontent and audio manifest into the Remotion project source files. - Rendering: runs
npx remotion renderinside the Remotion project directory and outputs the final MP4 to theoutput/folder.
The script reads credentials (AZURE_TTS_KEY, AZURE_TTS_ENDPOINT, AZURE_TTS_VOICE) from a .env file or environment variables, so no secrets are hardcoded.
Additionally, this PowerShell script imports a HookPayloadHelpers module to act as the middleware. Because PostToolUse fires after every tool invocation it must be checked if the summary.json is created or updated. It reads the hook payload, normalises the tool name and input across all common write tools (editFiles, createFile, apply_patch, etc.), and checks whether summary.json was the target. Any other tool call causes an immediate exit with no side effects.
Link to the PowerShell script and the helper module: https://github.com/johnlokerse/changelog-video-tts-generator/tree/main/.github/hooks/scripts
Stages
In this section, I will explain the three stages that make up the full video and voice-over generation pipeline. Each stage builds on the previous one: GitHub Copilot gathers and structures the changelog data, a hook detects when the data is ready, and a PowerShell script handles the audio synthesis and video rendering automatically.
Prerequisites
Before you start, make sure you have the following:
- Node.js for Remotion and scaffolding the Remotion project
- Microsoft Foundry instance with access to the
MAI-Voice-1model. Use the variablesAZURE_TTS_KEY,AZURE_TTS_ENDPOINT,AZURE_TTS_VOICEfor the key, endpoint, and voice name stored in a.envfile or as environment variables. afinfo(macOS) orffprobe(other platforms) for audio duration measurement
Flow overview
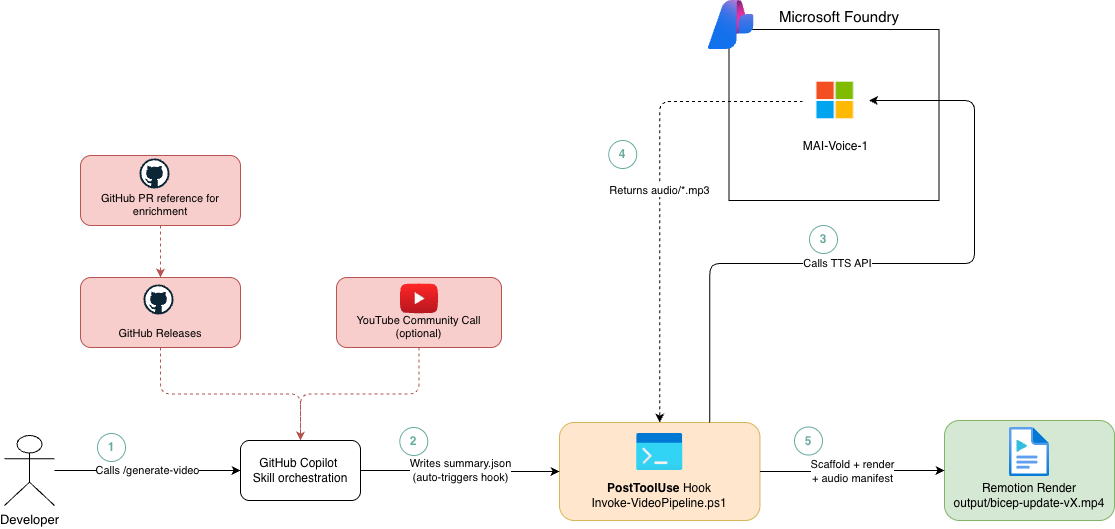
Stage 1:
- A user calls the
/generate-videoskill, which orchestrates the other skills. For example,fetching-changelogretrieves the changelog content from GitHub,fetch-youtuberetrieves the YouTube video information tied to a specific Bicep release, andsummarizing-bicep-updatesummarises the changes retrieved by the previous skills. - The
summarizing-bicep-updateskill aggregates the gathered information into asummary.jsonfile containing the highlights, headline, breaking changes, version, and release date.
Stage 2 and 3:
- When the
PostToolUseGitHub Copilot hook fires, a PowerShell script calls the Microsoft Foundry text-to-speech (TTS) API and uses theMAI-Voice-1model to generate the audio. The script also creates an audio manifest so the audio can be aligned with the video. - Microsoft Foundry returns the MP3 files based on the content in
summary.json. - Finally, Remotion scaffolds and renders the video, including the generated audio.
Let’s take a look at each stage in more depth.
Stage 1: Calling Agent Skills
The first stage is handled entirely by GitHub Copilot. It uses four Agent Skills that together form the changelog video pipeline. Once the skills are installed, you can trigger the full workflow by calling the generate-video skill in GitHub Copilot Agent mode:
/generate-video Use the following changelog from GitHub: https://github.com/Azure/bicep/releases/tag/v0.41.2
You can also pass a YouTube community call URL alongside the GitHub release URL, or omit it when no community call video exists for that release.
GitHub Copilot will then:
- Fetch the release notes for the specified Bicep version from GitHub.
- Optionally fetch community call metadata from YouTube, such as the title, description, and thumbnail, when a URL is provided.
- Enrich each highlight by fetching the referenced GitHub pull request or issue, creating more accurate narration.
- Summarise the release into a structured
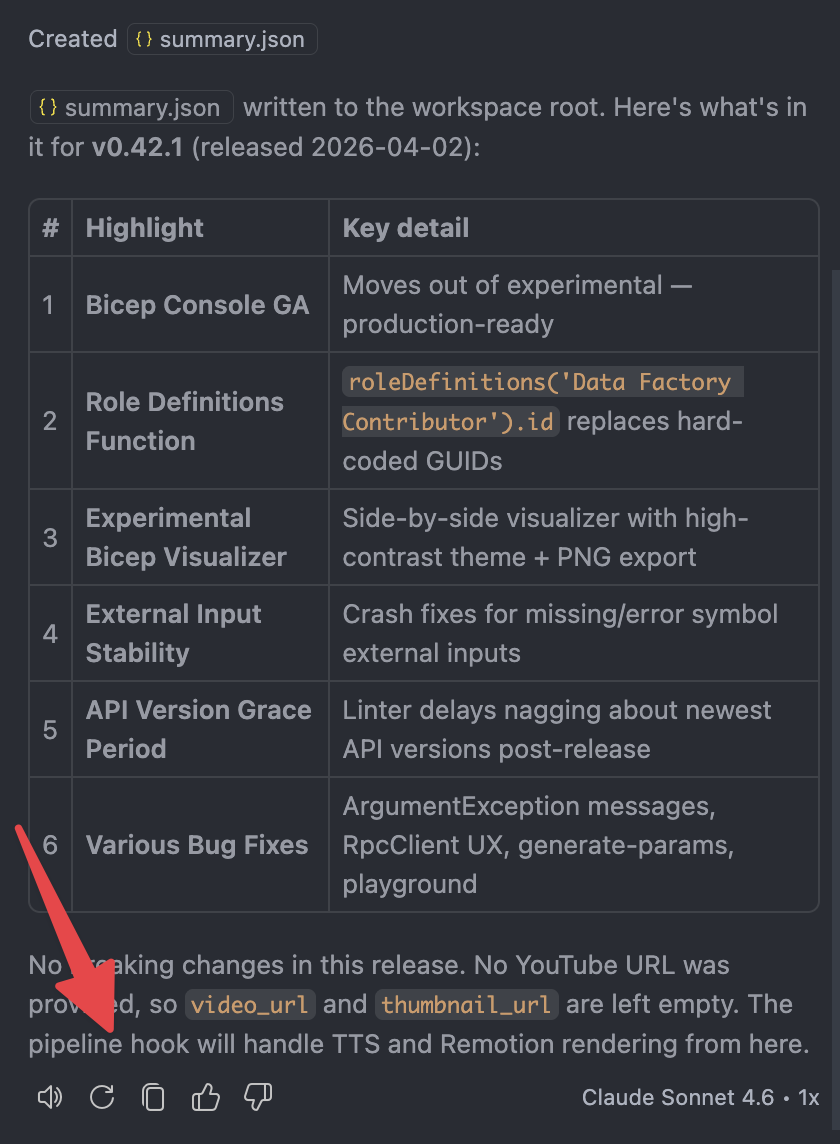
summary.jsonfile containing the version, headline, highlights, breaking changes, and anarrationfield for each highlight. - Write
summary.jsonto the repository root.
The moment summary.json is written the PostToolUse hook fires automatically.
Stage output
summary.jsonin the repo root, containing version, headline, highlights (up to 6 with narration), breaking changes, release date, and optional YouTube metadata.
You can find an example summary.json file in my GitHub repository: https://github.com/johnlokerse/changelog-video-tts-generator/blob/main/summary.json
Stage 2: The PostToolUse hook triggers the pipeline
The hook is configured in .github/hooks/video-pipeline.json. Whenever Copilot completes a tool call, VS Code executes the command defined under the PostToolUse event.
| { | |
| "hooks": { | |
| "PostToolUse": [ | |
| { | |
| "type": "command", | |
| "command": "pwsh -NoProfile -File .github/hooks/scripts/Invoke-VideoPipeline.ps1 -HookMode", | |
| "cwd": ".", | |
| "timeout": 1800 | |
| } | |
| ] | |
| } | |
| } |
When invoked with -HookMode, Invoke-VideoPipeline.ps1 calls two helper functions from the HookPayloadHelpers module: Read-HookPayload reads the PostToolUse payload, and Test-ShouldRunPipeline verifies that a write-type tool targeted summary.json. If not, the script exits immediately.
This means the hook fires after every tool use, but the video and voice generation pipeline only runs when the right file has been written: summary.json.
An example of a hook payload:
| { | |
| "timestamp": "2026-04-21T08:28:53.253Z", | |
| "hook_event_name": "PostToolUse", | |
| "session_id": "<session id guid>", | |
| "transcript_path": "/Users/<user>/Library/Application Support/Code/User/workspaceStorage/<id>/GitHub.copilot-chat/transcripts/<id>.jsonl", | |
| "tool_name": "create_file", | |
| "tool_input": "...", | |
| "tool_response": "", | |
| "tool_use_id": "toolu_vrtx_01Tue5PksWNk5eSmAvMJphY3__vscode-1776759846716", | |
| "cwd": "/Users/<user>/Documents/Repositories/changelog-video-tts-generator" | |
| } |
If a hook is triggered and the file is not summary.json it logs the following:
| 2026-04-21 08:42:13.110 [info] [#116] [PostToolUse] Output: | |
| 2026-04-21T06:42:13.0656950Z [INFO] Skipped: tool 'read_file' did not write summary.json. |
You can find an example of the GitHub Copilot hook, the PowerShell script, and the helper function in my GitHub repository: https://github.com/johnlokerse/changelog-video-tts-generator/blob/main/.github/hooks
Stage 3: PowerShell generates audio and renders video
This stage is started by the GitHub Copilot hook and invokesInvoke-VideoPipeline.ps1 to perform three tasks in sequence: it synthesises per-scene MP3 audio from summary.json, scaffolds the Remotion project, and renders the finished video.
Task 1: Building per-scene narration
The script reads summary.json and builds a separate SSML document for each scene: intro, headline, one per highlight, an optional breaking-changes slide, and an outro. Each SSML block uses mstts:express-as with a media delivery style (via style="media") for a clear, broadcast-friendly tone:
| <speak version='1.0' xmlns='http://www.w3.org/2001/10/synthesis' | |
| xmlns:mstts='http://www.w3.org/2001/mstts' xml:lang='en-US'> | |
| <voice name='en-US-Jasper:MAI-Voice-1'> | |
| <mstts:express-as style="media"> | |
| Hey everyone, and welcome to the latest Azure Bicep release update! | |
| </mstts:express-as> | |
| </voice> | |
| </speak> |
For this blog, I went with the persona en-US-Jasper:MAI-Voice-1 and with expression media. Click here to learn more about which personas and expressions Microsoft Foundry provides.
Link to the Build-Ssml function in my GitHub repository: https://github.com/johnlokerse/changelog-video-tts-generator/blob/main/.github/hooks/scripts/Invoke-VideoPipeline.ps1#L139
Task 2: Calling the Azure Speech REST API
The script sends each SSML document to the Azure Speech REST API and saves the generated audio as an MP3 file:
| function Invoke-Tts { | |
| param( | |
| [string]$Ssml, | |
| [string]$OutputFile | |
| ) | |
| $headers = @{ | |
| 'Ocp-Apim-Subscription-Key' = $script:SubscriptionKey | |
| 'Content-Type' = 'application/ssml+xml' | |
| 'X-Microsoft-OutputFormat' = 'audio-48khz-192kbitrate-mono-mp3' | |
| 'User-Agent' = 'MAIVoiceDemo' | |
| } | |
| Invoke-WebRequest -Uri $script:Endpoint -Method Post -Headers $headers -Body $Ssml -OutFile $OutputFile | |
| } |
After each MP3 file is saved, the script measures its actual duration using afinfo on macOS or ffprobe on other platforms. It then writes an audio/audio-manifest.json file containing the duration in seconds and frames The output of audio-manifest.json looks like this:
| { | |
| "intro": { | |
| "file": "audio/intro.mp3", | |
| "durationSeconds": 12.17, | |
| "durationFrames": 396 | |
| }, | |
| "headline": { | |
| "file": "audio/headline.mp3", | |
| "durationSeconds": 10.13, | |
| "durationFrames": 334 | |
| }, | |
| "highlight-0": { | |
| "file": "audio/highlight-0.mp3", | |
| "durationSeconds": 8.30, | |
| "durationFrames": 280 | |
| } | |
| } |
The audio files and manifest are saved in the audio folder:
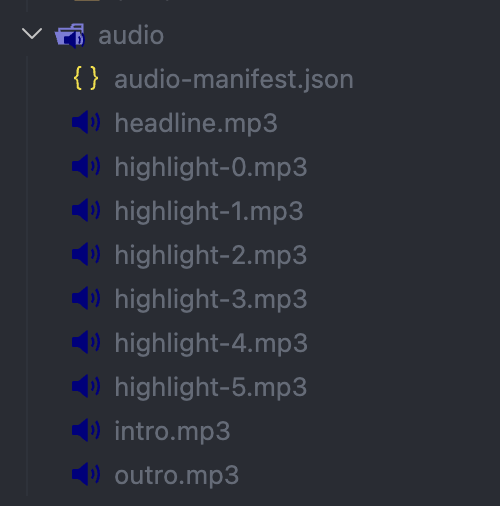
You can find these examples in my GitHub repository https://github.com/johnlokerse/changelog-video-tts-generator/tree/main/audio
Task 3: Rendering with Remotion
Once the audio is ready, the script builds the video. It first runs a scaffold step that takes summary.json and the audio manifest, then generates a ready-to-render Remotion project in the bicep-video/ folder.
The scaffold script does a few things:
- Generates the Remotion source files: it writes the React component files that make up each slide (intro, headline, highlights, outro), populating them with the content from
summary.json. - Copies the audio files: it moves each per-scene MP3 into
bicep-video/public/audio/so Remotion can serve them as static assets during the render. - Sets scene durations: it reads
durationFramesfrom the audio manifest and uses those values to size each slide so it matches the length of its narration clip exactly. - Styling: additionally, the scaffold handles the styling of the video.
Then it installs the project’s dependencies and starts the render via essentially this set of commands, but it is triggered via the scaffold.js:
# Scaffoldnode remotion-scaffold/scaffold.js ` --input summary.json ` --output bicep-video/ ` --audio audio/audio-manifest.json# Install and rendercd bicep-videonpm install --prefer-offline --no-audit --no-fundnpx remotion render BicepUpdate --output output/bicep-update-v0.41.2.mp4
The scaffold was generated beforehand by GitHub Copilot. You can find the scaffold example in my GitHub repository: https://github.com/johnlokerse/changelog-video-tts-generator/blob/main/remotion-scaffold/scaffold.js
Stage output
- Per-scene MP3 files, for example
intro.mp3,headline.mp3,highlight-0.mp3 audio-manifest.jsonwhich maps each scene name to its file path, duration in seconds, and duration in frames- Final MP4 video (e.g.
output/bicep-update-v0.41.2.mp4), rendered via Remotion from the scaffold
Result
After running the full pipeline the output is a generated changelog video that includes the voice-over:
Why a hook and not a skill?
You might wonder why the audio and render steps are handled by a hook instead of additional Agent Skills. The key difference is determinism.
A skill can instruct Copilot to call a script, but the agent still decides when and how to use it. A hook is deterministic because it executes your code at a defined lifecycle point, regardless of how the agent was prompted.
In short, a skill helps Copilot decide what to do. A hook guarantees that your action/command/script runs when a specific lifecycle event happens.
GitHub Copilot Hook Logs
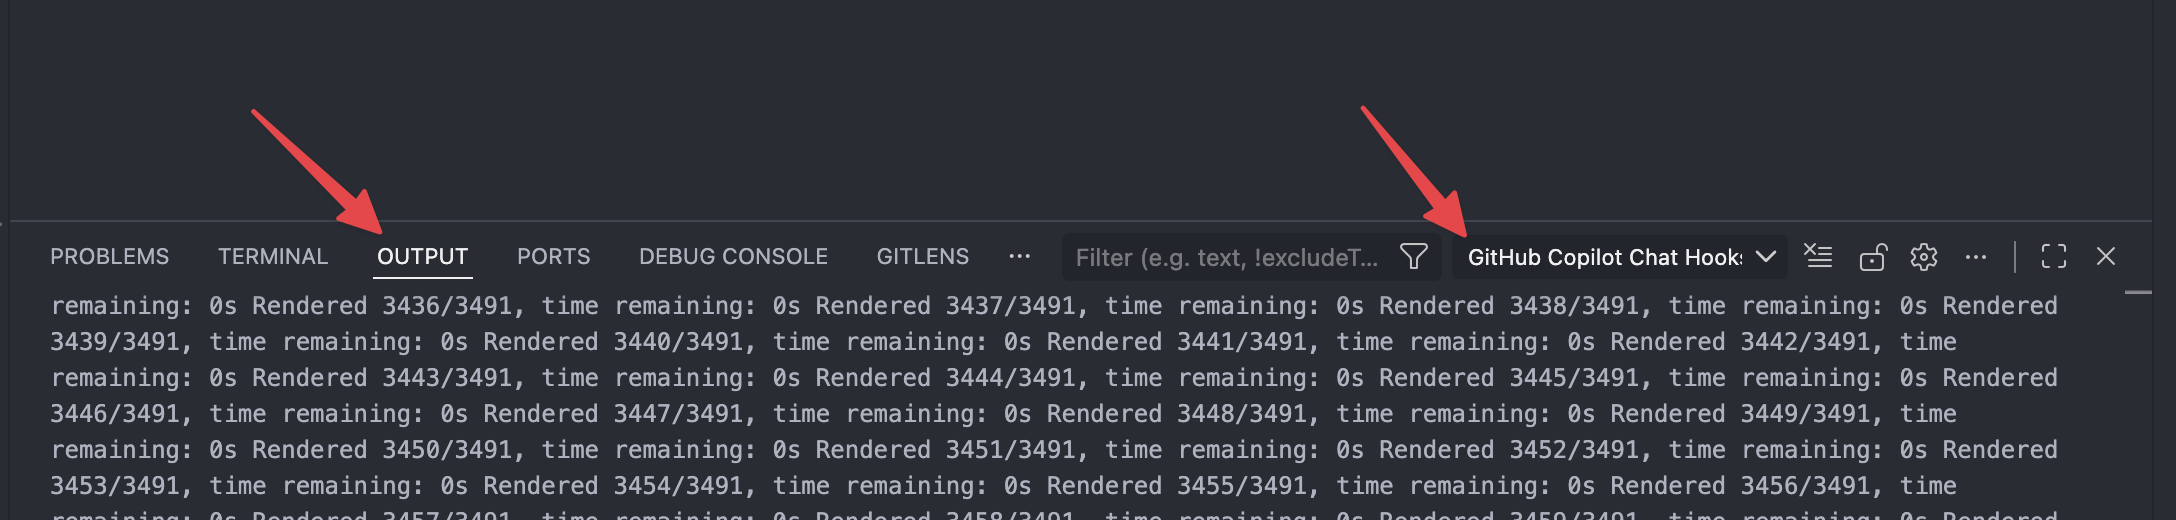
At the moment, the interface is quite limited, and there is no easy way to see when a hook has fired apart from a message in the Copilot chat window. However, you can view the log trail of fired hooks in VS Code, including the executed events and payloads.
In VS Code, open the Output view and select GitHub Copilot Chat Hooks from the drop-down list to see the hook logs. These are live logs, meaning the Output view is updated after every Copilot call.
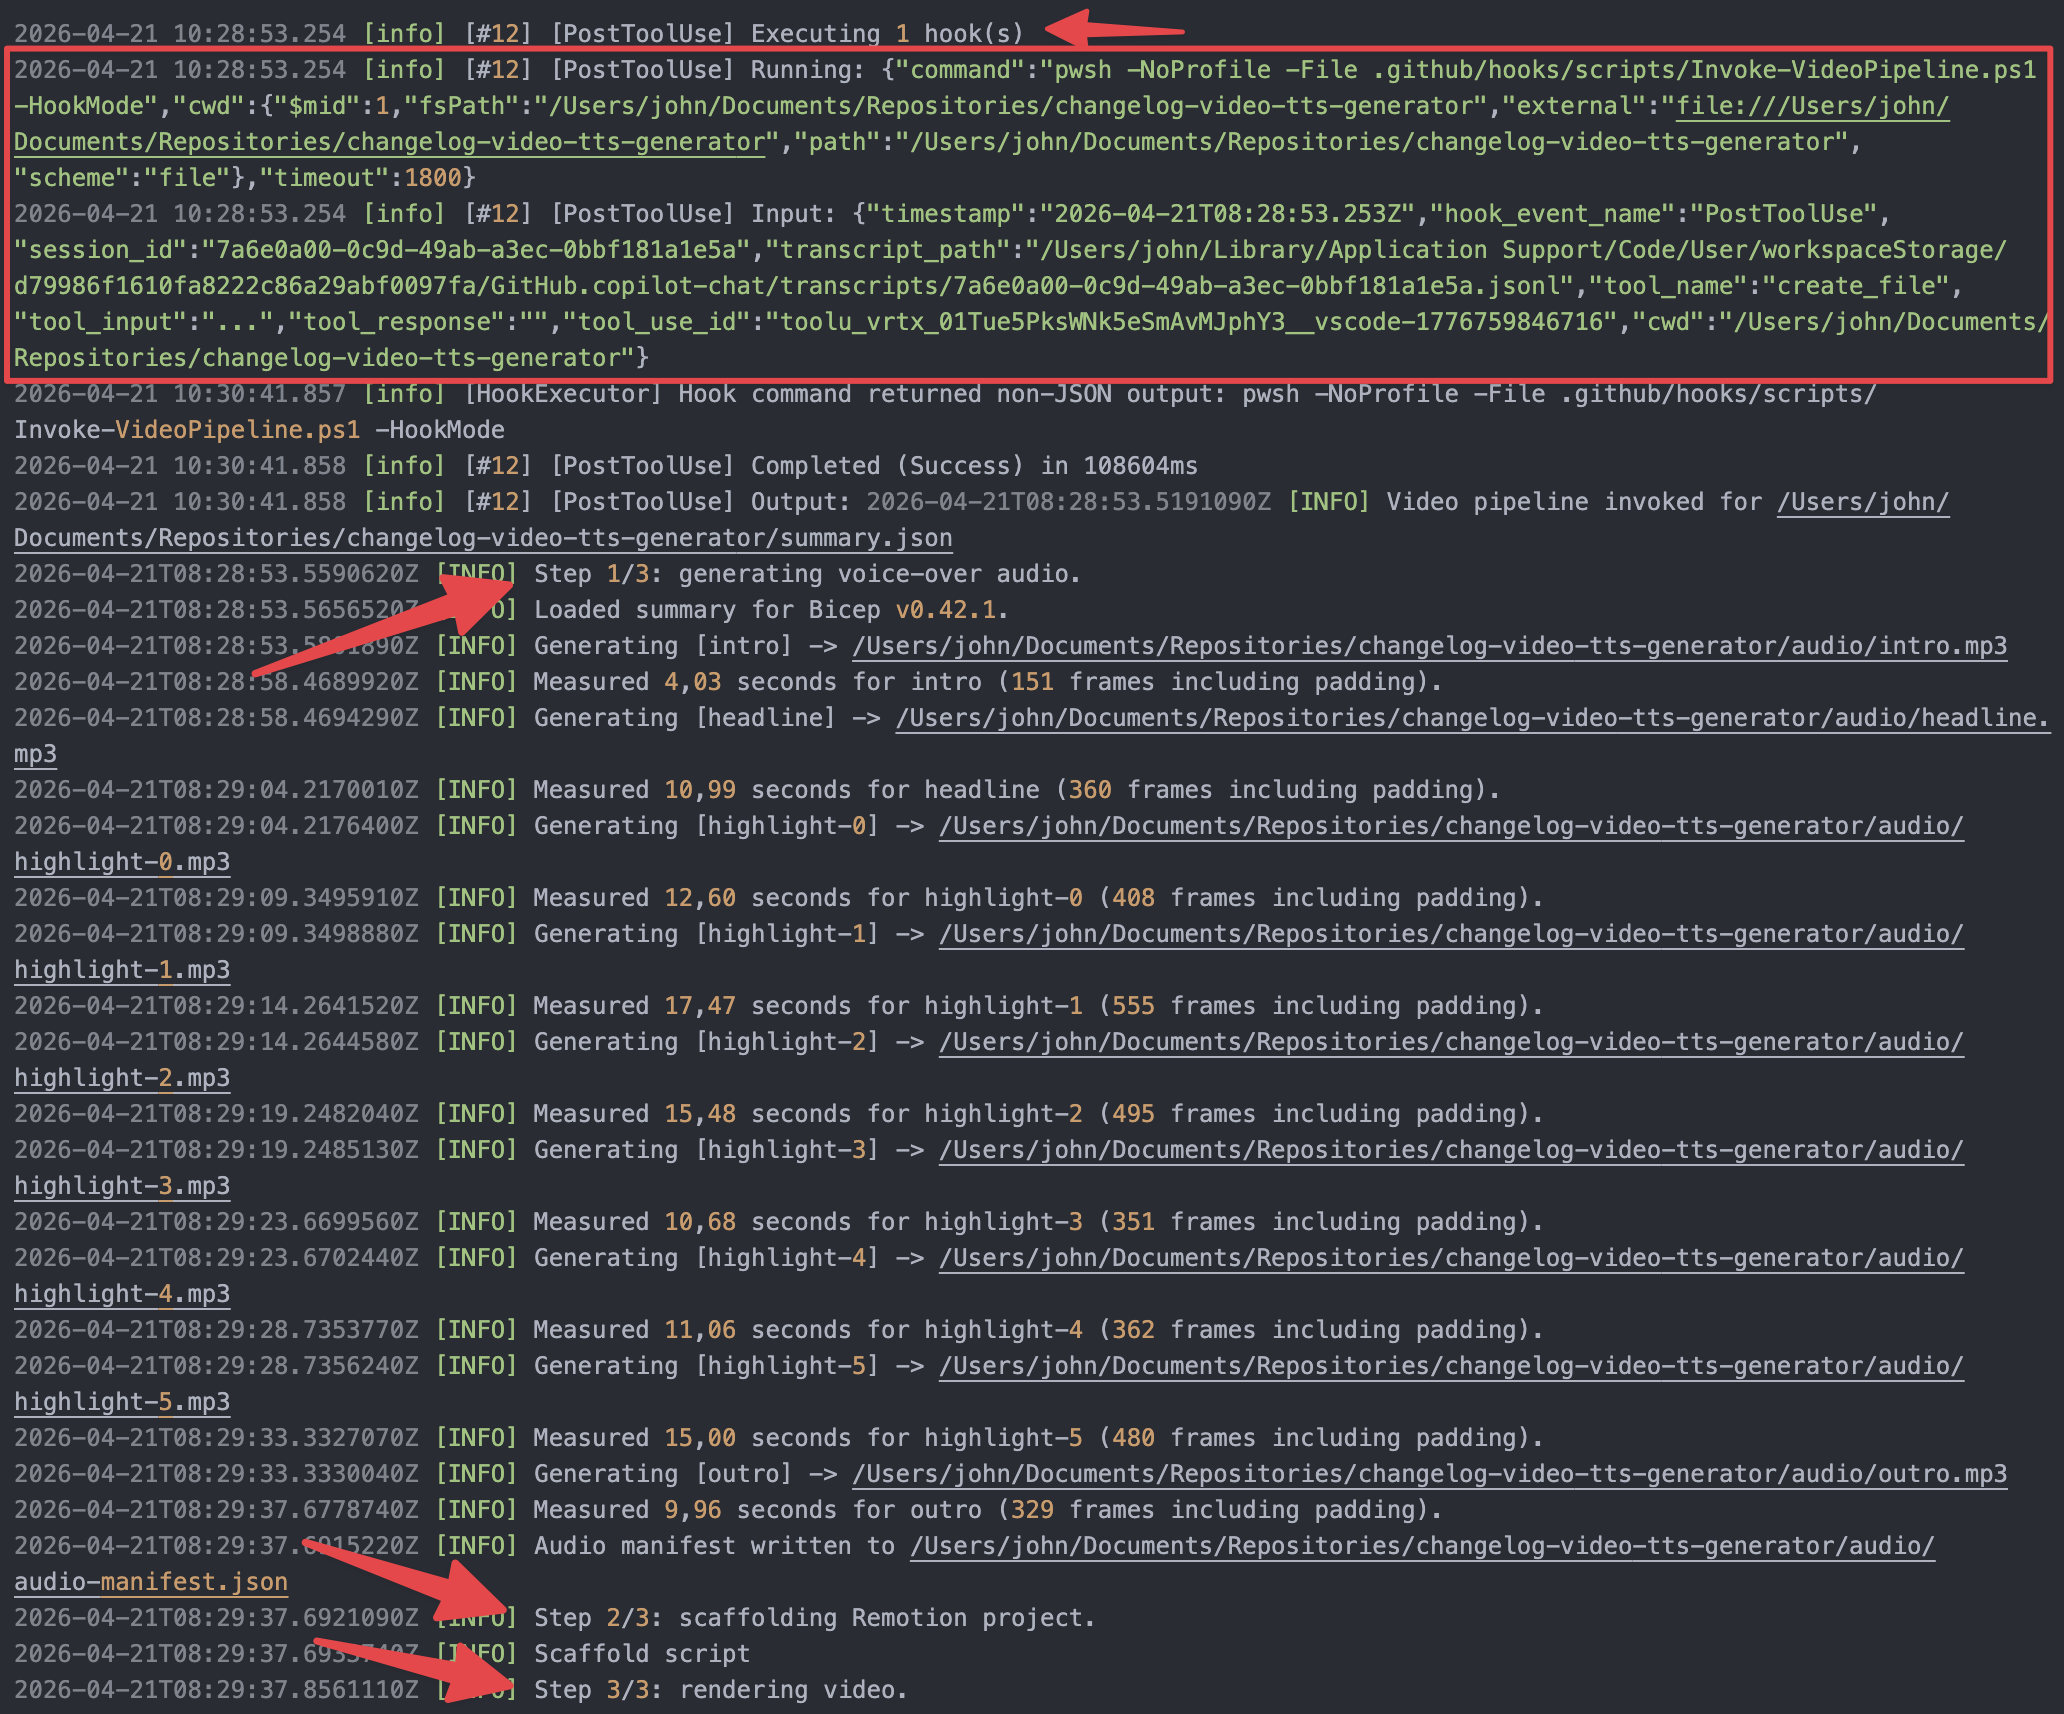
In the image below, you can see the logs of the hook I created. First, the hook is executed. The payload then shows the tool name create_file, which means the script should continue. After that, you can see the logs for the voice-over generation, scaffolding, and rendering of the Remotion video.
Hooks future update wishlist
GitHub Copilot Hooks in VS Code is in preview, and there are a few limitations I would like to see improved:
- Trigger hooks from Agent Skills
It is currently not possible to trigger hooks directly from called Agent Skills. This would make it easier to chain skills and hooks together in more advanced automation scenarios. - Native file-change conditions
Today, you need to build your own middleware to check whether specific files have been created, modified, or deleted. It would be useful if hooks could support file-based conditions out of the box. - Better visibility and debugging experience
The current user experience makes it difficult to see when hooks are triggered, how they are triggered, and what output they produce. A dedicated hooks view, structured logs, or clearer output in the chat window would make using GitHub Copilot Hooks much easier.
This is what you currently see in the chat window that indicates GitHub Copilot triggered a hook:
Conclusion
This is how you can combine GitHub Copilot Agent Skills, a PostToolUse hook in VS Code, Azure Speech, and Remotion to fully automate narrated Azure Bicep changelog videos.
This was a fun project to set up, and it shows the power of hooks in GitHub Copilot. Hooks can help you save tokens by moving deterministic work out of the agent flow, while giving you more certainty that scripts run when specific lifecycle events happen.
The examples in this blog are entirely focused on generating Azure Bicep changelog videos, but the skills and the scaffold can be reused for repositories you want to generate videos of.
