With version 0.7.4 of Azure Bicep, the feature “generate Bicep parameters” was introduced. In this blog, you will read about how to generate parameters from a Bicep template using the Azure CLI or Bicep Visual Studio Code extension.
Example Bicep template
To illustrate how generating parameters works, I have created an example Bicep template. The following Bicep template defines a virtual machine, network interface card, a reference to a subnet, and defined a few parameters:
| @description('The name of the virtual machine.') | |
| param parVmName string | |
| @allowed([ | |
| 'westeurope' | |
| 'northeurope' | |
| ]) | |
| param parLocation string | |
| param parComputerName string | |
| param parAdminUserName string | |
| @secure() | |
| param parAdminPassword string | |
| param parDiskSizeInGb int | |
| resource resWindowsVM 'Microsoft.Compute/virtualMachines@2020-12-01' = { | |
| name: parVmName | |
| location: parLocation | |
| properties: { | |
| hardwareProfile: { | |
| vmSize: 'Standard_A2_v2' | |
| } | |
| osProfile: { | |
| computerName: parComputerName | |
| adminUsername: parAdminUserName | |
| adminPassword: parAdminPassword | |
| } | |
| storageProfile: { | |
| imageReference: { | |
| publisher: 'MicrosoftWindowsServer' | |
| offer: 'WindowsServer' | |
| sku: '2012-R2-Datacenter' | |
| version: 'latest' | |
| } | |
| osDisk: { | |
| name: 'osdisk-${parVmName}' | |
| caching: 'ReadWrite' | |
| createOption: 'FromImage' | |
| diskSizeGB: parDiskSizeInGb | |
| } | |
| } | |
| networkProfile: { | |
| networkInterfaces: [ | |
| { | |
| id: resNic.id | |
| } | |
| ] | |
| } | |
| diagnosticsProfile: { | |
| bootDiagnostics: { | |
| enabled: true | |
| storageUri: 'storageUri' | |
| } | |
| } | |
| } | |
| } | |
| resource resNic 'Microsoft.Network/networkInterfaces@2020-11-01' = { | |
| name: '${parVmName}-nic' | |
| location: parLocation | |
| properties: { | |
| ipConfigurations: [ | |
| { | |
| name: '${parVmName}-ipconfig' | |
| properties: { | |
| privateIPAllocationMethod: 'Dynamic' | |
| subnet: { | |
| id: resSubnetRef.id | |
| } | |
| } | |
| } | |
| ] | |
| } | |
| } | |
| resource resSubnetRef 'Microsoft.Network/virtualNetworks/subnets@2022-01-01' = { | |
| name: 'MyVnet/MySubnet' | |
| } |
Azure CLI
To make use of the generate parameter feature you need version Azure CLI 2.38.0 or higher. To check your Azure CLI version run az --version. Azure CLI has a dedicated command to generate parameters from a Bicep template. This command can be found under the az bicep group.

The az bicep generate-params command has one required argument, which is --file. To generate a parameter file run az bicep generate-params --file.

The output of the command is a JSON parameter file with the parameter inputs of the Bicep template. What is missing are the @decorators, these are not yet included when generating the parameter file.
| { | |
| "$schema": "https://schema.management.azure.com/schemas/2015-01-01/deploymentParameters.json#", | |
| "contentVersion": "1.0.0.0", | |
| "parameters": { | |
| "parVmName": { | |
| "value": "" | |
| }, | |
| "parLocation": { | |
| "value": "" | |
| }, | |
| "parComputerName": { | |
| "value": "" | |
| }, | |
| "parAdminUserName": { | |
| "value": "" | |
| }, | |
| "parAdminPassword": { | |
| "value": "" | |
| }, | |
| "parDiskSizeInGb": { | |
| "value": 0 | |
| } | |
| } | |
| } |
If you want the parameter files to be automatically saved into a directory or other specific paths, add the parameter --outdir.
Visual Studio Code extension
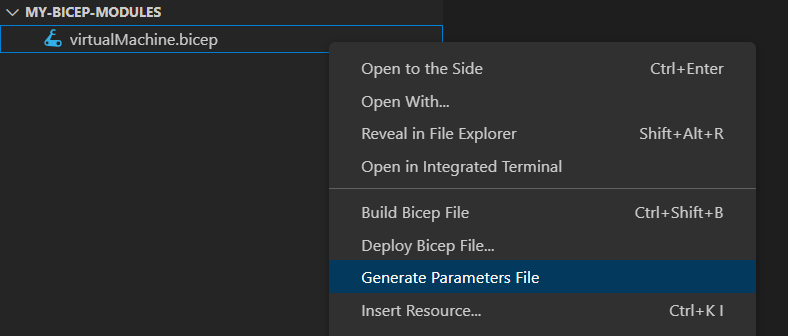
Using the CLI is not the only way to generate parameter files. The Bicep team also added this feature in the Visual Studio Code extension. You can find the Bicep extension here: https://marketplace.visualstudio.com/items?itemName=ms-azuretools.vscode-bicep.
After installing the Bicep extension, the only action to do is to left-click the Bicep template you want to generate parameters for, and it’s done.

Conclusion
This is how you can generate parameters for your Bicep templates. The feature has saved me time writing parameter files. I hope it does for you too.
